Get ready to be amazed with this project idea from Natasha Trupp!
"Impression plates add depth and interest to cards. In keeping with the 5th Anniversary gift theme of Wood, I am challenging you to use your wood themed impression plates. In order to add an additional “wow” factor, we’ll be inking up those impression plates. If you don’t have a wood-themed impression plate, you could also use a stencil or embossing folder. You can try this technique with other impression plates, but be sure to still include a wood-type theme into your card somehow. A lot of the other Papertrey Ink impression plates would still look very wood like if used in brown tones (other suggestion: Diagonals, Rustic Burlap, Aida, Diagonal Stripes, Striped Sweater, Herringbone, Animal Prints (zebra stripes side), Argyle, Diamonds, Cane Print, Linen & Canvas, Moroccan Motifs, Tin Types, etc.) Get creative!"
- Cut card base to size and score it.
- Gently ink up an impression plate with your ink of choice (Dark Chocolate used in my project). Try to swipe the ink pad in the same direction as the pattern to avoid ink from going into the grooves. If any ink gets in the grooves, you can also wipe it with a cotton swab. Place Dark Chocolate cardstock on top of the inked impression plate. Place items into a folded piece of lightweight copy paper. Place rubber mat on top of this sandwich, ensuring that the entire impression plate is covered. Run through your die-cutting machine (I used the cuttlebug and used the sandwich A,B, impression plate/paper, rubber mat, B, cardboard shim)
- Die cut 3 “thanks” out of Americana card stock and one of each of the leaf prints from Rustic Cream card stock
- Adhere the 3 thanks together
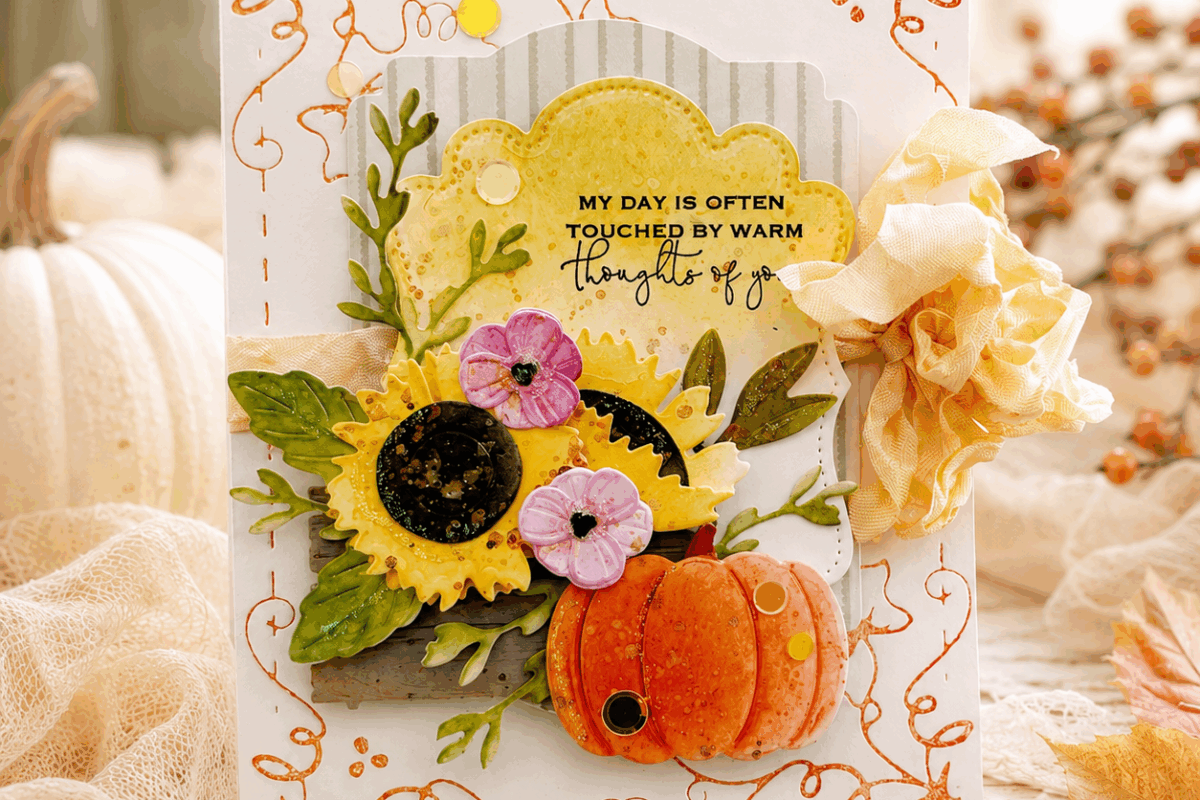
- Stamp the leaf prints images onto the corresponding leaf prints die cuts. I used Harvest Gold and Honey Oat for the elm leaf, Prairie Grass, Honey Oat, and Cocoa Bean for the oak leaf, and Americana and Terracotta Tile for the maple leaf. To achieve a blended look, start with the lightest ink color, then ink the desired portion with the darker color and then tap the lightest color back over the entire image. I used Dark Chocolate for the line detail image.
- Stamp the sentiment on Rustic Cream sentiment strip, using Dark Chocolate
- Adhere woodgrain panel to the Kraft card base. Next adhere the sentiment strip to the woodgrain panel. Attach the “thanks” die cut. Adhere all of the leaves with foam tape.
- STAMPS: Leaf Prints, Wet Paint
- INK: Dark Chocolate, Honey Nut, Harvest Gold, Prairie Grass, Cocoa Bean, Americana, Terracotta Tile
- PAPER: Kraft, Rustic Cream, Americana, Dark Chocolate
- DIES: Wet Paint Cuts, Leaf Prints
- OTHER: Woodgrain impression plate, Foam Tape, Glue, Tape
- Now it's your turn! Create a project featuring an inked impression plate (or cover plate, stencil, etc.) technique. You can choose to re-create the exact project from Natasha above or design your own using the same concepts. Your project must also incorporate at least one Papertrey product.
- Post your project on your blog, in your gallery, Instagram or on any other photo-hosting site (such as photobucket or flickr).
- Add your project to the InLinkz list below.
- You will have until 7am ET, Thursday, August 31st, to add your link to the list to be eligible to win. One project per person please.
- As a reminder, you will have until 7am ET, Thursday, August 31st, to add your link to the list to be eligible to win.
- One randomly selected winners will be chosen from all of the InLinkz entries on this post on Thursday, August 31st. The winner will be posted on our Thursday night Stamp-a-faire winners page after 9pm ET. The randomly selected winner will get a $20 PTI gift certificate to spend however they like!
- One randomly selected winner will be chosen from the comments of this post on Thursday as well. You will have until 7am ET, Thursday, August 31st to add your comment and be eligible to win. The randomly selected winner will get a $10 PTI gift certificate.
I love the subtleness of this look and how it can really be applied to just about any kind of project. The inking definitely makes the impressions look more defined and crisp, which is something I think we are all trying to achieve, aren't we? Were there any little tips that Natasha shared that really stuck with you. We look forward to seeing your projects using this great technique!
Excited to bust out the impression plates. I haven’t used those in a looooong time!
Great tutorial Natasha. Love the technique. Cheers.
Great technique! I’ve never inked an impression plate before! Time to change that! Another nice masculine card – love it!
It’s amazing how how inking the coverplate adds such depth.
Great card – I forgot I had the Leaf prints stamps and dies. So fun to use
A perfect project with fall around the corner. What a cool idea… ink the impression plate!
Love your card and the tutorial!
Neat technique! Thank you!
I just love fall and leaves…Gorgeous card!
You wood is beautiful, Natasha, and it was interesting seeing how you finessed the leaf stamping.
I don’t have PTI’s wood grain impression plate, but I do have some woodgrain embossing folders, which I will try.
Love this inked impression plate technique Natasha! The ink really accentuates the impressions. Thanks for a great video!
Nice technique! It looks great!
I love the real look this gives just by adding the ink to it!
Love this! The wood element is my favorite!
I haven’t inked impression plates in a long time! Need to get them out! Thanks for the inspiration!
I don’t think I’ve ever inked up my wood grain impression plate before, gotta give it a try!
Beautiful card, I love those colors. I think I have that Impression Plate. I’m going to have to dig it out…lol!
The wood effect is so handsome – love it!
Love this card and concept!! The ink on the impression plate gives such depth and movement to wood grain, looks amazing. Thanks so much!
Love the colors and card for the upcoming season.
Love the look of th ink in those impression plate grooves. Pretty!
Love the wood grain impression plate, but unfortunately, I don’t have one. I’ll have to thnk out of the box again.
What’s fantastic technique and I love your card. Thank you.
I always love anything with leaves and this is another great video with PTI leaves.
I’ve always loved woodgrain and this is so beautiful! Thank you for the inspiration Natasha!
Awesome technique!! Love the depth the inking creats. Your card is gorgeous!
Such a pretty fall project! I love this idea.
This is another fun technique. Love your card.
Wow, so pretty and loved how you created/stamped up the leaves too.
Another great way to create a more masculine card.
Thanks for a clear and simple video, that is easy to follow. Feeling inspired.
The added ink to the impression plate gives nice depth!
I’ve never used impression plates and didn’t know you could ink them up like this – what an amazing look!
Lovely. There are many wood grain emboss folders and dies but I’ve not found an impression plate to get that nice deep wood grain. Wood you mind sharing where you got yours? jlingraham@hotmail.com
Love this kind of card! I had fun making this and will definitely by one that I mail out come thanksgiving! thanks for the inspiration!
I don´t have an PTI Impression plate but an Wooden Embossing Folder. I think it work the same way. Great technique and lovely card.
Yay for showing us how to re-invent our impression plates,
love the woodgrain look, will have to give it a try today.
Very pretty card, you make it look so easy!
Beautiful card, just right for fall time.
Going to try this with some woodgrained cardstock and see what kind of color I can add to it. Maybe a driftwood gray!
I don’t get it! I watched the You Tube and you did not have links to the products. I come to this site and again you have no links to purchase the products! I clicked the shop button and searched for the products with no luck! Have never encountered this before. I guess you don’t sell the products to create the card. Very strange.
Your card is lovely! Great technique.
Great technique. I’ve been wanting to try this!
I never thought about inking up mu metal cover plates! Duh! This weekend has been so informative.
Used this to make a fall card for my daughter. Really nice to have new ideas for cards. Thank you
All of your samples of wood embossing look so real, love the card you made!
Great technique, Natasha! Love your card!!
Beautiful. I’ve had my eye on the Woodgrain Impression plate for a while. I think you’ve convinced me to get it. Thanks for including the video.
Love your card & video, Natasha!
The wood grain plate is probably my most used impression plate! Love this technique!!
i love this, amazing, thanks for sharing!
Cool technique! I’ve seen this done before. Thanks for revisiting it. Looking forward to trying this again! 🙂
Great video! You’ve inspired me to try to emboss using the basket stencil.
I have ALWAYS wanted to try this technique, of inking an embossing folder or impression plate, but I have never done it. Thanks for the push/inspiration. It was very easy and gives a lovely effect.
Karen
Love this wood grain background. What a terrific background for any type of card. What a great technique!
Beautiful cards. Can’t wait to try this!
I have so many wood impression plates/folders and all of them are just a little bit different but the one from PTI is my favorite because it’s so fine. Love the texture they give a card. They work so well for lots of different types of cards too.
Beautiful fall card!! I love your color combos, so pretty. Thanks so much for sharing this amazing technique!!
Love the inked look with the impression plate!
Great project. I do not have a cover plate but I do have a wood grain embossing folder; I need to give this a try.
NICE CARD, I’M READY FOR FALL. I HAVEN’T USED THAT EMBOSSING PLATE IN FOREVER, TIME TO PULL IT OUT AGAIN.
Lovely woodgrain card. Great technique.
This is so pretty for fall!
I love this!
My wood grain impression plate is going to see some ink. Very fun and pretty.
Love the rich look of ink with the woodgrain impression plate! Great tutorial.
Oh how I wanted to CASE your card, Natasha, but I’ll do that another day. So happy your technique used products I already had in my stash!
What a FUN CARD! AND PERFECT for this season! 😉 LOVE the richness of the wood grain too!
I would never think to do this but it really adds an enhanced look to the woodgrain. Thank you for sharing this technique!
This was so easy & really does give the impression more depth. I tried it with Classic Kraft paper & Classic Kraft ink and am really happy with the results.
Gorgeous card and awesome video.
Wow!! What a gorgeous card!! Thank you for sharing!
Love the color combination of this card. The woodgrain impression is a great look!
Beautiful showcase of the woodgrain impression plates. Love it!
I lovthis technique and am very pleased with the card I made for it!
Fabulous card! I really love the wood texture!
I’ve used this technique before, and am always thrilled with the way it looks. I used a non-traditional color scheme for my project and love how it turned out. Your cards are gorgeous!
I am looking forward to trying this technique. Great idea! Thanks for the inspiration, Natasha!
Oh this technique will be used again and again for all of my Autumn Birthday/Anniversary cards, as well as Thanksgiving and thank you notes! Totally love Natasha’s card inspiration 🙂
I have the wood impression plate in my stash, so happy to see it in use again! Thank you for inspiration!
Oh, this is right up my alley — I love the rustic look to this! Thanks for this inspiration!
Great idea using tone on tone ink and paper to make the impression.
Beautiful card, love this look, must get impression plate!
Love the different tones created with the inked texture!
Really nice effect! Your card is beautiful!
Such depth is achieved with inked impression plates. Thank you for the reminder to use this technique.
What a lovely project! Thanks so much for the great inspiration!
I love how much the added ink highlights the woodgrain! This was a fun technique to try – thanks so much for the video Natasha!
Loved this technique! I’ve done it with embossing folders before, but had never tried it with impression plates. Cool effect!
The embossed wood look is perfect for fall cards. This adds a nice layer of dimension to your project too.
Cute card! I never think to use the wood grain. Thanks for the ideas
This was so fun to do, and the results are amazing. I’m so glad I had the Woodgrain plate. Thank you for the great video!
I just love the way this woodgrain look is made. It is definitely something I will be trying.
Pretty!!! Great idea for a thanksgiving/fall card!
Like the reminder to use embossing plates!
Beautiful!!
I have some wood grain cardstock I’ve been enjoying, but it was good to have the challenge to use my woodgrain embossing folders. I can’t believe I haven’t ever tried adding ink; I love the look!
What a great card! Your stamping inspires me to make my leaf stamps look more lifelike.
Very stylish card Natasha. Thank you for a wonderful tutorial.
I’m in love with that rich wood grain background! Love this idea of using the traditional anniversaries for PTI’s 10th!
Great masculine card concept!
What a warm, cozy card! Love it!
2017 SAF was THE event of all crafting events! I loved that there were 3 days of fun crafty activity! I managed to complete 14 of the 21 challenges. SO MUCH FUN!! Thank you so much for putting on such an amazing event!!
Love wood grain & hope to try your technique soon!
This is such a fantastic technique, especially with fall coming so soon!!
What a fabulous idea!
Love using ink to make impressions more vivid! It’s a fabulous technique!!
Great fall inspiration! I need to try inking an impression plate, but I’m scared of the mess. 🙂
I haven’t ever tried inking up impression plates and cover plates before running them through my die cut machine, but Natasha’s card has inspired me. This technique is so versatile.