One of my favorite parts about our company is the wide variety of styles we are able to incorporate into our product line because of the diversity of our stamp designers. We have noticed that each of them seems to gradually build a following, a group of stampers that really connect with their individual style. To embrace this diversity, we thought it would be fun to challenge all of the designers to create a few holiday tags, all coordinating with the super jumbo (blue) scalloped circle punch from Marvy. A few of them took the challenge by the horns, and this stamp set is a testimony to that. Heather Nichols, Lisa Johnson, Melissa Bickford and myself all contributed to one simple stamp set that ranks high in creativity! Just wait until you see how versatile this set is!
I thought I would show you a super simple project today. It is something that I designed for myself to use this year in keeping up with the hustle and bustle of the holidays, but it could also be used as a fun pre-holiday gift for someone special. I call it my Tag Tin.
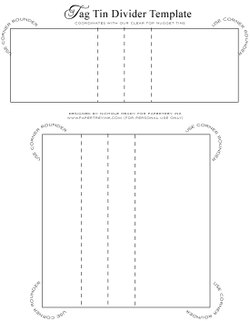
It all starts with one of our Nugget Tins and a template. The nugget tins can be found here, and the template can be downloaded here:
Download tag_tin_insert_template.pdf
……………………………………………………………………………………………….
As you can see, it is VERY simple. The only challenge for me was all the measuring & tweaking, which I have already done for you!!! You’ll love how easy this comes together!
……………………………………………………………………………………………….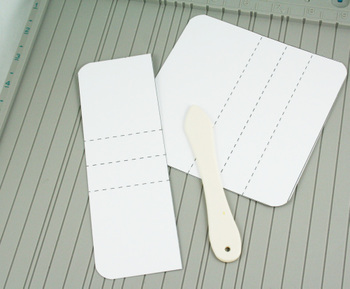
First you want to cut the two pieces out along the solid lines. The large piece is marked to have all four corners rounded using a corner rounder punch. The small piece only has the two upper corners rounded. After cutting & punching is complete, scoring rounds out the prep work.
……………………………………………………………………………………………….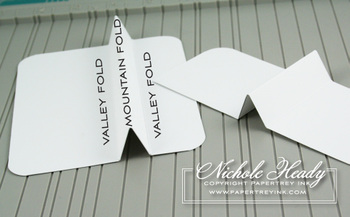
You will notice that each piece has three score lines. You want to keep the printed side down of your templates (so it doesn’t show on your final project) and create a valley fold, mountain fold and another valley fold. Stamper’s Select white cardstock is the best weight for a project of this nature.
……………………………………………………………………………………………….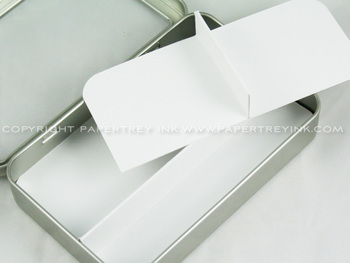
You want to run a piece of double sided tape down the inside of the mountain fold and adhere the two sides together to form a a sturdy divider. The large piece gets inserted into the tin and covers the entire interior bottom. The second smaller piece is inserted in the upper half of the space that the first divider created. The *walls* of this divider are perfectly measured to fit just under the lip of the tin, making adhesive unecessary. So you might feel a bit forceful when trying to put it in, but it will fit perfectly once you are past the lip!
……………………………………………………………………………………………….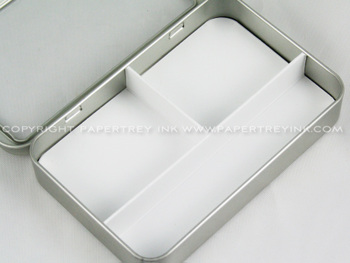
The finished divider changes the space within the tin into a trio of seperate areas, just waiting to be filled!
……………………………………………………………………………………………..
I used the new tag set to make a few tags to fill my tag kit. Most of them were stamped directly onto white cardstock and punched out with the scalloped punch. Others were layered for a more detailed look. The font combination you see here is one of my all-time favorites.
……………………………………………………………………………………………..
I also made a batch of labels by using this stamp set with our white label sheets. These label sheets measure 8.5 x 11 so you can stamp the same image a bunch of times and then punch them out with the coordinating scalloped circle punch. It seems like every year I resort to buying those tacky peel & stick to-from labels.This solution takes all of 5 minutes, not to mention looks better too!
……………………………………………………………………………………………….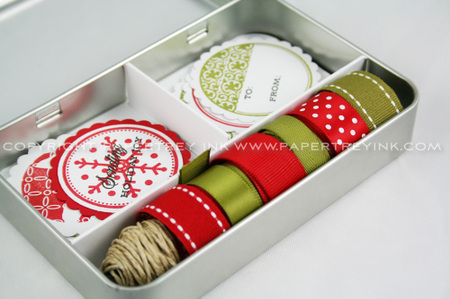
The filled tin looks a bit like this. I love how everything has a place. The ribbon was really easy to coral. I cut a wooden dowel rod (about the same diameter as a pencil) to 5-inches long and ran a piece of double stick tape down the side of it. This allowed me to add one ribbon at a time, wrapping a yard or more of each type that coordinates with this ensemble. I designed the section at the front of the tin to hold this spool perfectly!
……………………………………………………………………………………………….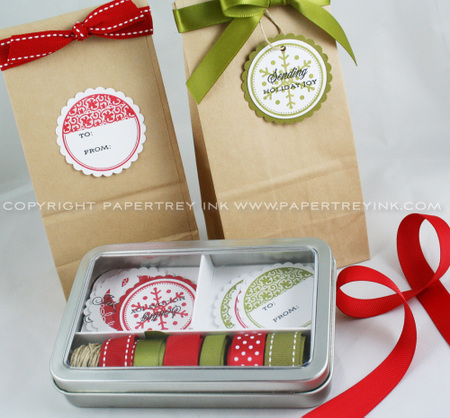
Along with this kit, my goal is to set up a small station with kraft packaging items, such as wrapping paper, bags and boxes. By just pulling out a few of these pre-made items, I will be able to send wraps out the door that have style, but did not take much of my time. I am really excited about the ease of this process and think it would benefit so many others who usually find themselves stressed during the holiday season. This year I have sworn to get an early start, be organized and stress free. Want to join me?
……………………………………………………………………………………………….
……………………………………………………………………………………………………..
If you would like to see THE most adorable edible project in countdown history, be sure to head on over to Lisa’s Blog to see what she’s been up to.
Melissa has another special project to share using her new set, Merry & Bright Additions.
Heather also has some more peeks in store for you!
Lauren is sharing some more details about one of her new templates.
……………………………………………………………………………………………….
…………………………………………………………………………………………………
Stamps: 2008 Holiday Tags Collection (available October 15th)
Ink: Pure Poppy, Ripe Avocado & Black Noir Palette inks
Paper: Stamper’s Select White, Pure Poppy and Ripe Avocado
Other: Super Jumbo Scalloped Circle punch, Pure Poppy swiss dot, grosgrain and stitched ribbons; Ripe Avocado satin, twill & stitched ribbons; hemp twine, nugget tin, small kraft coffe bags, label sheets



I love your ideas! I’m with you…I hate the stress I get myself into every year by starting projects too late. Thanks for the template and all the photos. I love your holiday tags.
Love the tags! I’ve been looking for something that’s simple and elegant and these are perfect! I can hardly wait to get these beauties!
Just love your idea for the tin – you are so clever and inventive. You have so many brilliant projects.
Oh my gosh! I love it. You are so thoughtful and creative, thank you for sharing.
It’s a good life!
Terri E.
What a great idea. The tags look great and what a fun way to store them.
Again, what a wonderful idea! Love your creativity, Nichole!
LOVE how you turned the nugget tin into a holiday tag center. I can’t wait to see what all the tags look like on the 14th. 🙂
That is a great idea. I am always scurrying around trying to find my tags. I love the colors.
Another terrific idea! Thanks Nicole for being so inspiring!!
LOVE, love these ideas!
I totally love this idea. I am always trying to find cute and unique gifts to give, and this is one of them!
Y’all are just TOO creative…great idea!!
What a fabulous idea Nichole! Thanks for sharing your template. What a great gift this would make for teachers, etc.
I love these. I would love to be organized too!
What a great project!! LOVE it!! 🙂
This would be perfect for teachers, they would actually use them. Can’t wait to see the rest of the set, I love making my tags. You are so organized, wish that could rub off through cyberspace!!!
WoW! I so envy your imagination! Thanks so much for sharing your ideas and designs. You are an incredible resource for us who’s ideas do not come that easily or quickly!! 🙂
This is so cool. Thanks for sharing the template too!
Nichole, I can’t wait to see this complete set. The project is so clever. A great gift for a co-worker. You’re amazing.
I can’t wait to get my hands on these tags! The tin is awesome! You are too creative! I can’t wait to see the rest of the set!
I’m already ahead of the game as I brought supplies with me LAST Christmas to my in-laws and made 50 cards for THIS Christmas… (using PTI, of course). Presents are purchased too. All I need to do is wrap things and I’m done. (I’ve also bought some Tastefully Simple food items to make so I’m set.) Santa, bring it on!! LOL
What an amazing idea Nichole. I find that the busier I am the more organized I am also. Thanks for coming up with such an incredible idea.
Brilliant!
I love this tin idea! I had so much fun making holiday tags last year. I should get started again soon! I love the stamps too 🙂
Oh my GOSH, I am geting all giddy for the realease! I keep telling myself I can’t have my babies until AFTER the 14th. I don’t want to miss it! 🙂
love these tags! And what a cute idea organizing the tags & ribbon in a nugget tin! Can’t wait to see everything on the 15th!
Love the tags! Love the tin idea, too! I promise myself each and every year that I will make my own tags long before the holidays, so that I’ll be ready. I accomplished that only one time…several years ago…and it really did make my packaging look nicer. I can’t wait to order this set and get my tags finished the holidays!
That is fantastic! Great ideas!!
What a great project! I can’t wait to see all of the stamps in this set. I would love to receive the tin you made, so I’m sure it would be a great gift to give to friends and family.
This looks great! Is the circle the same size as the circle in Spooky Treats II?
Aimee,
No, they are not the same size. If you refer to the description for Spooky Sweets II on the web site, the label image coordinates with the Giga scalloped circle punch. The tag set I showed you a peek of today coordinates with the super jumbo scalloped circle punch, so they are much smaller.
~Nichole
Great idea! Thanks for keeping it one size.
Your ideas and concepts never cease to amaze me!
This would make a perfect little gift for just about anyone!
Oh this release really packs a punch! I just can’t wait!! This tin template is fabulous, I can definitely use it for so many things!
k
This is such a darling idea!! I’ll have to make some cute kits for my SILs!!
Another great idea, Nichole! Your creativity is endless!
Oh my goodness! I want it I want it I want it! Papertrey is really becoming a leader in the stamping industry – goodbye to some of the other well known (although I will not mention) places I have shopped for stamps in the past! I am actually dropping a membership to a stamp club I am in as soon as the year is over because the company is not making the strides Papertrey is!! Keep up the great work and God Bless You!!
Those mice were ADORABLE! You and your design team come up with the BEST ideas!!
~Meredith
Love the tags! Can’t wait to see them all! You have the best design and gift concepts!
Melissa
Thank you for letting me know!!! I’m really thrilled about the holiday tags – my favorite holiday project, now made easier!!!
Once again, you are a genius! Do you ever get tired of hearing that? LOVE the whole tag kit box thing – it’s just perfect and so pretty, too! Thanks for sharing your genius with us!
This is fantastic!! I never buy those tackyish little self stick tags. I take all the Christmas cards our office receives and cut those down but THIS idea is great and I will certainly try it. So fun! I hope I absorb some of your genius talent when I give you a big hug on the cruise! I can’t wait to meet you!
I love this idea. I just bought some nugget tins and think this is a great holiday gift idea.
Charmaine
So pretty and organized! Thanks for sharing, can’t wait for the release!
Hello
I didn’t find the ” ripe avocado” ink in the store ??
What a fantastic idea! You are entirely too creative.
GORGEOUS !!!!!!!!!!
Love, love, love this idea! I have wrapped Christmas presents with nothing but kraft paper and beautiful ribbon for the past several years and am always looking for nice tags to go with. And now I won’t have to look in the stores anymore – I can make my own!
Nichole, I love this project and I adore you! This is absolutely perfect! And you’re just the cutest around. Thanks for continuing to inspire me!
Megs
This is one of the coolest projects ever!!!
Oh my gosh! What a genius you are! I love this idea! Thakns for sharing!
I LOVE THIS, and this MIGHT even be something that I can do, or at least try to! Which tin was used for this? I looked up the nugget tin, and it looked really small. It seems like this fits the large hinged tin better? What are the measurements of the two pieces that are to be cust and scored? Thanks!!!!!!
DUH! NEVERMIND. You print the template directly onto the paper you are using. Sigh! I am beginner. Sorry for the dumb question.
Thank you for this great idea!