I am so excited to bring you this sweet little project! It is super easy and inexpensive to create. There are so many different ways you could embellish it as well! Here are the complete instructions to make my particular sample. But please don’t hesitate to shake things up a little and create a different size, color or theme!
2 chipboard coasters (approx. 4×4 inches)
(2) 12×12 sheets of coordinating patterned paper
(2) 12×12 sheets of coordinating cardstock
18-inches of wide ribbon
(2) 10-inch pieces of narrow ribbon
various stickers, alphabet stamps or rub-ons
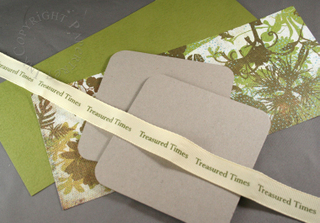 Now to get started, you will need to cut two strips measuring 4 x 10-inches; one from patterned paper and one from cardstock. You will also need your coasters and wide ribbon.
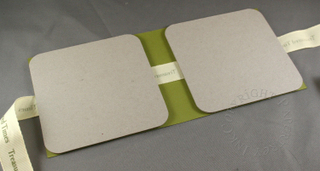 Place your cardstock face down. Lay your wide ribbon across the cardstock and securely adhere in place (I used double sided tape). Adhere one coaster to each end of the strip.
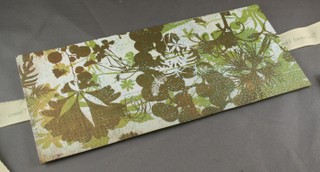 Apply adhesive thoroughly on top of the coasters and one strip down the middle (on the exposed cardstock). Adhere the patterned paper strip on top.
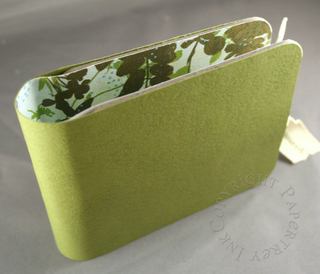 Sand your edges and corners so they are flush with the coaster. Viola! You have created the most adorable (and sturdy) cover for your book!
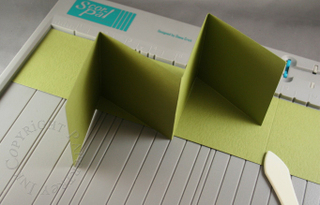 Now we are going to create two accordion pages to go inside. I cut two strips of cardstock measuring 3 x 12-inches. I then used my ScorPal to add score marks every three inches. (If you wanted your strips to be longer, you could just adhere additional strips end to end.)
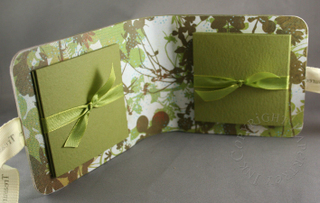 Tie the two books closed with your narrow ribbon and securely adhere them to the inside of your book (one on each side).
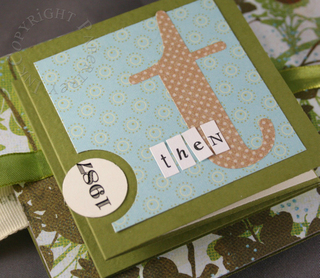
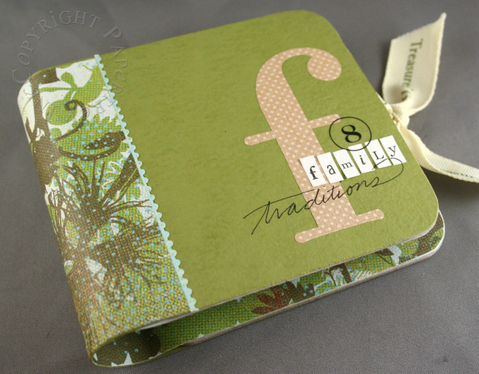 Now that you have completed the basics, you can have fun and add embellishments! Here is my final cover. I just let it flow and went freestyle. Don’t be afraid to layer several different types of elements & materials. I used stickers, rub-ons and my own handwriting. (Detailed supply list below)
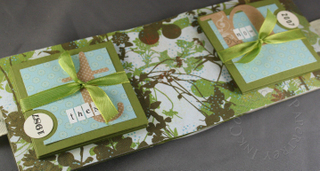 This is the interior of the book with the embellished accordion page covers.
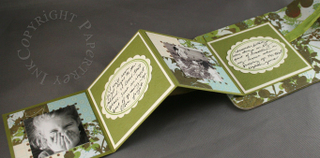 Here is an accordion page unfolded. I just combined my patterned papers and threw in some fun journaling labels created with our Borders & Corners Oval stamp set and my Marvy Mega scalloped Oval Punch.
I entitled my book "Family Traditions", with the two accordion pages comparing traditions from my childhood to the ones I have imported into my own family’s lifestyle. It was fun to revisit moments like this. Having the two separate accordion pages would really compliment many compare & contrast themes:
He said, She said
Then & Now (for the graduate, new mommy, bride, anniversary, sweet 16)
Sibling vs. Sibling
What I Love & Hate
Have fun with the layout of these pages. You could add pockets & tags. Attach labeled tabs. You could make the accordion pages out of acetate or vellum. You can also play with what could go inside this cover OTHER than the accordion pages. The design of the cover could be fitted with pockets inside to hold gift cards or money, making it a gift portfolio rather than a scrapbook! There are so many possibilities with this.
Don’t forget to post your version of this project over at Splitcoast using the keyword: NOV07VSBNC. I can’t wait to see what you create!
SUPPLIES:
Ink- Landscape & Burnt Umber Palette inks
Stamps- Borders & corners Oval and Square from Papertrey Ink
Paper- Basic Grey Mellow Collection (floral paper), Baywood Lane (blue polka dot reverse) from Savannah Collection by Scenic Route, cardstock from Prism
Other- Treasured Times ribbon from Stemma, narrow green ribbon from Hobby Lobby, Kraft Paper Monogram stickers from Making Memories, Boho Chic Tiny Alpha stickers from Making Memories, Fortunes Numero Rub-ons from 7gypsies. Marvy Mega Scalloped Oval Punch, 1-inch & 3/4-inch circle punches from EK Success, Teriffically Tacky Tape from Provo Craft. chipboard coasters from Bazzill





WOW! What an amazing book! I can’t wait to give it a try. Have a great weekend!
OMG Nichole, this is AWESOME! I can’t wait to try it! You are so talented!
~Lynda
OMG Nichole, this is AWESOME! I can’t wait to try it! You are so talented!
~Lynda
OMG Nichole, this is AWESOME! I can’t wait to try it! You are so talented!
~Lynda
Sorry about the 5 million posts, I was just going back to your blog….and I guess you can’t do that!!! LOL!!! I’m an idiot!
Nichole…this project is beyond stunning. You are such an inspiration. 🙂
What a great project. I am always on the look out for new and different paper projects so this one will be fun to work with.
Thanks for your inspiration.
Janine
You are such a gifted crafter! This little book is amazingly beautiful and simple to create, and I cannot WAIT to make one of my own! TFS all the directions! You rock!!
This is awesome! I got the challenge finished but still need to upload. I plan on making a few of these for gifts. LOVE IT!!
Thank you so much Nichole for being a hostess for VSBN! Your challenge is amazing and I can’t wait to give it a try!
Bravo! Well done. What an excellent project! I can’t wait to try it…maybe even tonight. 😉
OMGOsh, that is the coolest thing I have ever seen! I love what you did…just super awesome! Thanks for showing us how, your tutorials are GREAT! AMAZING NICHOLE! 🙂
Adorable! great directions too. However, my older eyes cannot read the supply list. Don’t know if it is my monitor or what. Just thought I let you know.
I’ve see some version of that but your is my favorite!! It’s really beautifull. Thanks for sharing that with us.
This looks like fun! Now, if I can just remember where I put those coasters!
Smiles,
Anne
Nichole, I noticed that you use the Scor-Pal. I have been thinking about getting one and did not know anyone that had used one.
Would you mind telling me if it is agreat product. Have you used the Scor-it if so haow do they compare.
thanks,
love it and I wanted to say way to go on the watermark I don’t think there will be anymore theft of your pics!!!
I am so going to make a few of these what a grest little gift for the grandfloks!!! TFS
Sarah
OMGoodness Nichole you are terrific! I am flying from one side of the country to the other (Austalia) in two weeks to suprise my Mum for her 60th and this project is perfect for a card/memento to give her to go with my gift. Thankyou so much for the inspiration and sharing of your brilliant talent. Just love it!!!
That is darling! I am going to a baby shower next weekend and I think that would be a perfect gift!
Thanks so much!
This is an awesome project! Thanks for the great tute!!
This little book looks fantastic – I can’t wait to give it a try. Thank you so much for sharing your creativity.
Thanks for such a wonderful tutorial. I just ordered my first coasters, got them and really had no clue how to use them. These are wonderful step by step directions and I really appreciate it. Your book is perfectly darling.
Ooohh! I haven’t had time to play at SCS but this sounds awesome! Thanks so much. I see a few xmas gifts in this!
Diane
Ooohh! I haven’t had time to play at SCS but this sounds awesome! Thanks so much. I see a few xmas gifts in this!
Diane
Wow! This is so awesome Nichole, THANK YOU so much for sharing & your awesome tutorial…glad to see you have a watermark now, it’s great!
Wow, this project is amazing! Thanks for sharing the awesome tutorial, I can’t wait to give one a try!
I just love, love, love this! Today is my SIL’s birthday…any guesses what I’ll be making for her? *grins*
Nichole:
This is a great little album, thanks for sharing the instructions for it.
Kim
Thank you for this great tutorial. I have made a coaster book as well (http://handmadebymeda.blogspot.com/2007/11/r-is-for-ruben-r-de-la-ruben.html), but doesn’t even come close to yours.
I have two coasters left so I’ll try to case yours.
I love this!! I am one of those people that bought 1000’s of coasters a while back and I need ideas! I’ll be trying this one!!
This is an awesome project! Thanks for sharing the directions, too. I think I may have to give it a try!
That green print paper…so compelling!
love.
that is such a beautiful project, Nichole! thanks for sharing!
Thanks so much for sharing! Just in time for Christmas too 🙂
This is wonderful. I can’t wait to create one of my own.
Now this idea is beyond cool! Thank you for sharing, I think I will need to make one for my grandmother this Christmas. She loves anything with pictures! Thank you…. Nicole
Hello from Switzerland
Waouh, your blog and your creations are fabulous. I love.
Thank you
Best regards
Rachel
This is a wonderful project, and your book is gorgeous!! Thanks for the tutorial!!
This is my new favorite project!!!! You make it so easy to follow with the step by step instructions and clear cutting directions!!! Thanks so much for sharing! 🙂 You need to write a book! All kinds of different altered projects. I would buy it!!! Lisa K
Nichole,
Thank you so much for the inspiration. I have a friend who just had a baby (only 3 lbs) and he is in the NICU. I created this book for his mom (what fun) and she can use it to journal his first days with a place for her thoughts as well.
Sincerely,
Jennifer
Thanks for another great idea! I love your step-by-step instructions. Your projects are always beautiful. Thanks for sharing!!!
Nichole these are fabulous! Thanks so much for sharing.
I love your challenge!! this project is awesome and also the tutorial. I tried to upload it to SCS but have problems, so I posted in my blog.
I did some modifications because I just fall in love with your cover, is AMAZING!!
Love,
Diana
I love your challenge!! this project is awesome and also the tutorial. I tried to upload it to SCS but have problems, so I posted in my blog.
I did some modifications because I just fall in love with your cover, is AMAZING!!
Love,
Diana
AAAAACK! Nichole, this is absolutely GORGEOUS!!!!!
absolutely inspriring!!
Hi Nichole, this project is over the top EXCELLENT!!! I’ve been trying to email you but I keep getting rejected!!
Oh my goodness! This is stinkin adorable! Nichole, you are a papercrafting genius! I can’t wait to try this!
Wow, what a great little book!! I have a question though. I really want to get a scallop oval punch after seeing what you had done with some cards, and definately after seeing your project. Do you have both the Mega and the Giga, or do you always just use the Mega? I had been going to get the Giga, but after seeing your album I’m wondering if I only need the Mega! Thanks.
Wow, what a great little book!! I have a question though. I really want to get a scallop oval punch after seeing what you had done with some cards, and definately after seeing your project. Do you have both the Mega and the Giga, or do you always just use the Mega? I had been going to get the Giga, but after seeing your album I’m wondering if I only need the Mega! Thanks.
Wow, what a great little book!! I have a question though. I really want to get a scallop oval punch after seeing what you had done with some cards, and definately after seeing your project. Do you have both the Mega and the Giga, or do you always just use the Mega? I had been going to get the Giga, but after seeing your album I’m wondering if I only need the Mega! Thanks.
This is so beautiful, I like it so much 🙂 I noticed that so many of your Spellbinders Nestabilities Dies has been sold out. I wonder if you have ordered more… I’m so anxious to having them.
This was super fun Nichole! Thanks for sharing it with us! I’ve uploaded mine to my gallery on SCS and my blog! Will definitley do more of these!
Great job! Love it. Love all the work I’ve seen from you. Keep inspiring us.
Nichole, this is a fantastic project! You always inspire!!! Thanks so much for sharing the tutorial!
This is just wonderful! Love it!!!!
OMG! I just love this!!! Thanks for sharing all your wonderful ideas and projects with us all.
Yea – I finally got to try one of these cute little books! Thanks for the great tutorial, it was so easy to follow and lots of fun!! http://stampinwithjulie.blogspot.com/2008/03/prettie-wednesday.html
thank u so much !!!!
MERCIIIII c’est vraiment adorable
biz sylviehavre
Hi this is so cute…It really looks like it would be fun to make and have to carry in one’s purse…
Thanks for the step by step info..Have a nice day!
Patricia H2ogardenlady
SO BEAUTIFULLL
Exelent gift! Thanks for the class!
thanks))) so cool and easy) thanks from Russia
What easy directions for this fantastic book, you make it all look so easy. I thank Vicki, for sending me this way!!
Thanks and great work!!
Hugs
Donna
I love how it folds out and it’s great that it’s super cheap to do.
Thank You for this, I love mini’s . Very clever closing.
Keep smiling and creating
Thanks for sharing the directions! What a beautiful gift!
excited to do the challenge. Nichole great share.
Love it have been given charity coasters with lovely pictures on front so will adapt thank you for sharing x