Another addition to our sales line-up for tonight’s release is WHITE CARDSTOCK!!! I am so excited about this! We searched far and wide for THE best white cardstock and finally found a perfect match! It is super smooth, accepts ink beautifully (the color remains SO vivid!) and is luxuriously thick (110lb vs. Stampin’ Up!’s 80lb.!!!). It makes sturdy card bases. Because of it’s thickness, you also have a little less bleed through occurring when you use markers or heavier inks. I love this stuff and am SO hooked! And I know you will be too once you try it! The price is right, 40 (8 1/2 x 11) sheets for $6 (that works out to be 15-cents a sheet!). So for today’s project I wanted to allow our NEW white cardstock to take center stage and create some beautiful patterned paper!
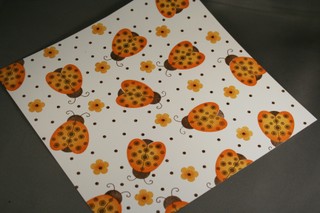
This vibrant pattern is made of ladybugs and flowers from the new Papertrey set being released tonight (midnight EST). The variegated color on the wings was created by utilizing the rock n’ roll technique with more mustard & pumpkin pie classic inks from SU!. The dotted stamp was done in burnt umber.
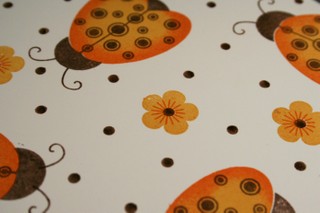
I ended up adding a little detail that I LOVED and will be sure to do again! I stamped the flowers from the new release in mustard and then stamped the sunburst image (from Butterfly Kisses) with pumpkin ink. As a final touch, the dot from the new release set was added to the center using burnt umber. Think of all the colors you could do this in!

1. Now that I had my paper made, I decided to create a little box that I learned the steps for when I was a child. I used to make them out of pages ripped from magazines or wrapping paper. Now I have a little more sophistication in the choice of my materials, but the pattern is still the same! For this particular size box, start with your cardstock cut to 8 1/2" square. Draw a line with a ruler in pencil from corner to corner, forming an "X".
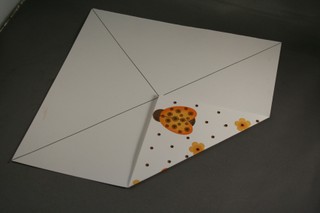
2. Using a bone folder, fold one corner to the center point of the "X".
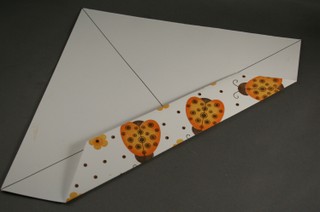
3. Fold the edge of your previous fold so it meets the center pencil line.

4. Unfold your previous folds. You are left with a set of horizontal creases.
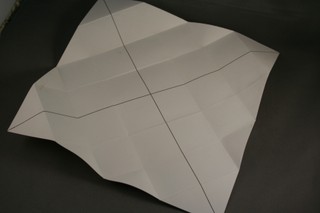
5. Repeat steps 2-4 for the remaining three corners. When completed you will have a series of creases that form a grid.
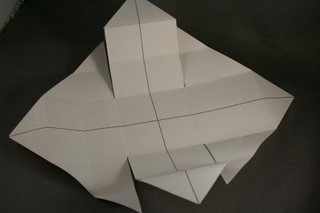
6. You will make four cuts with scissors. Pick two opposing corners. Create a tab that is 2 blocks wide and two blocks high (not including the "point") by make one snip on either side of your determined crease grid. Repeat the same snips on the opposing corner.
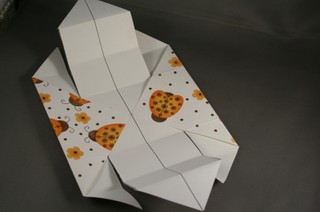
7. Fold the opposing corners that have not been altered to the center point of your "X".
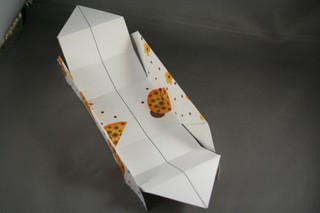
8. Fold them in half again, creating the first two "sides" of your box.
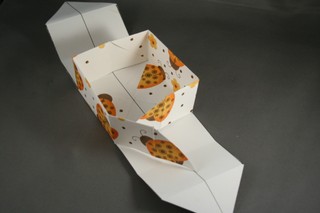
9. Fold the ends of the sides inward, forming the base of the remaining two sides.
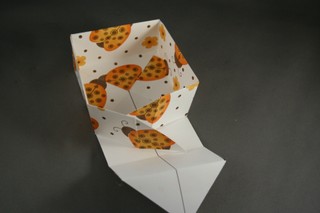
10. Fold the tabs created in step 6 over the side bases created in step 9. The point of the step 6 tabs will meat at the center of the "X"
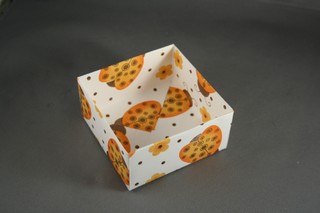
11. Now you have completed your box lid! Lined and everything, without any extra effort!!!
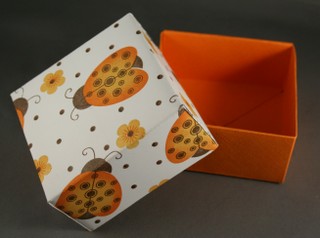
12. For the bottom, just repeat all of the above steps, except your beginning cardstock should measure 8-3/8" square.
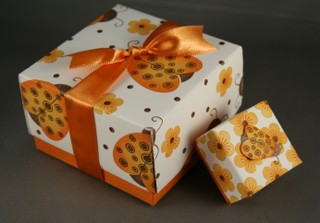
The fun thing about these boxes is that you can make them any size, it just depends on the beginning measurements of your cardstock square. (Always make your box bottom cardstock square about 1/8" smaller than the one used in creating your lid, depending on the thickness of the cardstock.) For the itty bitty one shown here, I started out with a 3-3/4" square for the lid and 3-5/8" square for the bottom. There are lots of things you can DO with the boxes as well. You could make a set of nesting boxes. You can tie them with ribbon or add tags. You could make box bands, like the one I showed yesterday on the card box. The possibilities are only limited by your imagination!

What absolutely beautiful patterned paper you’ve created!! I love the boxes…thanks for the instructions! ONE more day! 😉
Im just DIEIN” here!!! OMGosh midnite HURRY UP!! These are th ecutest boxes, and I would’ve NEVER thought to make those BODACIOUS Ladybugs that color!!! LUV LUV LUV!!!! Thankyou !!!!
Tandra
I am going to be stalking the site around midnight. I can’t wait!!!! Love ALL of these creations Nichole.
Alli Miles
OMG! How cute! I will be on as soon as I get to work in the morning to place my order. Crossing fingers you aren’t sold out!!!
Those ladybugs are SO GORGEOUS Nichole! I’m going to have such a hard time coming up with any thing different because this will be so stuck in my mind. And I’m low on white paper. A perfect time to give something new a try.
I can’t wait. Love the bugs and the boxes!
Wow Nichole, you never cease to amaze me! I love your patterned paper and the adorable box with THE perfect matching ribbon to finish it off. You are such a *detail* girl. And I’m so excited to hear about this new white cardstock. I better take a nap today so I can order first thing!
This is just the cutest box! I cannot wait until tonight! You’ve added a bit to my list! I hope the stamp set doesn’t get sold out before I add everything to my list! YIKES! 🙂
*jumping up and down* can’t WAIT for tonight! 😀
Is it Midnight already! Geesh…I wanted to order this set about 5 days ago…now I’m dying to order this set.
Thanks for the instructions for the box! Can’t wait to try one of these!
Linda
Midnight can’t come soon enough !!!!!
Oh, my — what a great little box! Love the patterned paper you created and the colors! Great find on the white cardstock — will definitely have to try that. Is it midnight yet? 🙂
Is it midnight yet?
This is just adorable!! I can’t wait for the release…I’ll be sitting at my PC at the stroke of midnight! 🙂
Love the paper you created and the box is so adorable. Going to make up some goodies bags and these would be perfect to add for an upcoming stamp I’m having at my house this summer. I’ll have to find that perfect little something to fill with. How is your white c/s with prismacolor markers? TFS
Dottie K
Wow, that paper sounds wonderful! And it sure looks great with your ladybugs stamped on it! Can’t wait for the new release…I just love your stuff! (and yes, I’m a SU demo!) Hurry up, midnight!!!
WOW! That paper you stamped is just gorgeous!! Can’t wait to order the new set, and some of the yummy sounding paper to COPY what you’ve shown here!! The colors are just perfect.
OMG Nichole supah, supah cute! love it! I have all the other sets and I am anxiously awaiting the new one!
LOVE IT!!!! What was your “technique” for doing the paper?
Wow – that’s gorgeous! I may have to stay up late tonight!
So CUTE! Thanks for sharing with us! More to buy!!
wow! you’re amazing!! so glad i can count on you to show me how to do all this great stuff. love your blog!!
very nice!!
Bety 🙂
Oh, my WORD! Nichole, you blow me away. . . This project is fabulous! I can tell you ONE person who will be up at midnight. . . I must try the paper and boxes!!
It’s soo incredibly cute! I think I’ve been away from stamping too long though. What the heck is the “rock & roll technicque”
V
OMgosh that is darling! Love the new images
I love it, but what’s the rock-n-roll technique? Please share because I love the look!
I have loved every single thing you have released. I am in awe of your talent!
Fabulous project!
the box is totally adorable! Thanks for the great directions!
OMGosh!! I’ve tried the cardstock and it is FABULOUS!!! Its everything nichole said and more!!!
Wow – this is the BEST little box!!! It’s the first time I’ve seen this one and I’m definitely gonna be using this one again. I love the butterfly stamp too!
Excellent!! Thank you for sharing such a wonderful idea, it’s priceless!!
I can’t believe how cute these are. I’m so anxious to get started making one.
I know that this is an old post, but I had to say, “You rock!” (as you probably already know). I have been making these boxes, but had been using other directions, which resulted in creases across the top of the box. Now I know how to remedy those unsightly creases. Thanks so much for all that you do!!!
Je craque…Un blog sublime!que du bonheur…
Beaucoup de coccinelles qui fait la grande joie de ma fille (collection)
bizzzz
sandrine
I love the boxes! I love your newest one with all the folded layers on the top. I do not see the directions for it on the page that I was directed to when I clicked on the link in my email.
Janice
🙂 la terminé ahorita en la oficina y me salio divina, solo que era hoja de maquina, salu2
I just got the link to this template today (fairly new to scs and blogging) and my jaw dropped over this! Not enough that the box is adorable, but that paper? That is so cute!! I was denying that I needed the ladybug stamps but since I will be ordering Out on a Limb when it’s back in stock it might find it’s way into my cart now! Love this! You are such a wonderful artist and an inspiration!
The box looks great!
I have a question about it.
I have tried to do this box many times, but every time- the result dose not looks like yours. The lid covers complitly the bottom of the box, not as your box- where you can see a little bit from the bottom.
What can I do? The measurements of the cardstock square are the same as yours.
But still- the lid covers it all.
Hope you can help me,
Dafna
Your Idea of gift box was very nice.
you also find Chocolate gift boxes wholesale are perfect food gift boxes. Special Chocolate gift boxes, food gift boxes wholesale http://www.searchperfectgifts.com.
what adorable paper…it took me a minute to realize you had made it with stamps (silly me!) and the box is so cute! i can’t wait to find an occasion to make it.
Eh really cool site i you are a very focus enthusiatics fan of origami. i want a make a proposal i dare you if you can build a figher plane with origami in just 20 minutes all the video intructions are here just go to.
http://origamistepsblog.findfastr.com
or go to
http://locatereviews.com/244235690
What a lovely idea!
This is so wonderful and the boxes so pretty! Thanks so much for sharing!
Oh wow, so neat!! Thank you so much for sharing. I am for sure going to make some! 🙂
HEY ITS NECESARY MADE ONE MORE LARGE THAN OTHER? OR IS THE SAME SIZE?
This box looks awesome! Love the colurs & the stamps you used to create it. Well Done
Martyn Munro
(Tasmania)
I really like your website, I also know a good standing hope to share with you http://www.dmchristianlouboutin.com
so cute, and just the right size for many goodies… for gifts.
great tutorial… I tried it with wrapping paper (the paper like one) and it came out beautifully… I was wonder, if I need to make the box taller, what do i do? thanks…
any idea how I would make a different size/shape box with this technique? I love the idea but I need a rectangle box for wedding favors.
Love the idea for the box. Looks fairly simple. You mentioned the 110 lb white cardstock at the start, but didn’t mention who makes it. I’ve been disappointed by the white cardstock I’ve found on the market. It always seems so thin, the ink usually bleeds through & it never seems as thick & sturdy as colored cardstock. I’m not fond of textured cardstock, except for core d’nations, as I prefer to do my own texturizing with embossing folders & impressibles. So where did you find this incredible white cardstock?
Hi, I’m new to this and am wondering if you used glue, double-sided tape, or something els to hold it together??
Thanks 🙂
I love this! Nice and simple! 🙂 🙂
What a great tutorial. I sat and made a couple of little boxes just because and at the end I was doing it on automatic 🙂
Such an easy tut and a great way to work through the piles of paper taking up space in my craft area.
Hey there, thanks a lot for sharing this tutorial, i made this in a competition and won first prize.
wow! i made it! i am so proud of myself! without even a slight effort and it came out great! thank you soooo much!!!!
Oh my god what a lovely work i just tried it now i got a great work thanks for every thing.
love it
Thanks! I’ve always wanted to do these boxes…and these directions are fabulous!