


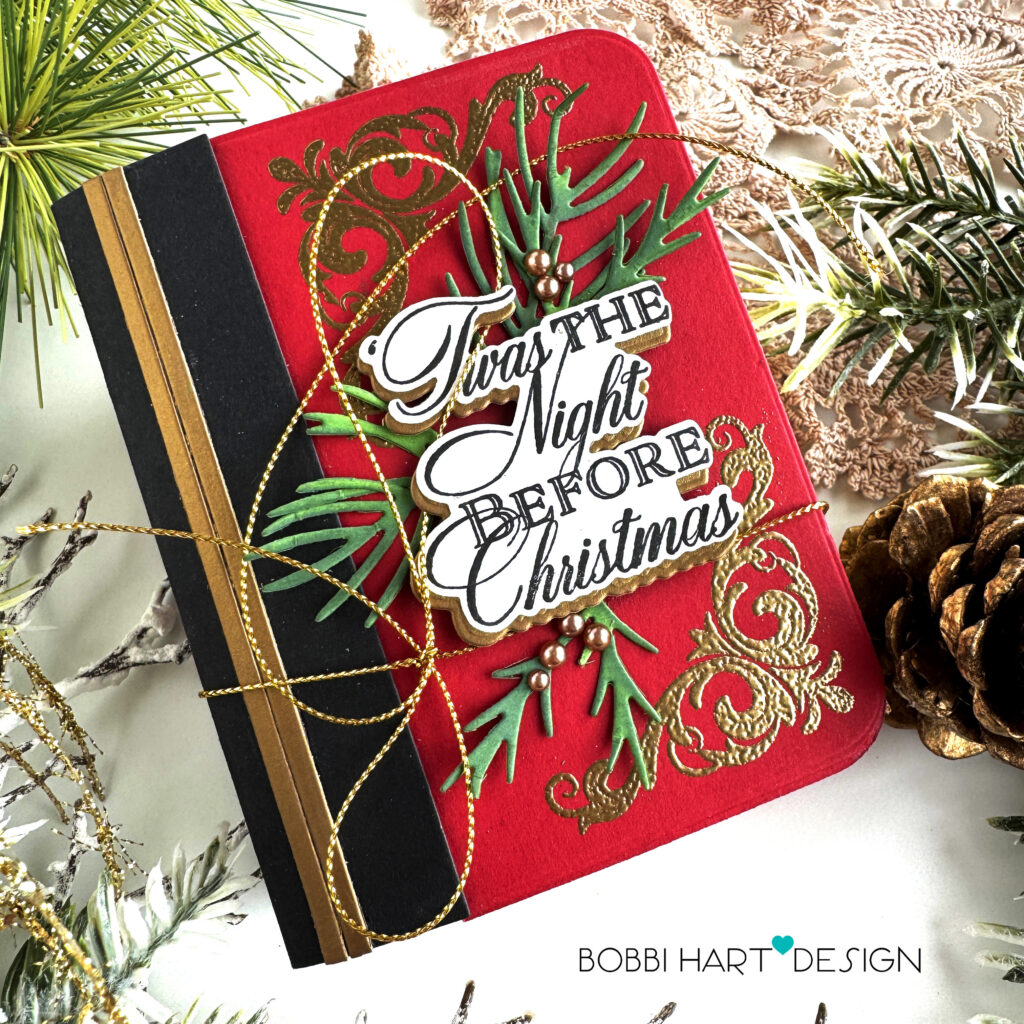
Hi friends. I find myself buying gift cards around the holidays for those friends and family members that have everything. To make it more special, I like to make a handmade gift card holder. When I saw the “‘Twas the Night Before Christmas” stamps and dies, I knew I had to make a holiday book gift card holder! Fortunately, Papertrey Ink has all the products to make this adorable Christmas story book gift card holder. This gift card holder to make many different books so think beyond Christmas to a baby book, photo album celebrating someone’s birthday, a retirement featuring the “last chapter” and the ideas continue!
I am using the following Papertrey Ink products:
Go-To Gift Card Holder: Book die
Go-To Gift Card Holder Book Box die
Go-To Gift Card Holder: Book Pockets die
‘Twas the Night Before Christmas Mini Stamp Set and coordinating dies
Merry Motifs Stamp Set and coordinating dies
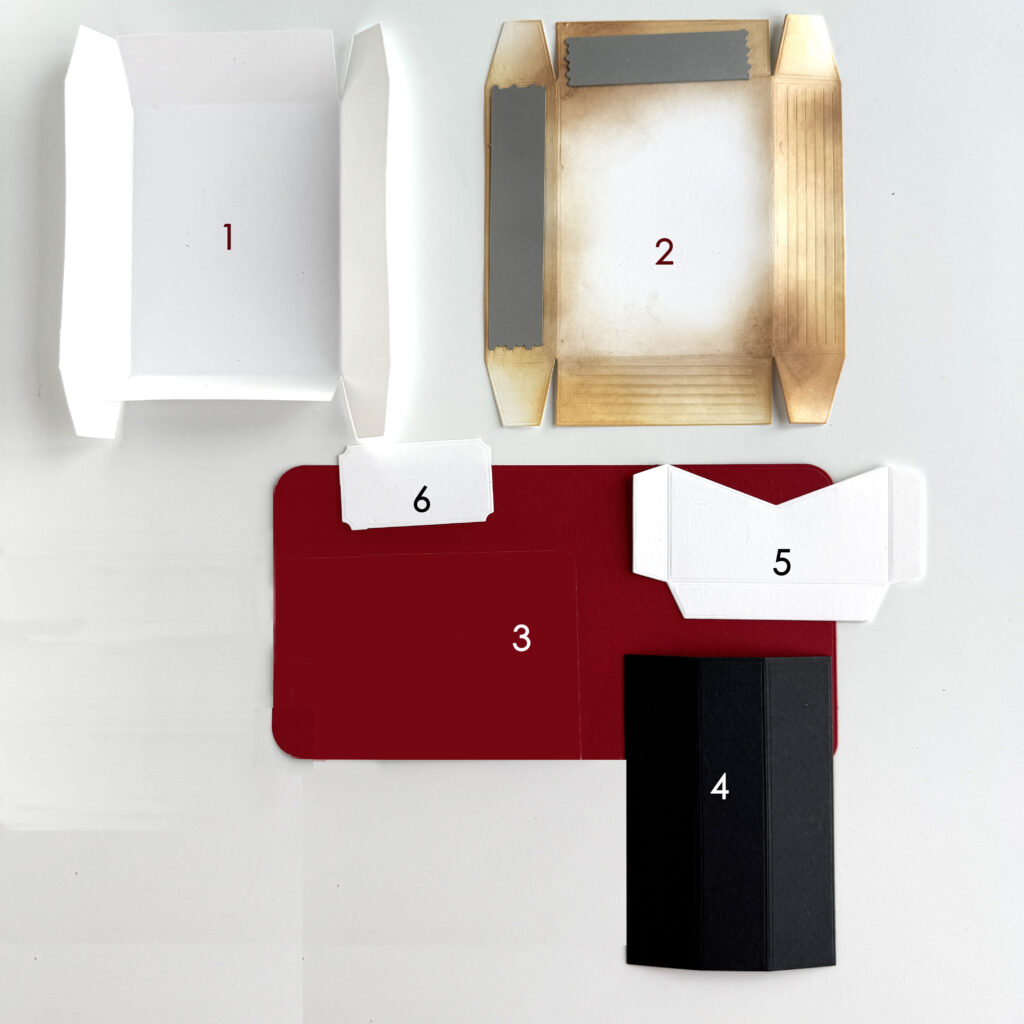
Step One – (1 & 2 above) Die cut the box top and bottom from Stamper’s Select White cardstock using the Go-To Gift Card Holder Book Box die . For the top, use the two accent “lines” dies in the die set to create the line indentions on the folded edges to represent the pages of the books. Using a Blending Brush (medium size), add ink to the sides and the edges of the top of the box using Ranger Distress Ink in Antique Linen. You don’t have to be perfect with this. Allow some of the ink to go up and around the edges of the top surface. This application will “age” the first page of the book!
(3 & 4 above) Die cut the story book cover and spine from Pure Poppy Cardstock and True Black cardstock using the dies from Go-To Gift Card Holder: Book die.
(5 & 6 above ) Die cut the interior pocket and the label from Stamper’s Select White cardstock using the dies from Go-To Gift Card Holder: Book Pockets die and Go-To Gift Card Holder: Book die, respectively.

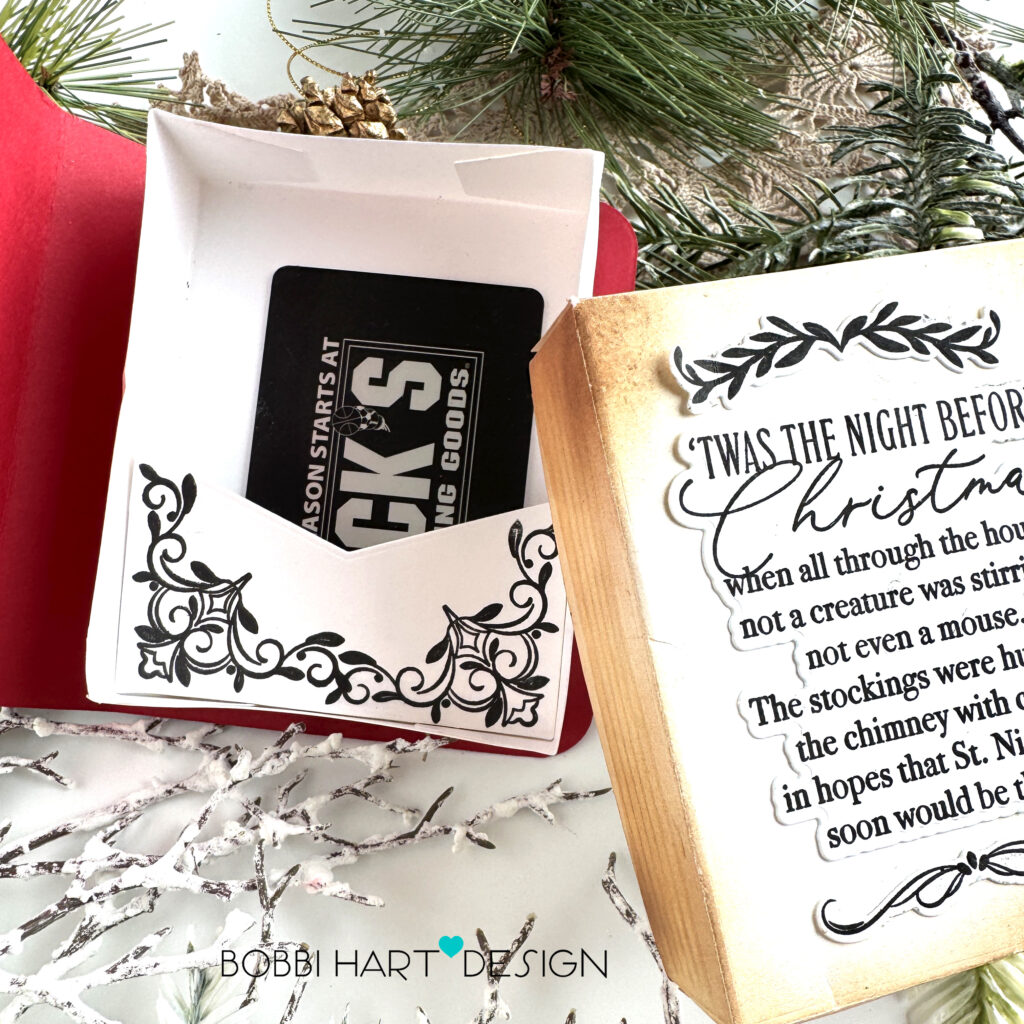
Step 2 – For the inside box, stamp the corner design from the Merry Motifs Stamp Set on the inside gift card pocket using True Black Dye Ink. Assemble the boxes. I use double-sided tape to adhere the folded flaps.
For the book’s exterior cover, stamp in Versamark Watermark Ink Pad and emboss with gold embossing powder similar to this powder, the Merry Motifs Stamp Set corner scroll design in two corners on the front of the book and the “season’s greetings” on the back of the book. Use a line design for the spine, stamping at the top and bottom on the black spine reinforcement. Stamp the “‘Twas the Night Before Christmas” title in True Black Dye Ink on Stamper’s Select White cardstock and die cut the design. Die cut a shadow layer from gold metallic cardstock. Layer the two, offsetting it a bit for the gold shadow to show at the bottom and on the left side of the title. This makes it just a little more dramatic on the cover!
Assemble the book. Optional: Attach two 1/8″ gold strips to the front spine reinforcement as shown. I like this added gold on the front.
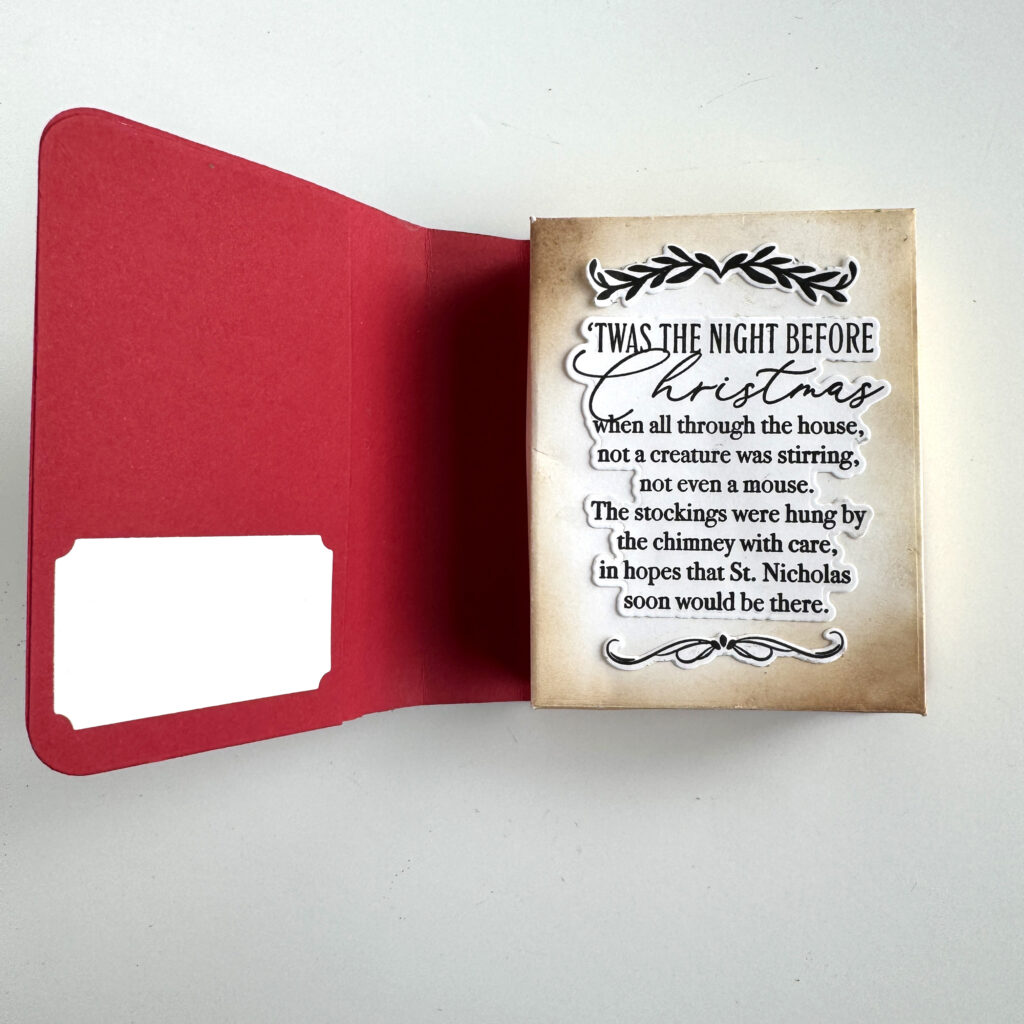
Step 3 – Attach the box to the inside of the book’s back cover. Use 1/4″ double-sided Scor-Tape for extra-firm adherence. It will help when the box is opened/closed. Stamp the verse and accent pieces from the Twas the Night Before Christmas Mini Stamp Set and coordinating dies using True Black ink on white cardstock. Attach to the top of the box to appear like the first page of the story.
Attach the white label to the inside of the cover. This is a great place to add a “to/from” or message to the recipient.
Step 4 – Add additional details to the front like greenery using the Into the Blooms: Christmas Sprigs die set and New Leaf cardstock, with Rustic Wilderness Distress Ink blended on the leaves using a Blending Brush (medium size). Attach golden pearl gem stickers to the greenery for berries.
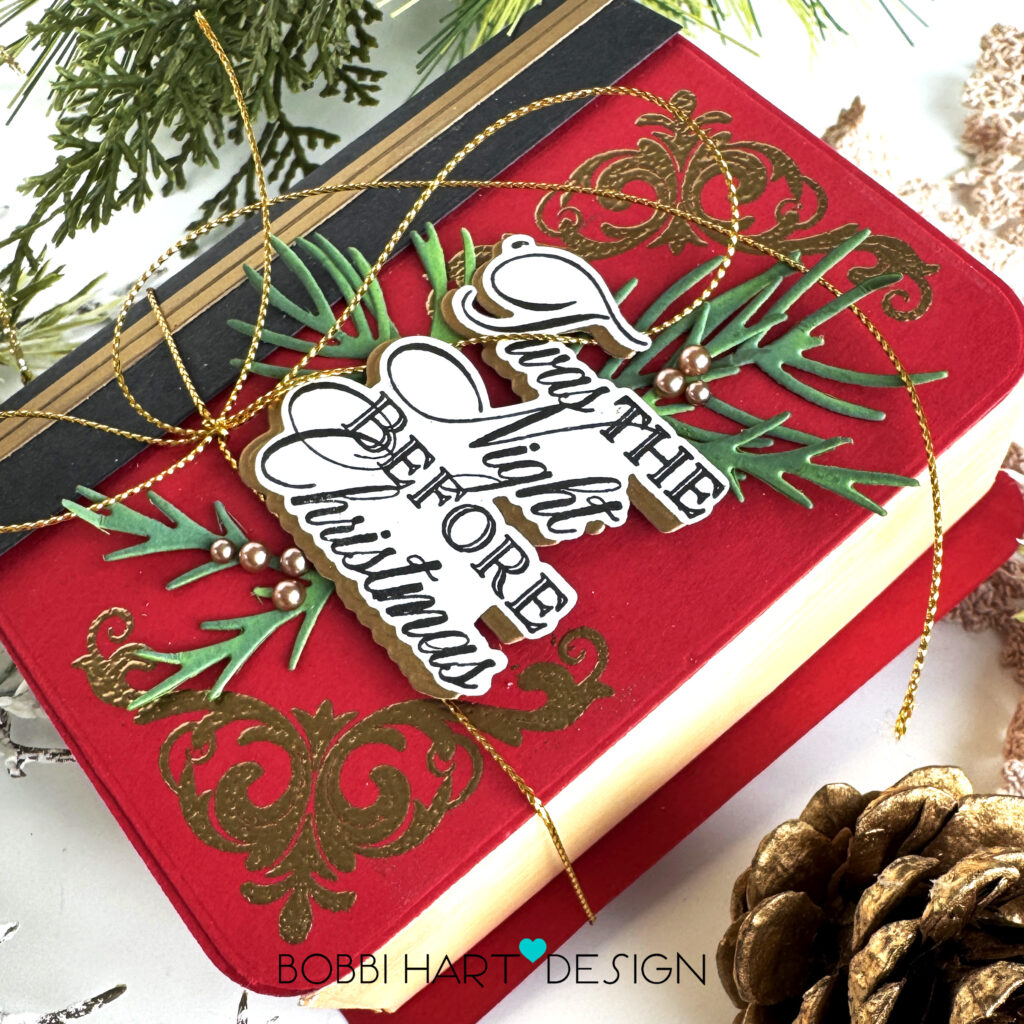
STEP 5 – Attach a gold string around the book to keep it in a closed position or add a self-adhesive Velcro closure to the inside. This card is ready to read! Give it to someone specials as a unique, handmade gift card holder for the holidays! The box is as special as the gift card inside!
You can shop the entire collection here at Papertrey Ink! If you decide to place an order, please use the links in this post so that Papertrey Ink team knows what inspired you. I appreciate it very much. It helps me to continue to bring more ideas to you!

Thanks for stopping by today. If you want to see more ideas and inspiration from me, subscribe to my blog, BobbiHartDesign.com. I’ll send you updates on new posts! You can also find me on Instagram as @BobbiHartDesign and on Facebook as BobbiHartDesign.
Bobbi Hartmann Lemanski, Bobbi Hart♥ Design, Adding h♥art into every design
diana froelich says
This card caught my eye immediately. Then to find it was a gift card holder? Perfect!Great job. Thank you
Sandi Lotter says
This is a winner! I always need a cute gift card holder during the holidays, and this one is just perfect for lots of people on my gift list. Thanks for the. Supply list and tutorial.
Terry Fest says
Love the styling and layout of this card. It is my favorite I think, so far. Not sure how it was put together = haven’t look into it – just stunning and enjoyable. Your style and design work is always attracting me. Thank you.