


Welcome to our final day of the August countdown. Here at Papertrey Ink we love to bring you tons of variety. If you like more simple designs or something a little more challenging, we have you covered. Each of our newly released products can be used in so many different ways to fit your particular style, we are excited to show you how they come to life!
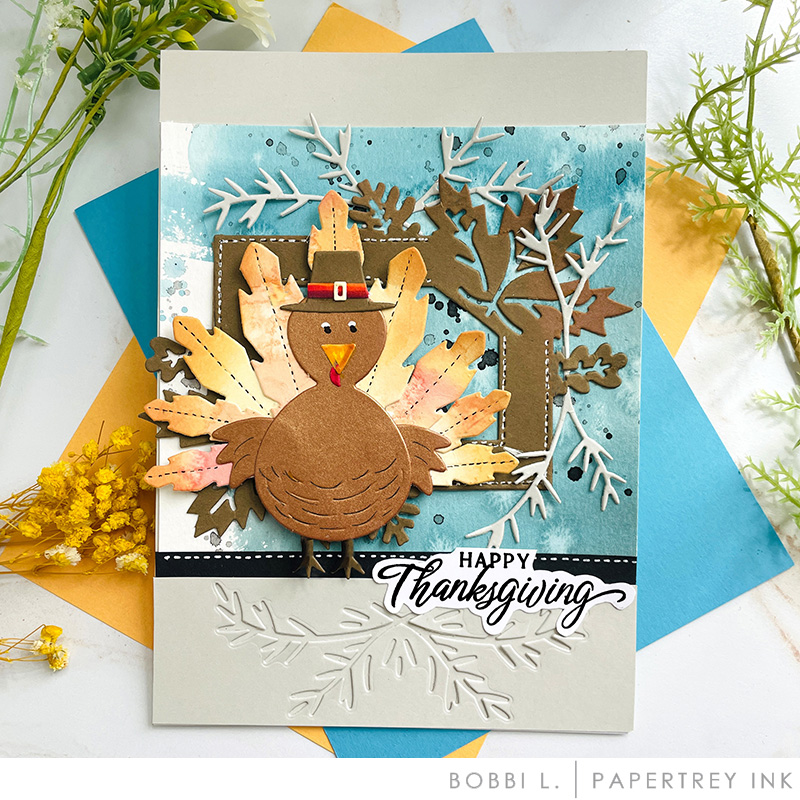
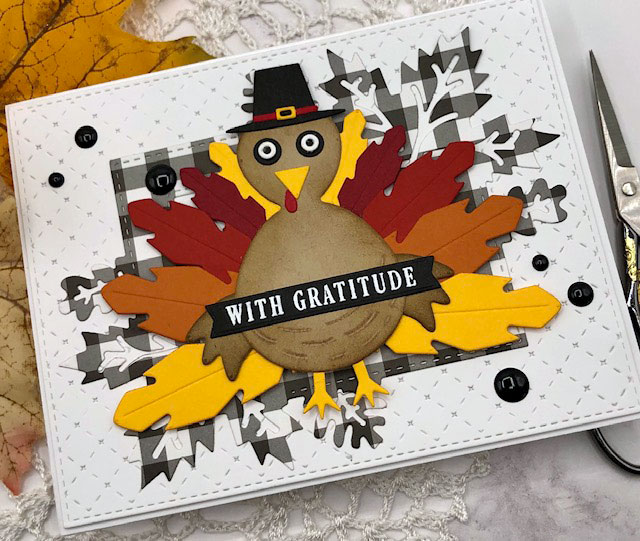
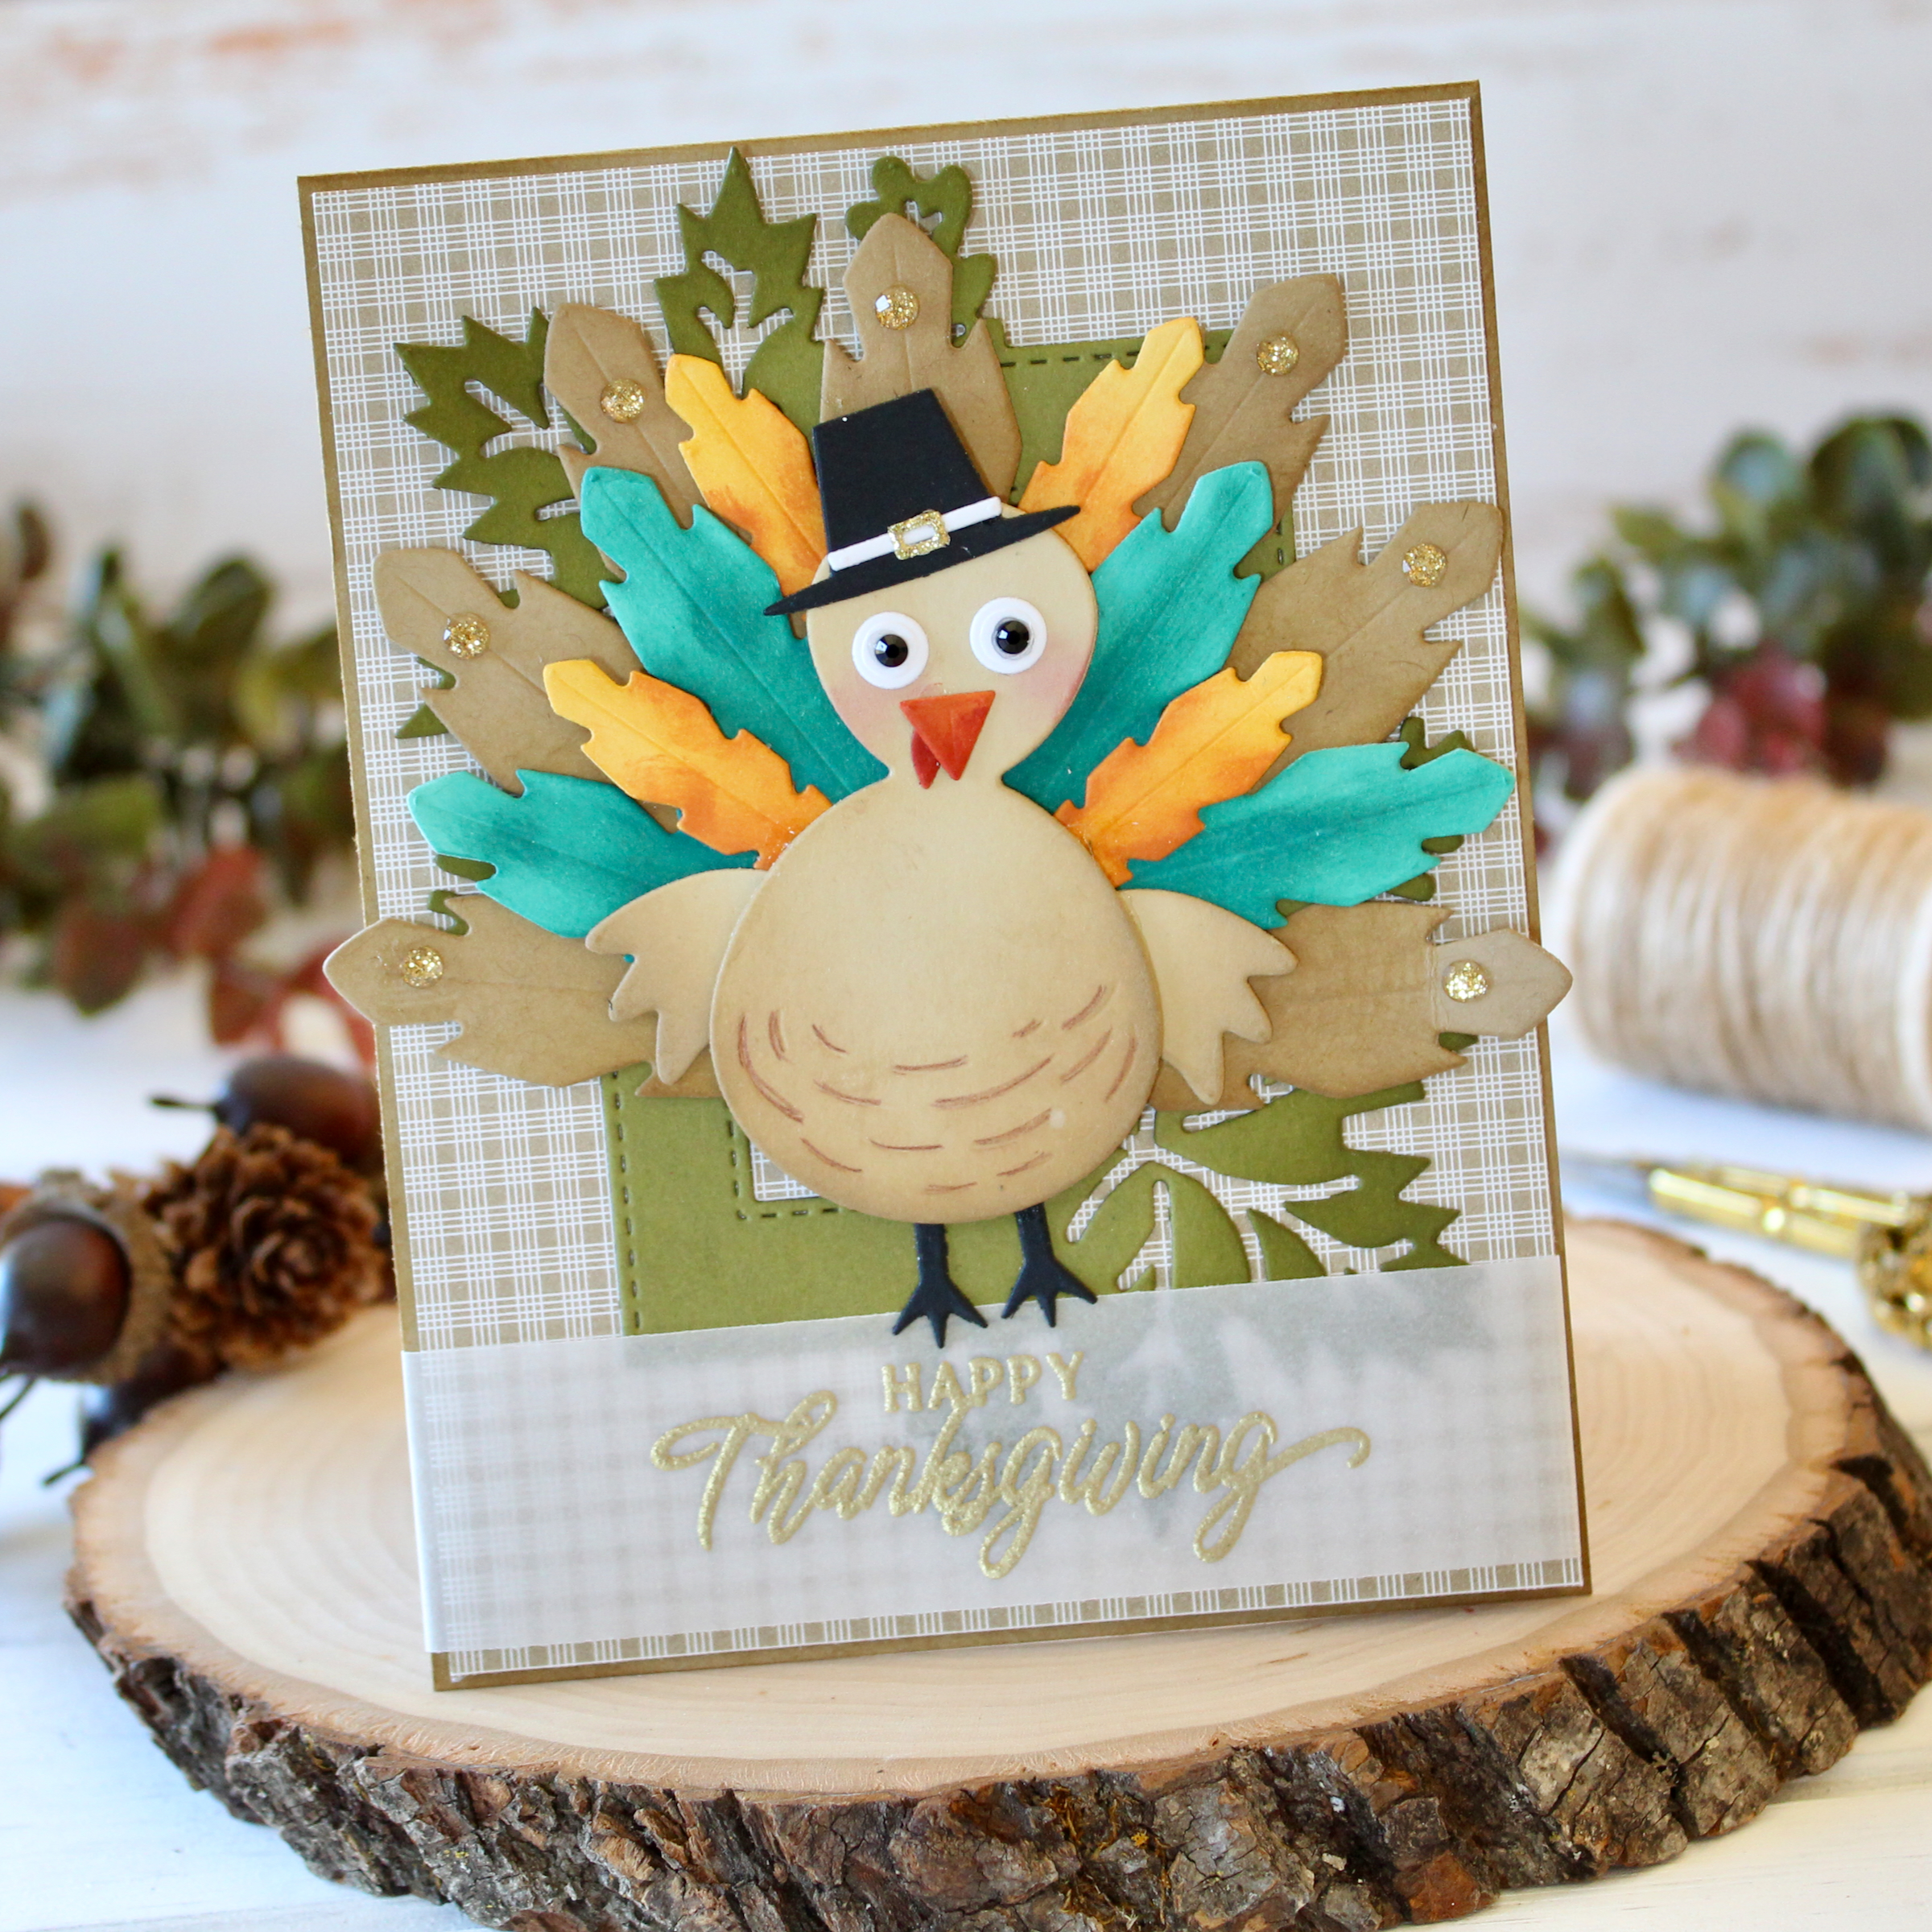
Hi, it’s Melissa, and I’m so excited to share our new products with you. We absolutely love bringing you the most amazing images made from the highest quality materials for you to add to your creative toolkit. I’m going to show you what I created with these wonderful products and then we’ll show you what the other designers made. The card below was created using our new Build-A-Turkey dies and Fun Frames: Leaves die. You’ll love these fabulous, new products!
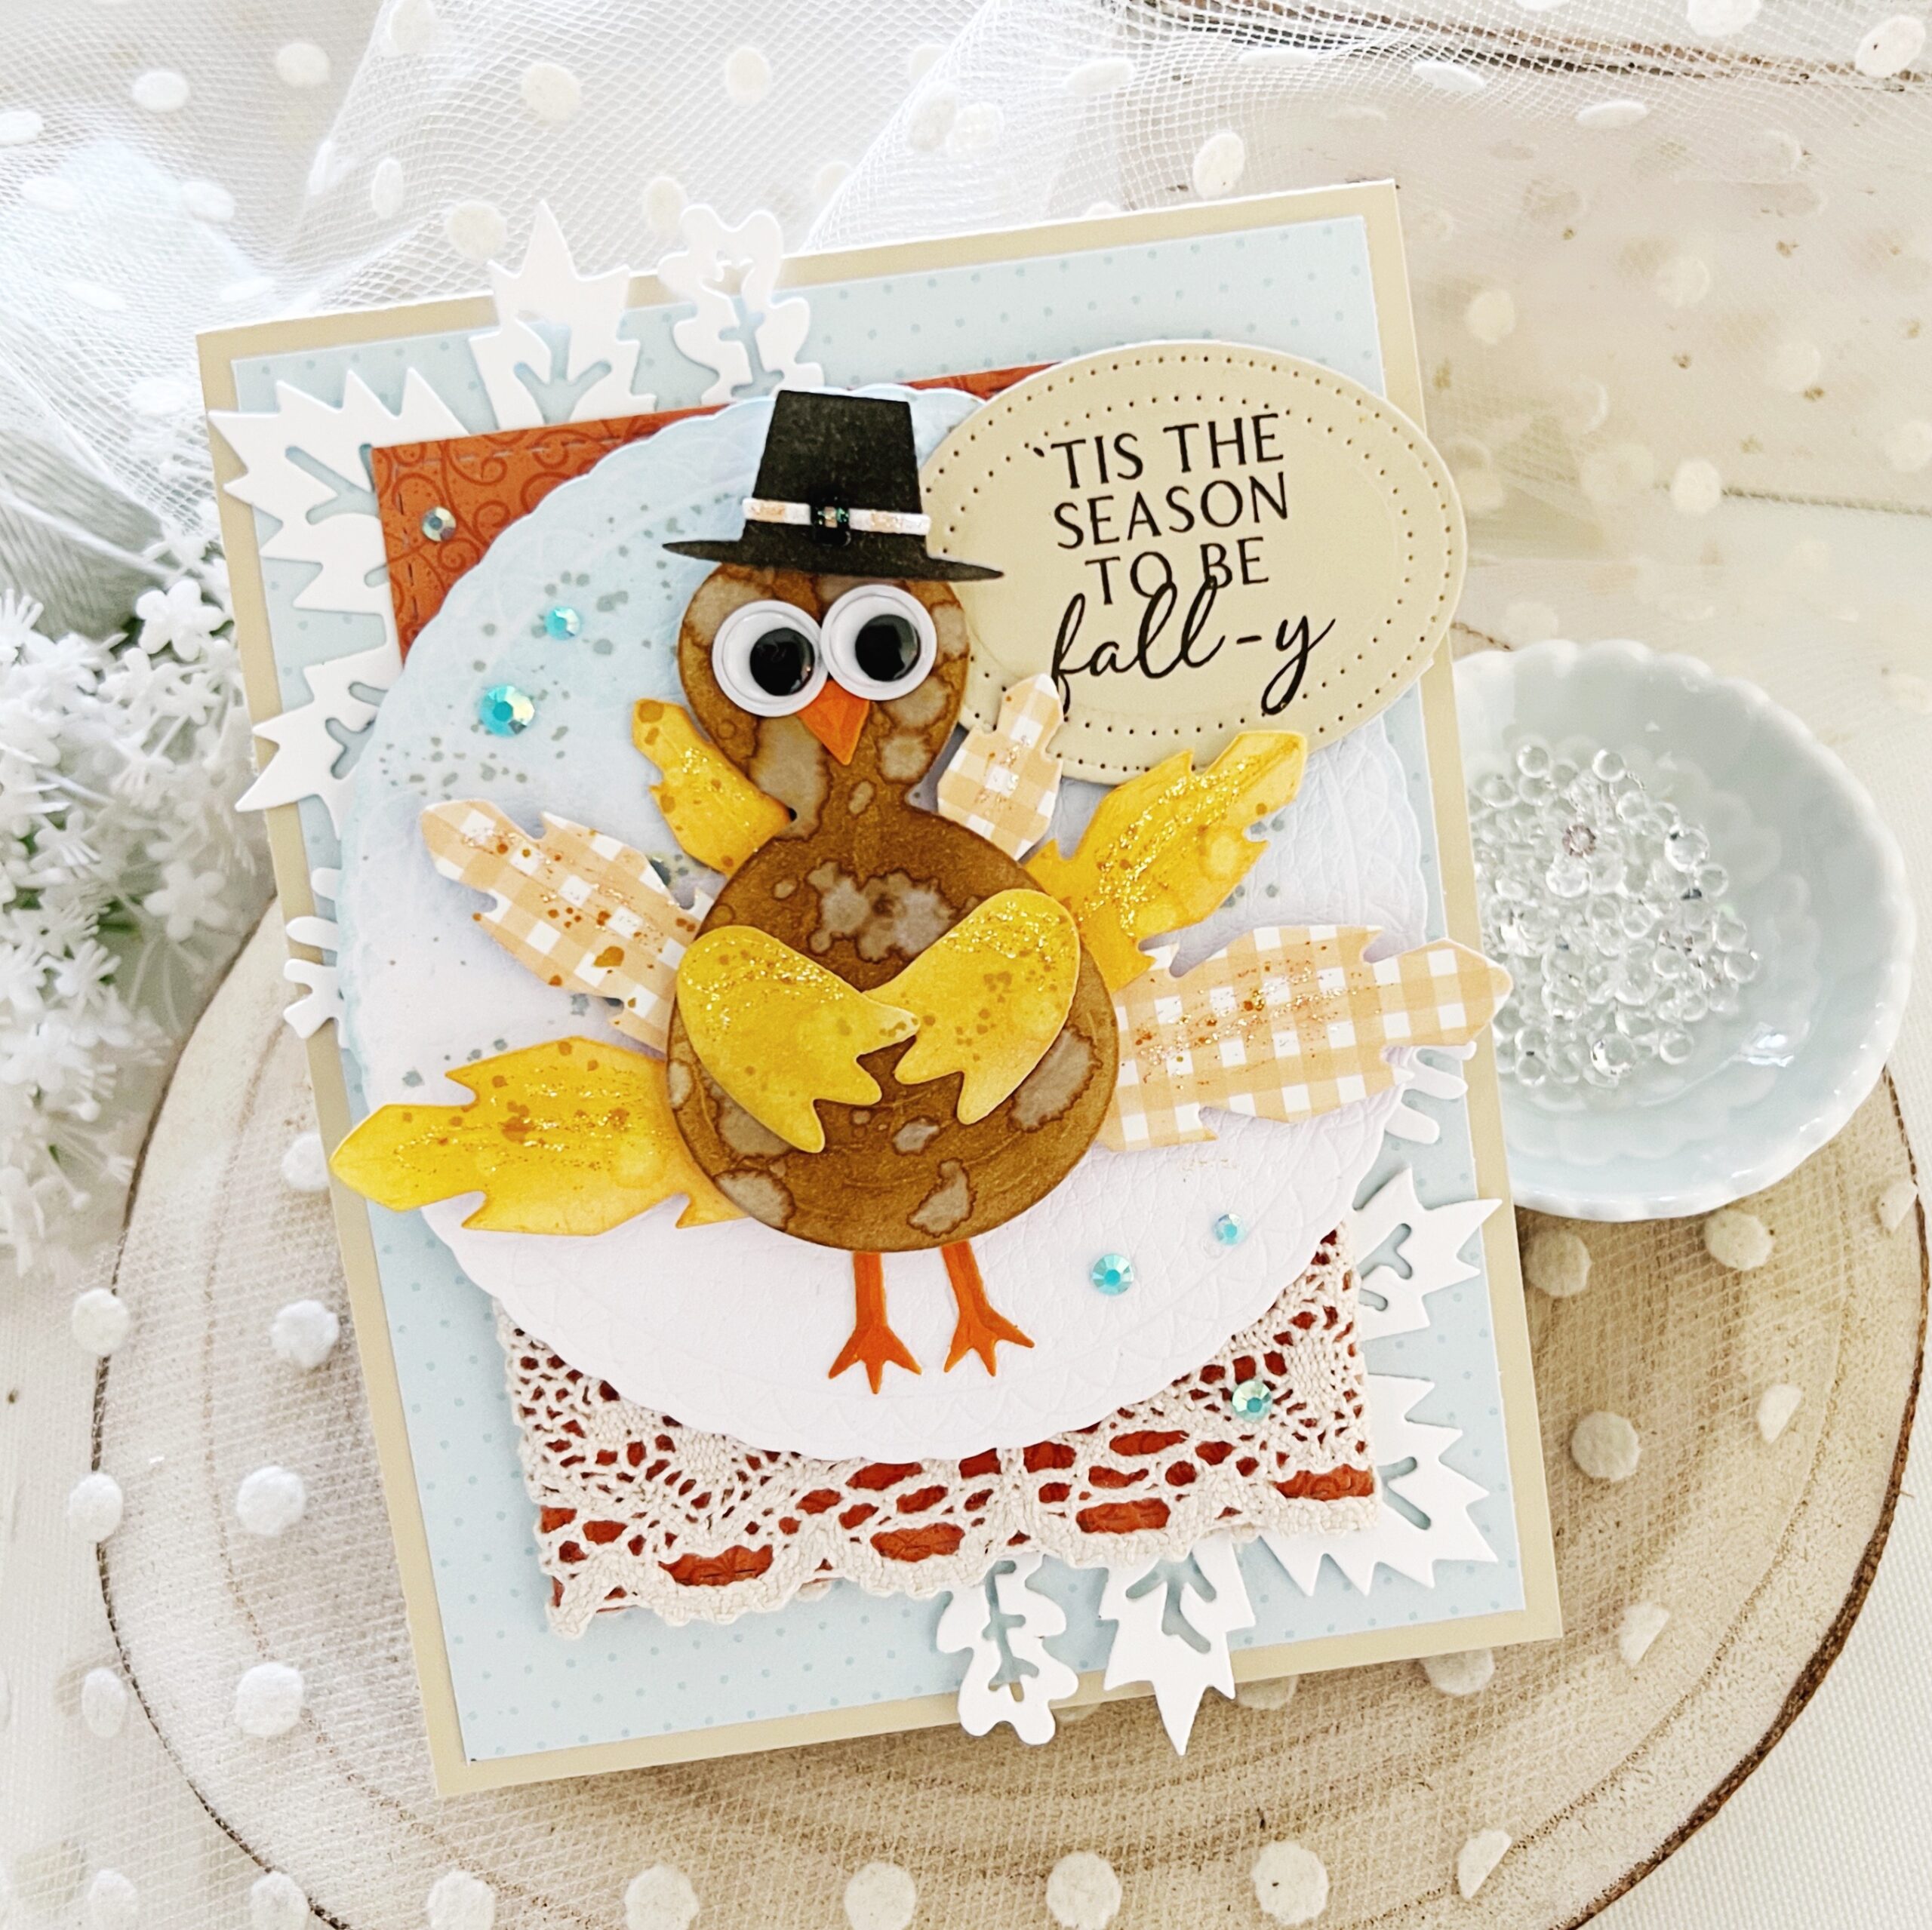
Our new Build-A-Turkey dies are pretty irresistible and most definitely playful! He comes with three different sizes of feathers, a body, wings, legs, beak, eyes, pilgrim hat, and more.
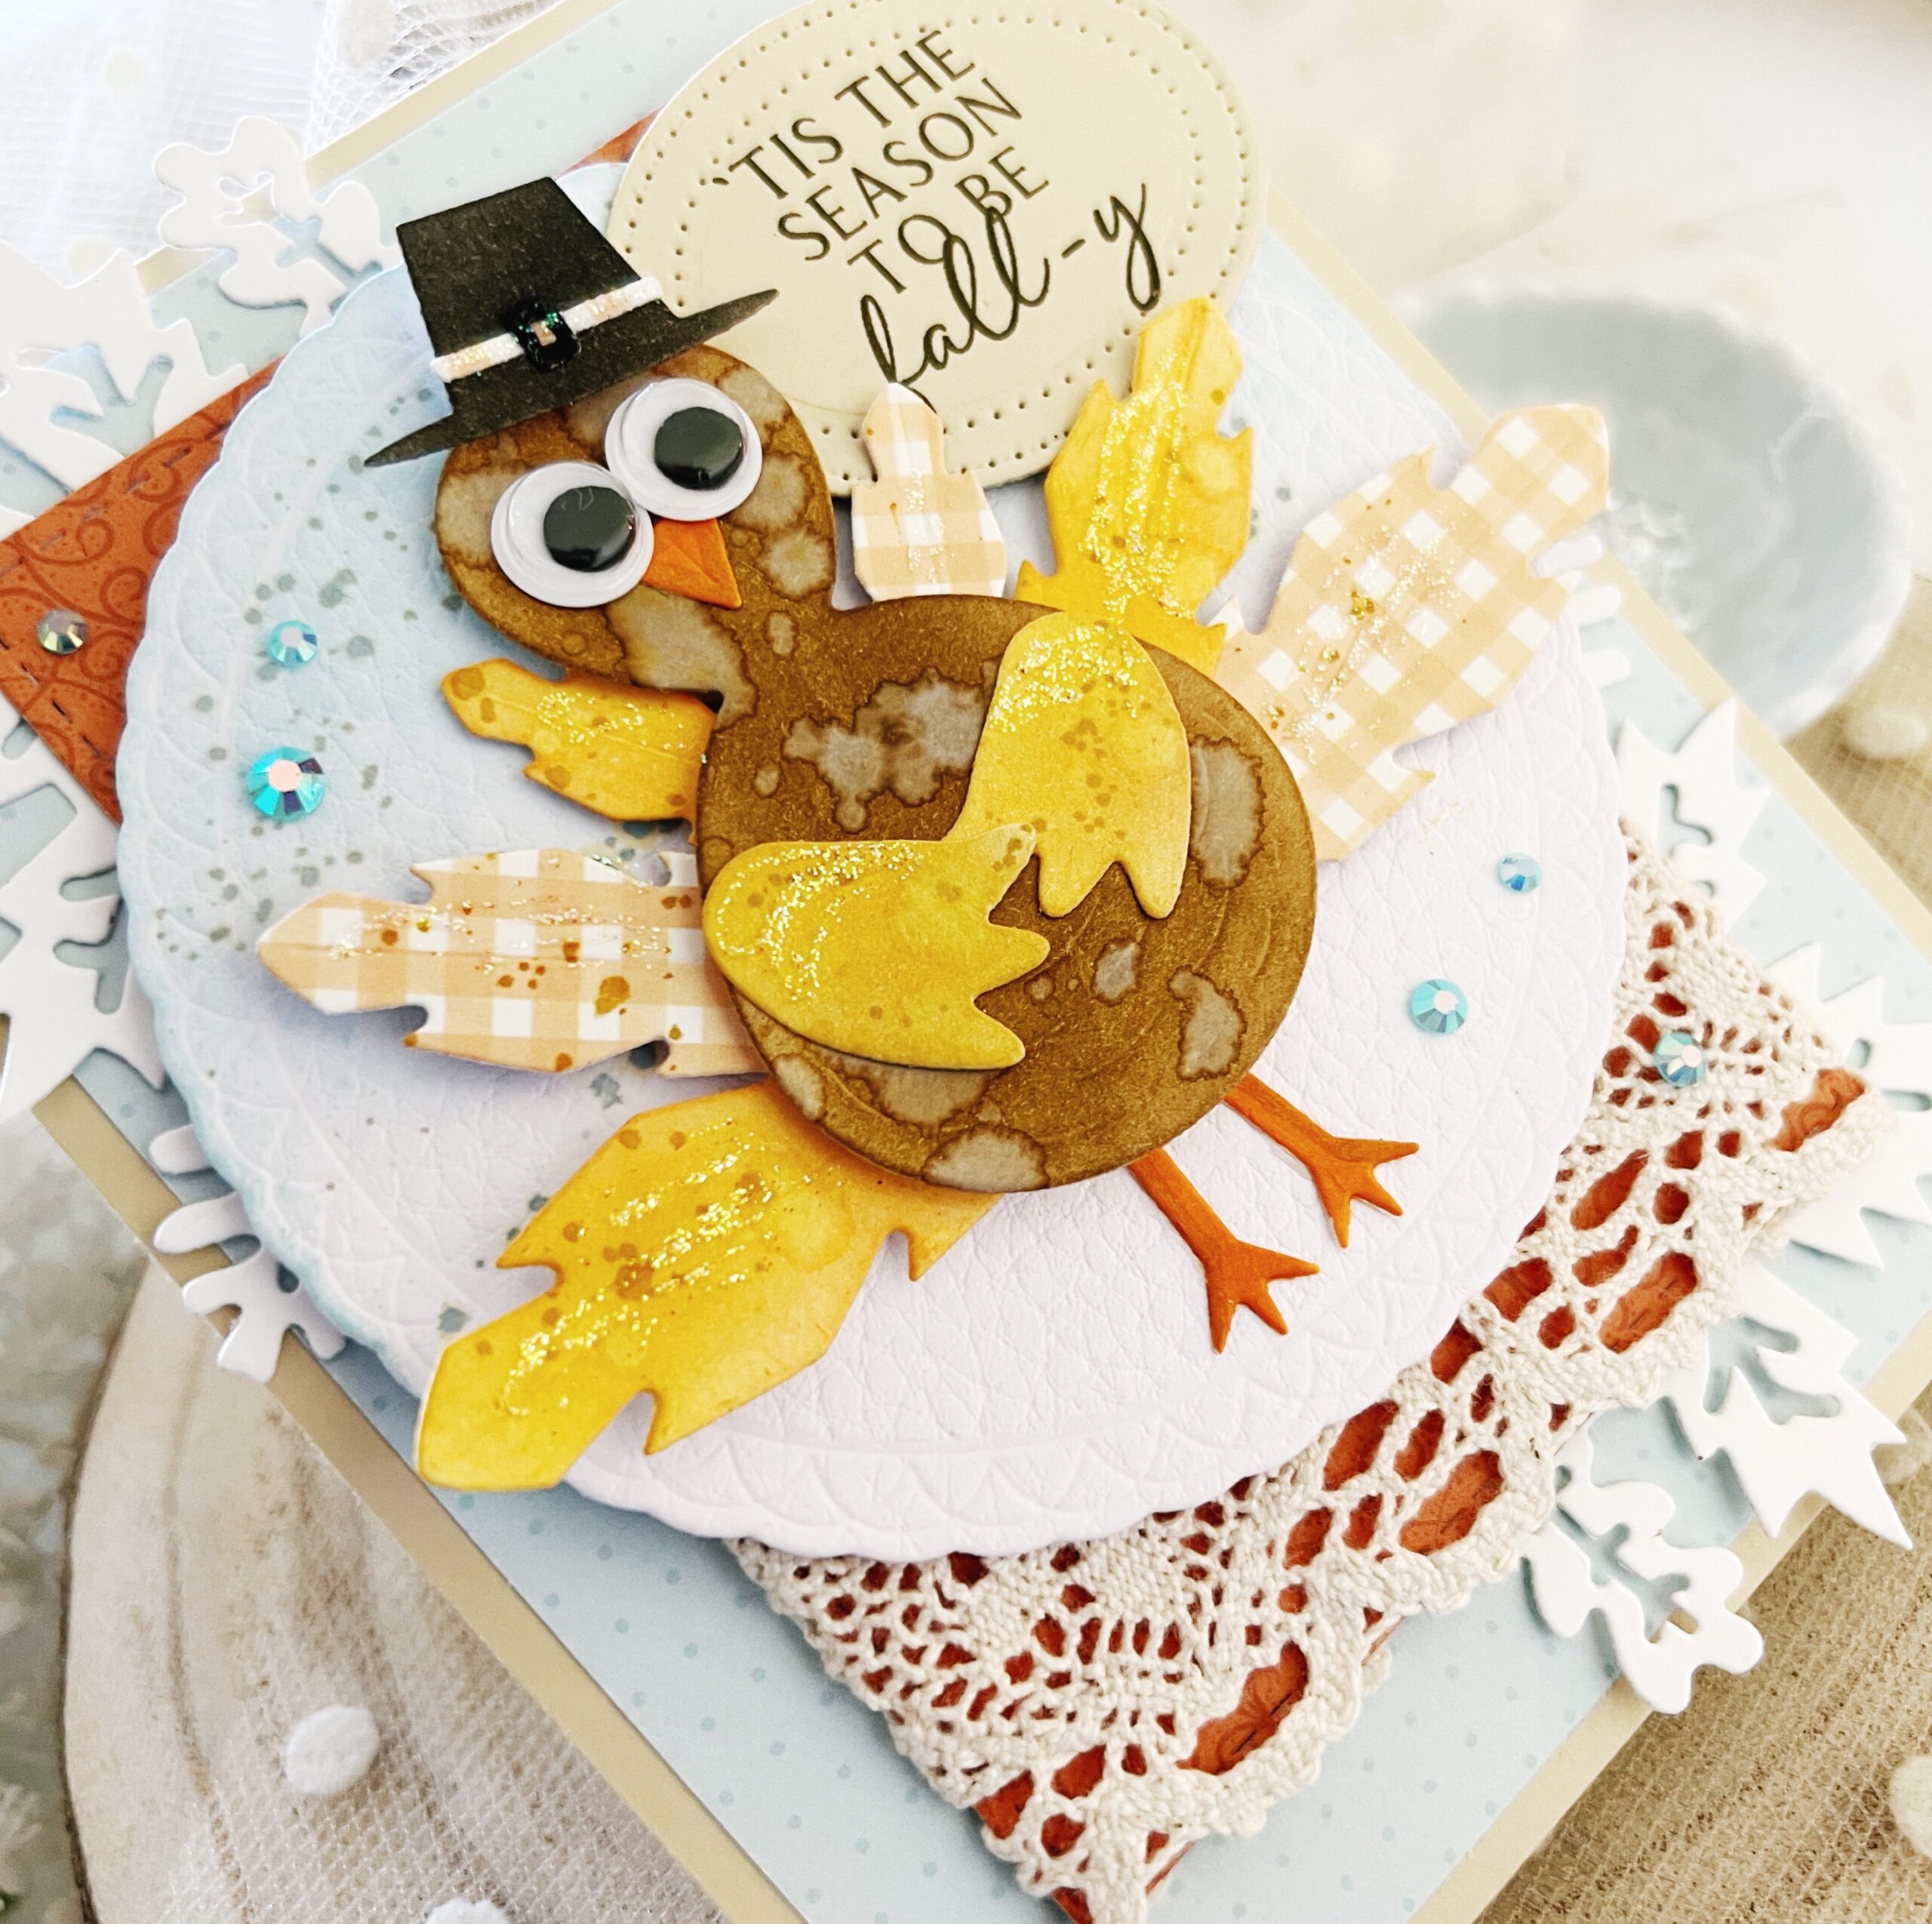
I die cut my feathers from gingham paper from the Basket of Blossoms paper pack and white cardstock that I sponged with ink to match the gingham. I wanted a fun, paper-pieced look to my turkey feathers, and this helped me achieve that. One fun addition that is an option as you create your Build-A-Turkey is adding googly eyes instead of using the die cut eyes included in the die set.
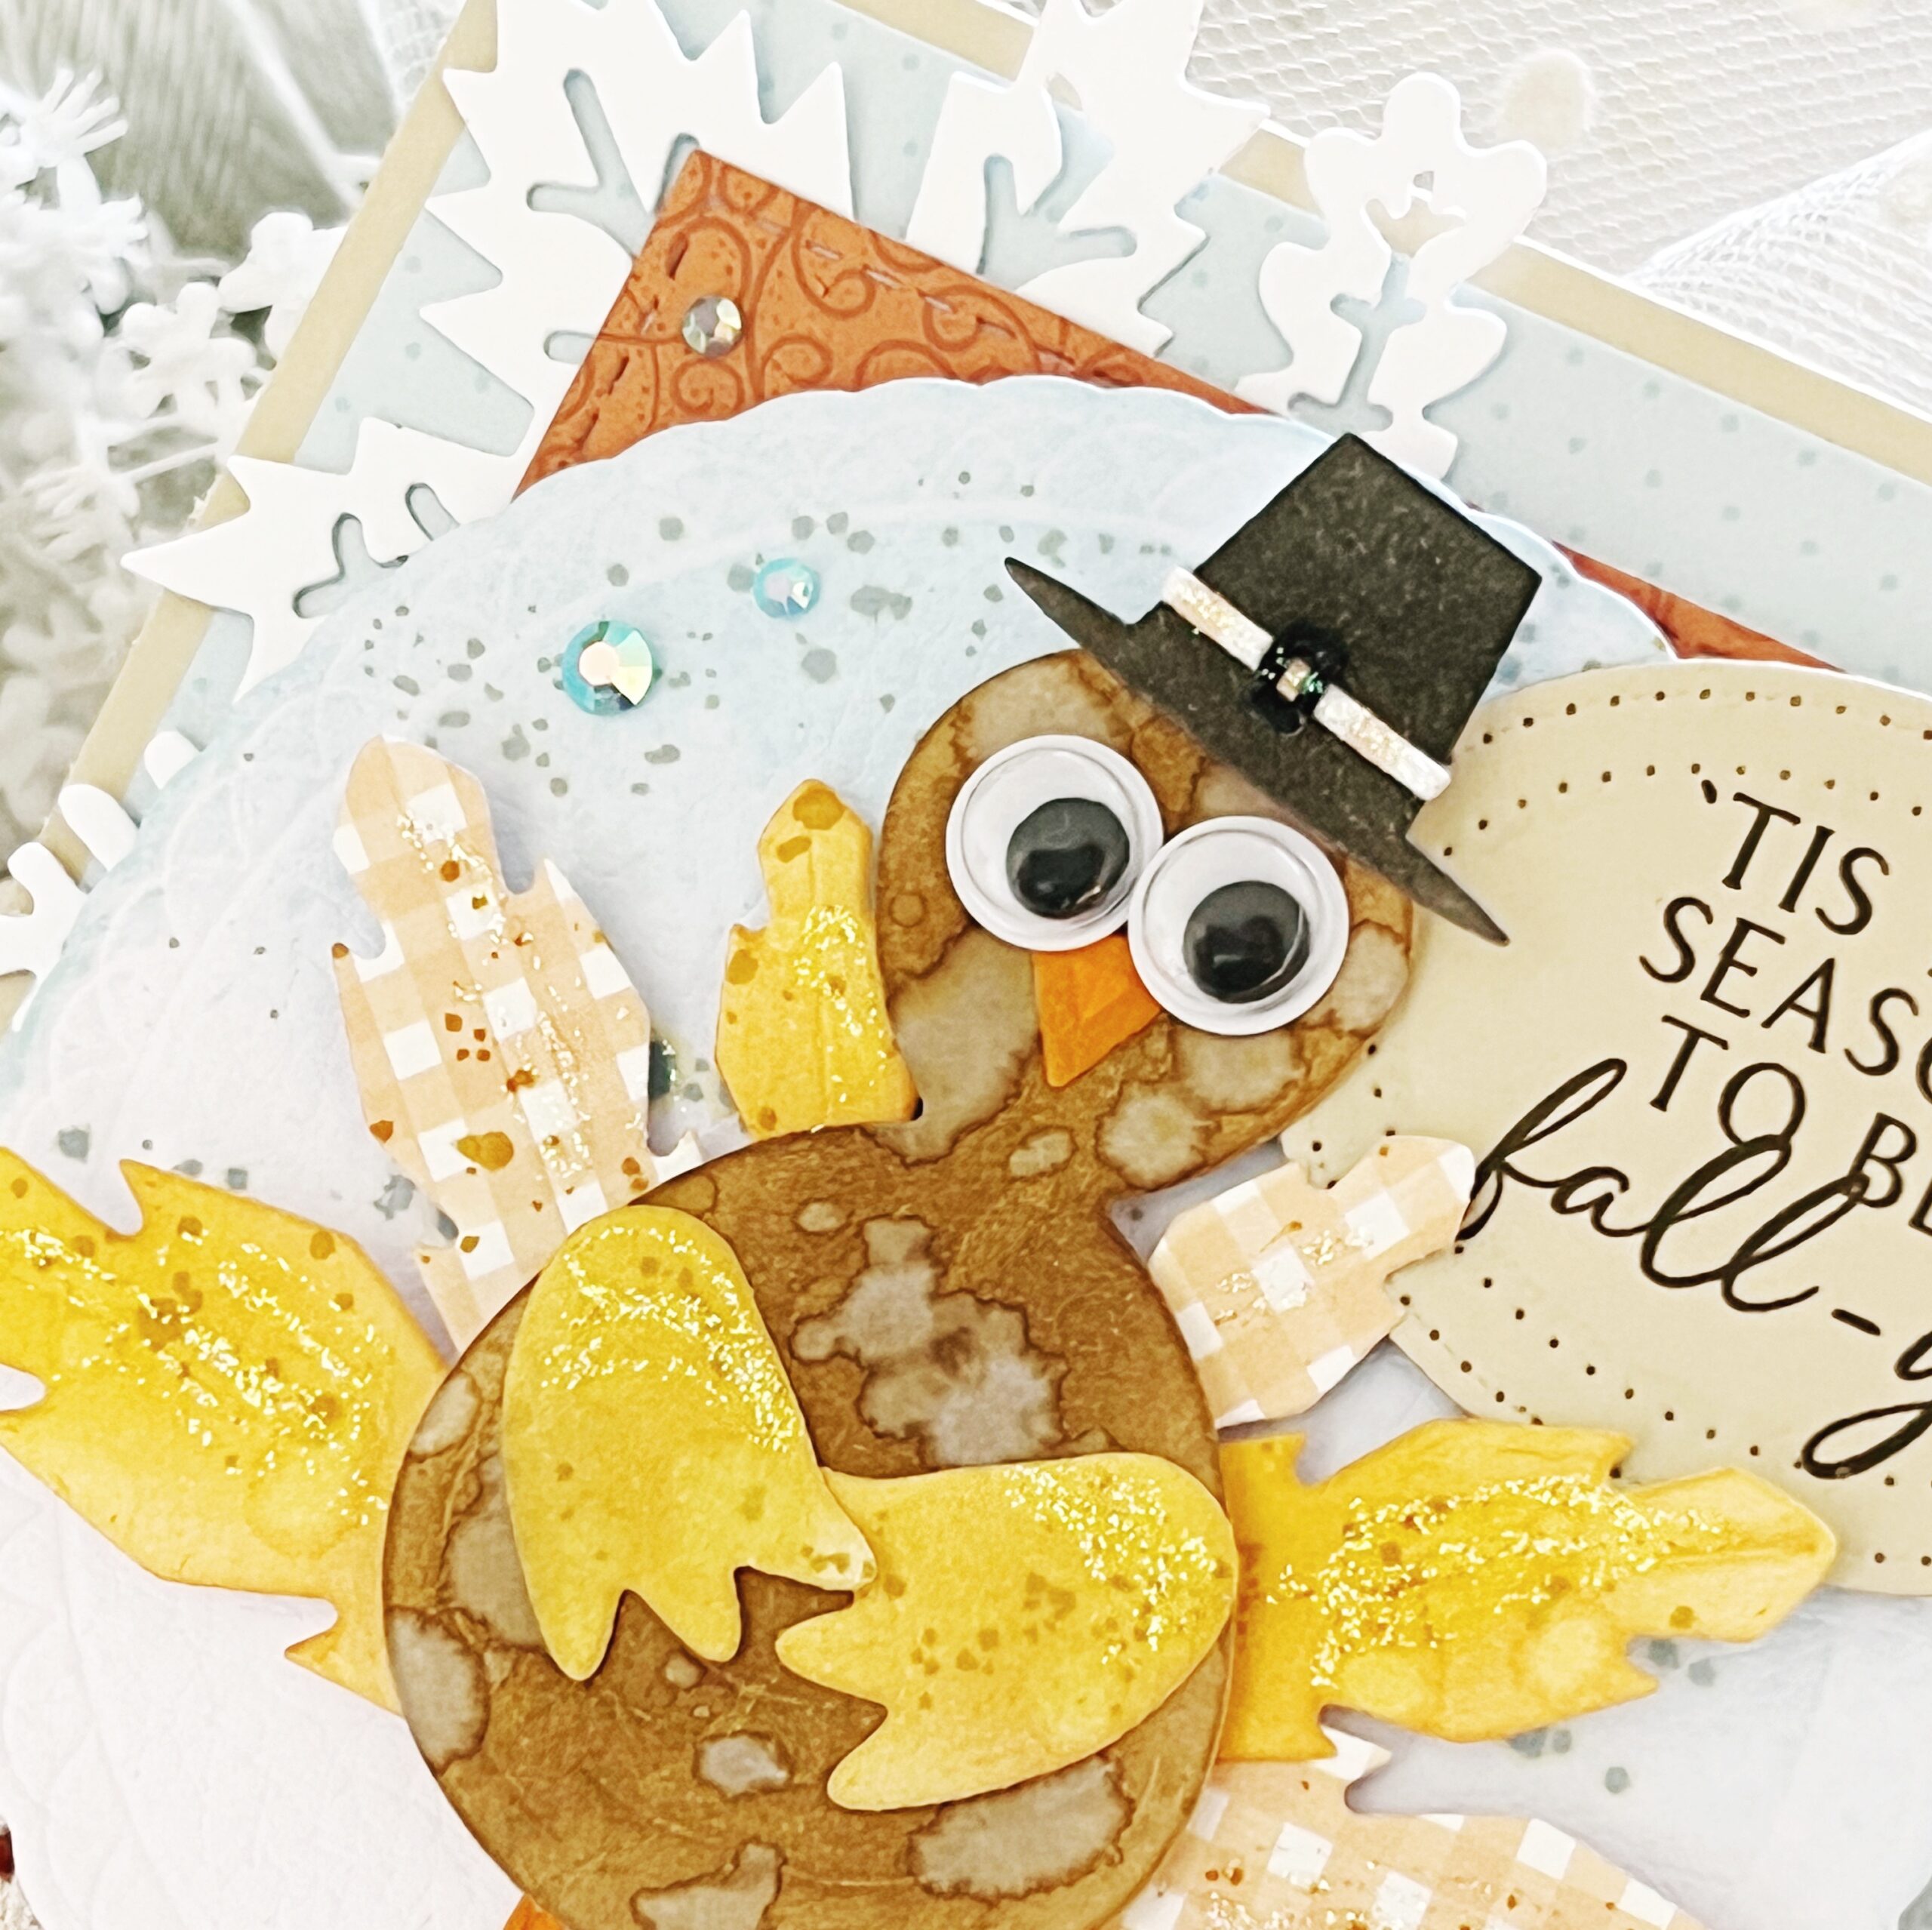
Behind my turkey, I used the gorgeous, Fun Frame: Leaves die. I cut the die cut in half so I could extend the frame and have leaves extending from the upper left and lower right corners. I adore this beautiful frame! It’s the perfect size to frame in sentiments and small focal points. My sentiment comes from the Just Sentiments: Happy Fall stamp set.
SUPPLY LIST:
STAMPS: Just Sentiments: Happy Fall
INK: Summer Sunrise, Orange Zest, Cocoa Bean, True Black, Aqua Mist, Olive Twist
PAPER: Fine Linen, Stamper’s Select White, Basket of Blossoms
DIES: Build-A-Turkey, Love to Layer: Delightful Brackets, Love to Layer: Scalloped Circles, Fun Frames: Leaves
OTHER: Trim, patterned paper, adhesive gems, googly eyes, Stickles glitter


TIPS:
-
I added ink to the doily after I die cut it to create variation in colors and texture.
-
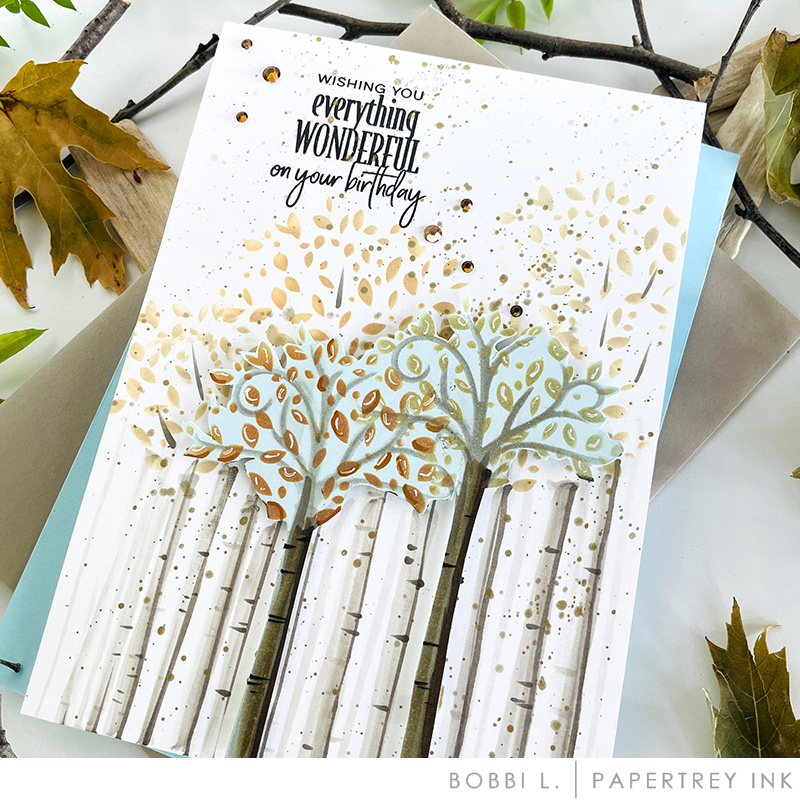
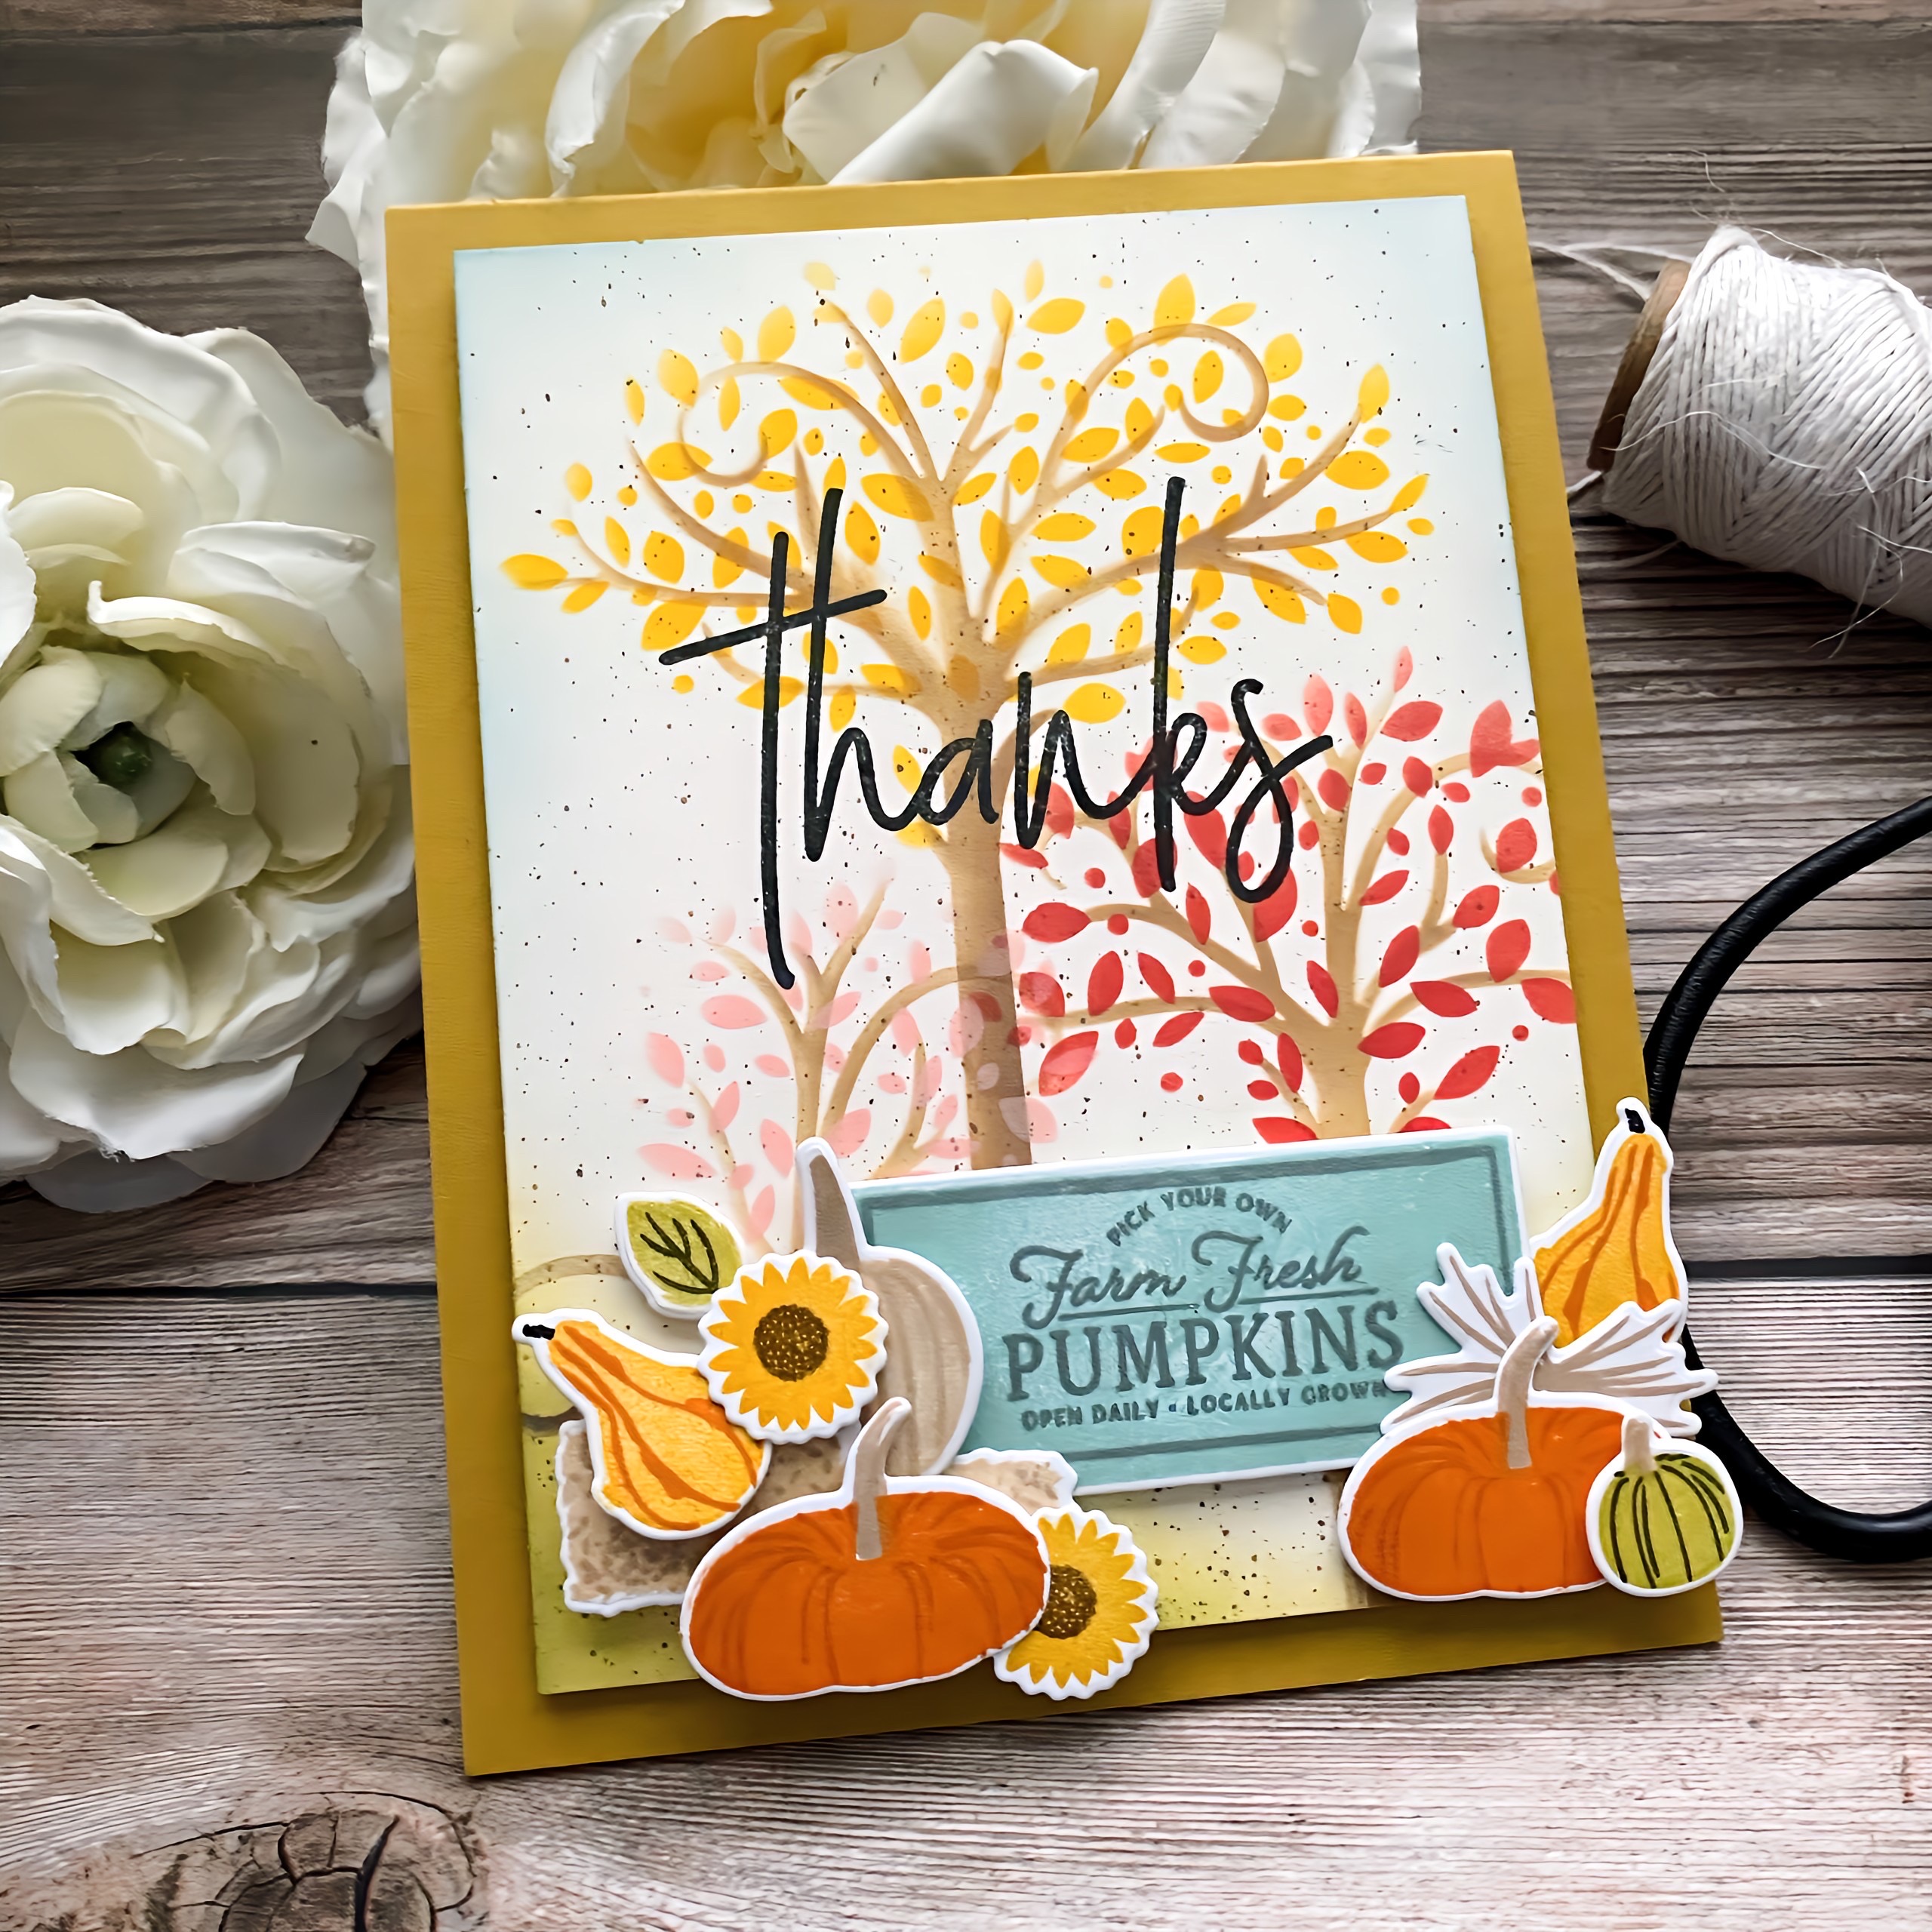
I used the top of the Delicate Tree Stencils to create leafy background pattern.
-
Add shading and copic marker detailing to diecut images to enhance the overall look.

- I removed the leaf stems from the die and inked them separately using darker shades for richer detail. I added adhesive card stock to the backs of the leaves for an easy glue inlay.
- I combined tonal colors onto colored card stock to create a soft subtle background using the Watercolor plaid stencil.
- I added black ink splatters to create dimension and texture.
TIPS:
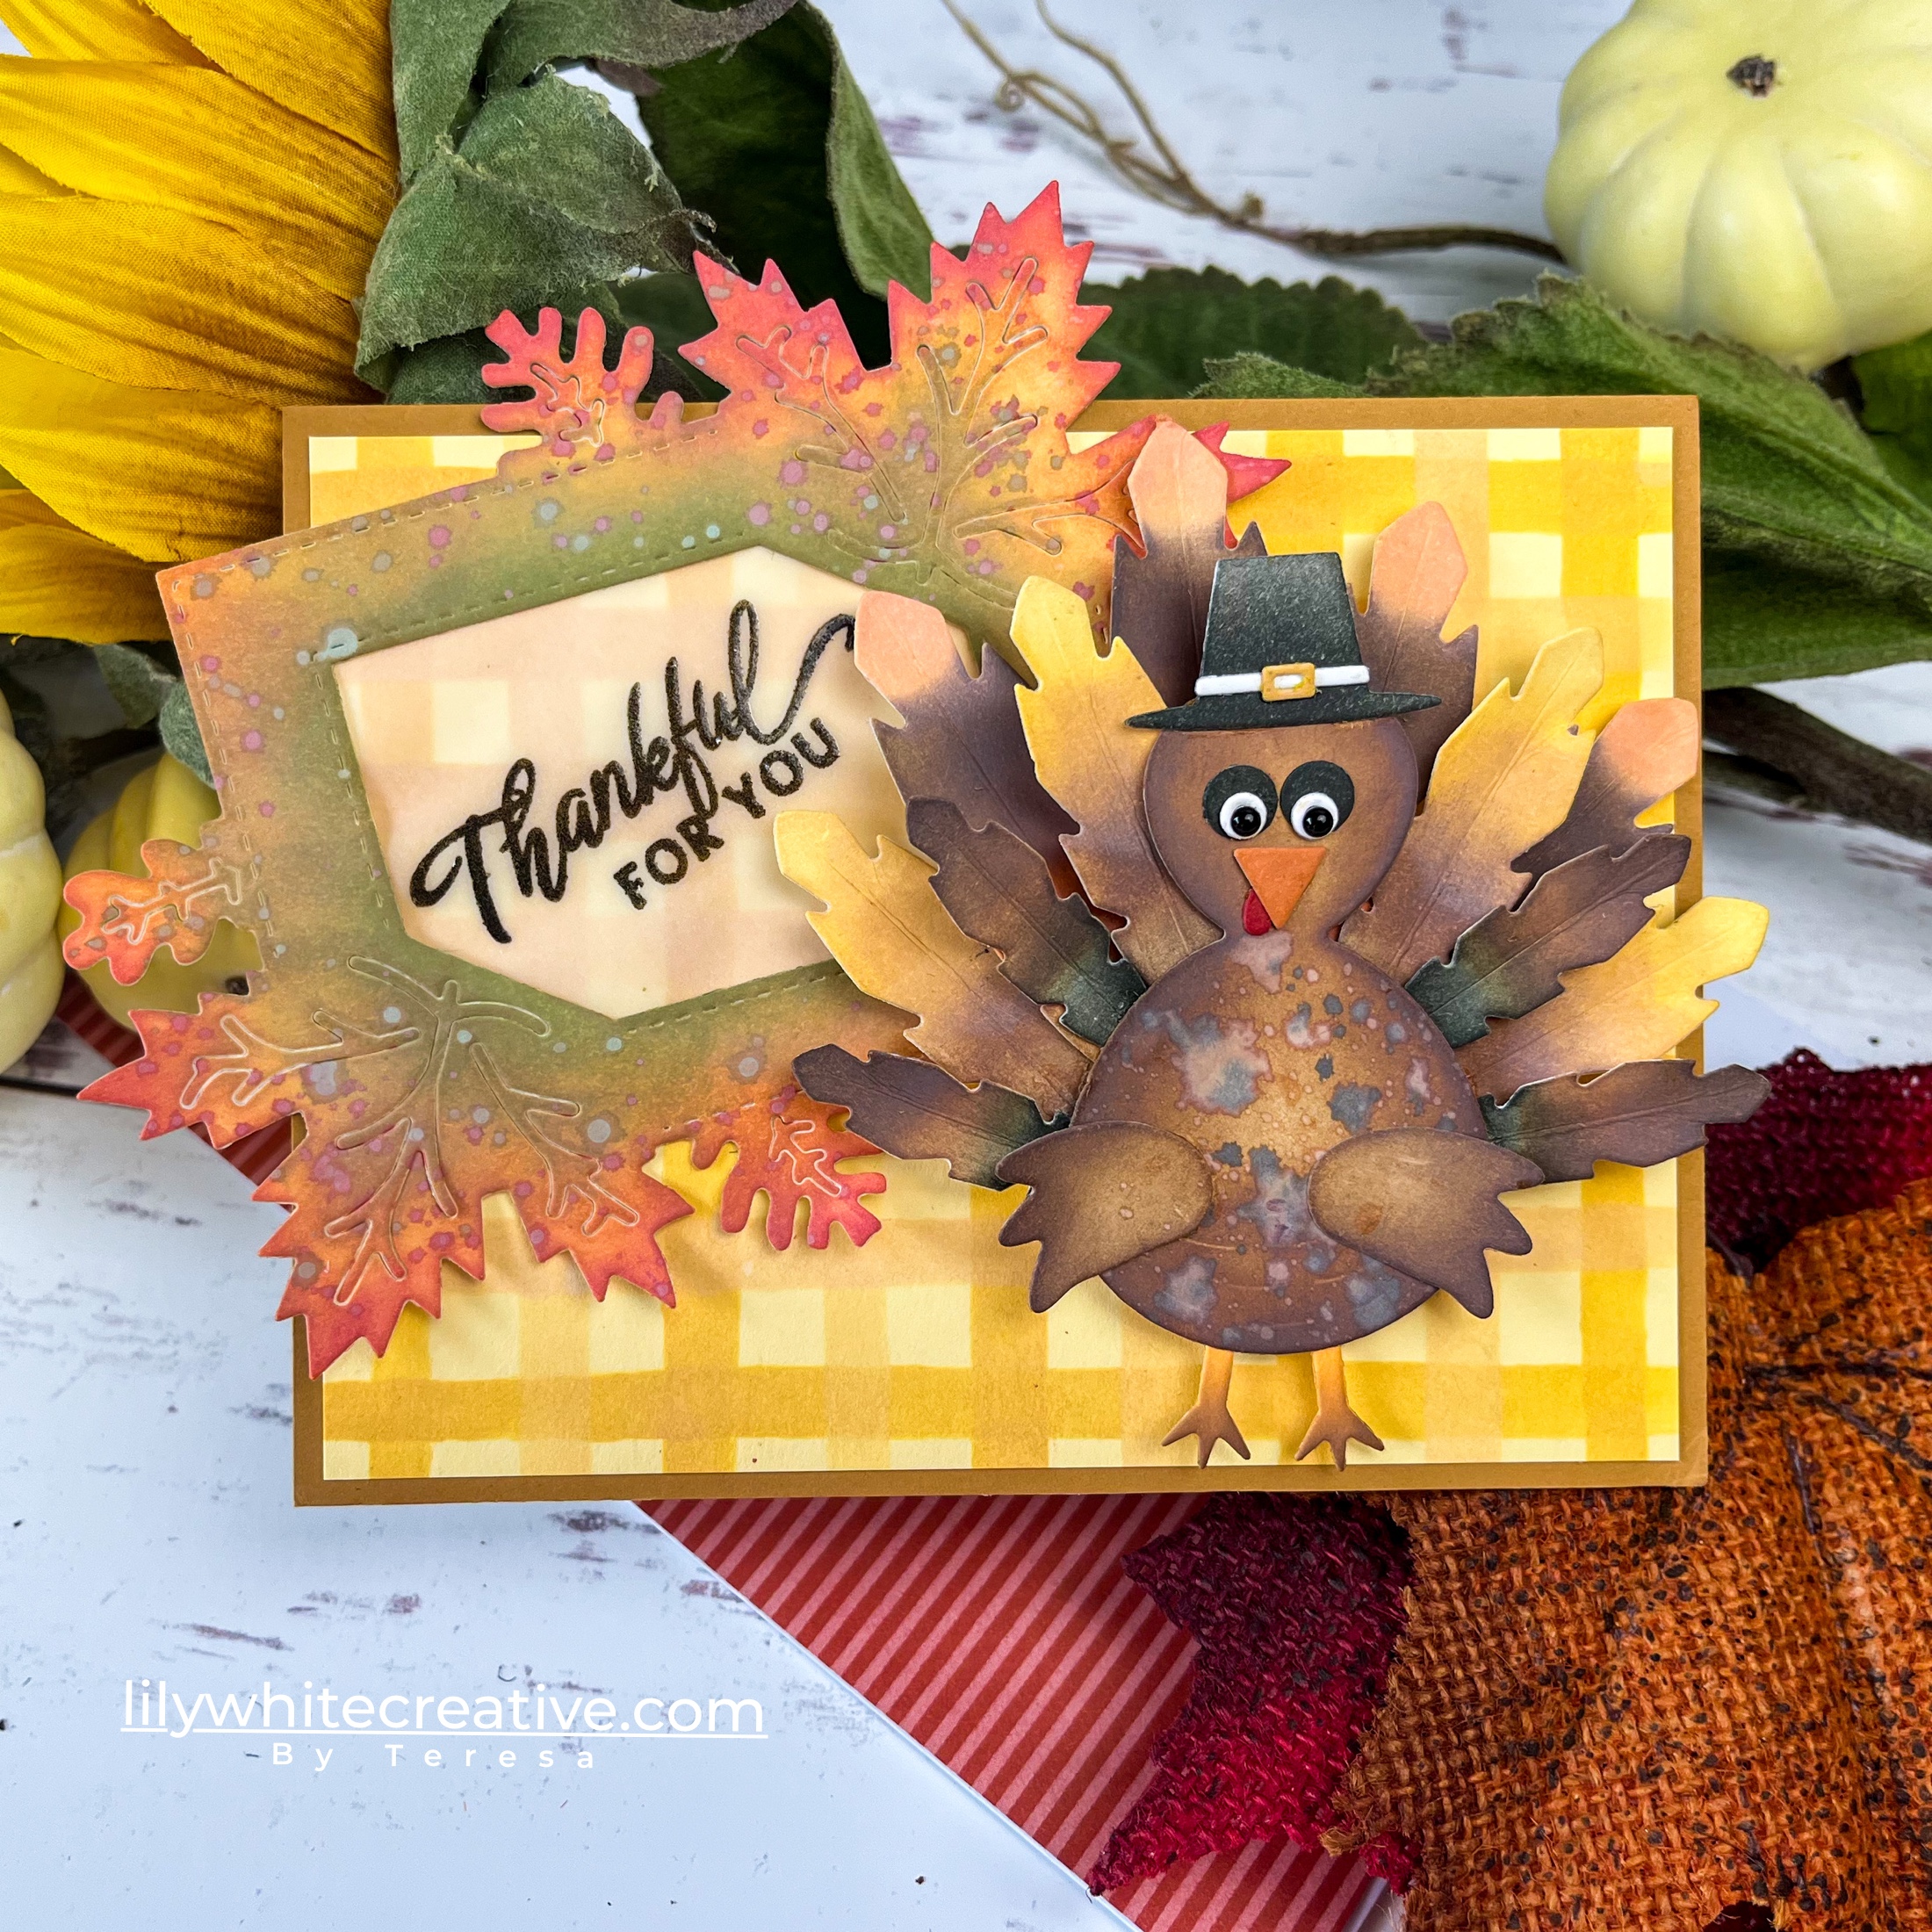
- I die cut the Fun Frames Die with PTI Luxe Gold Cardstock. This card stock is matte. However, I added a bit of liquid glue to a tissue and dabbed the die cut leaf frame. This process removes some of the matte look and leaves a beautiful matte/shinny detail.
- I ink blended the background panel using kraft ink. I added a couple of the Delicate Trees Stencils tree tops to opposite corners using kraft ink for added background texture.
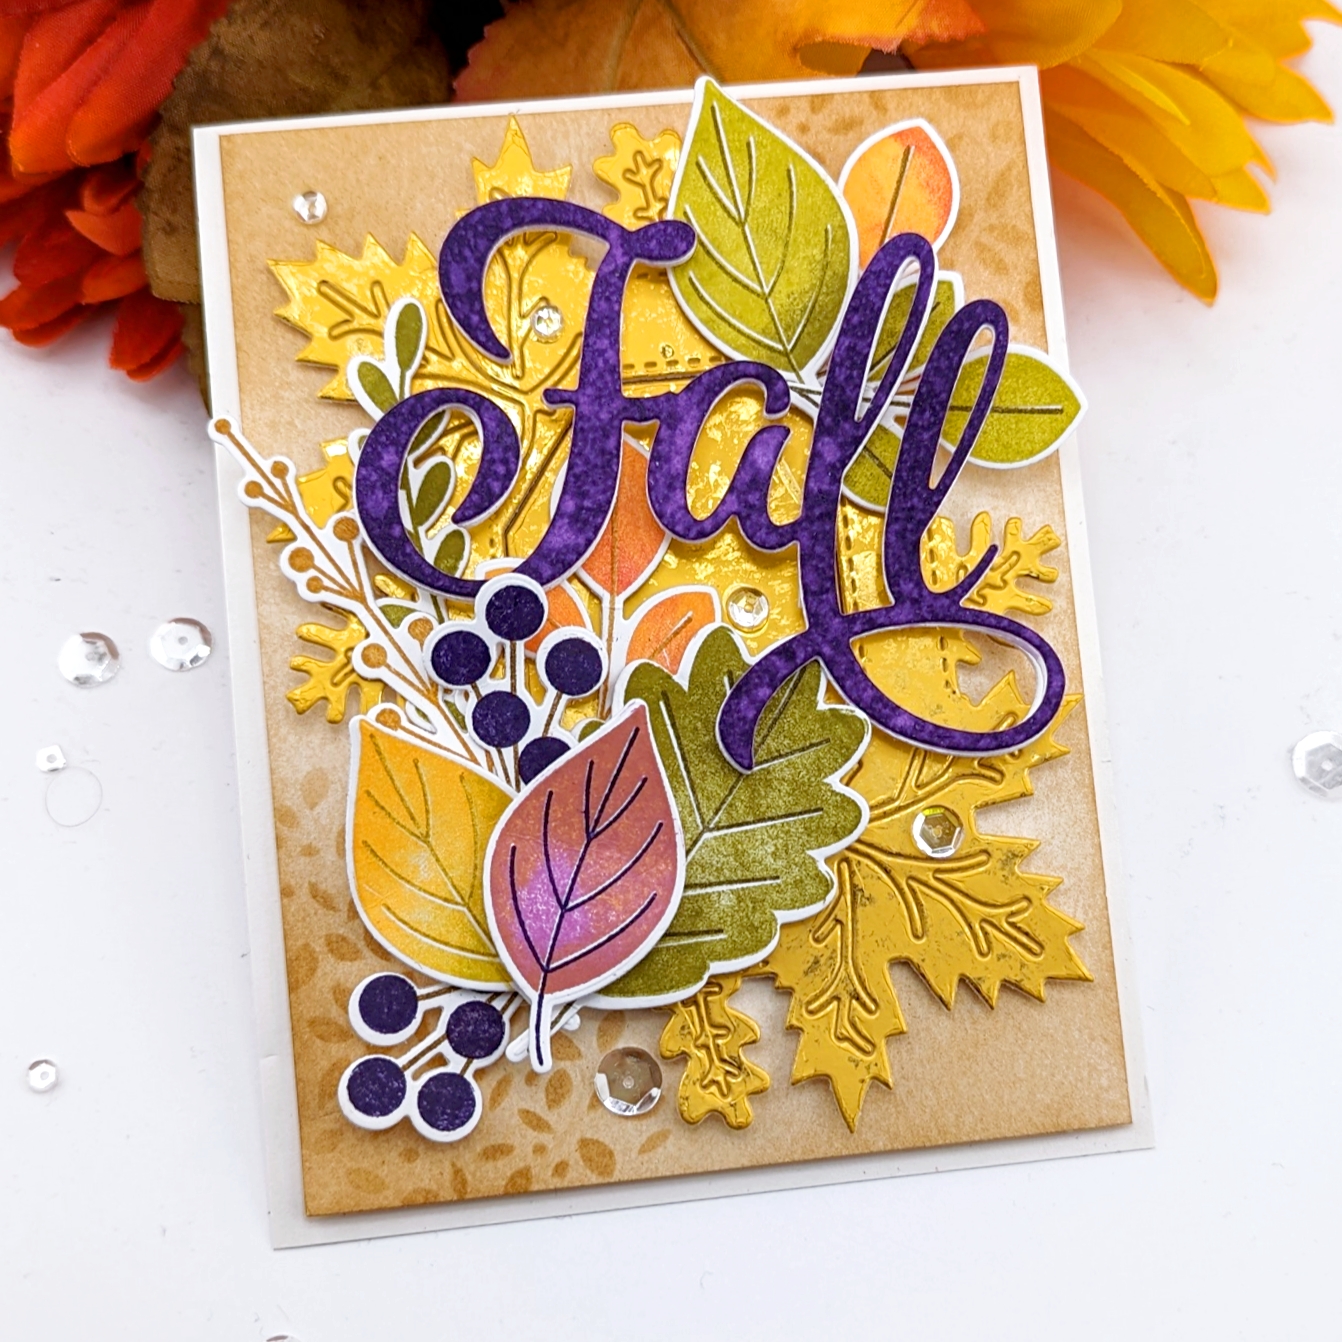
- I ink blended a panel using amethyst allure and royal velvet ink. I added water splatters and let dry. I die cut the Larger Than Life: Fall Die after panel dries
TIPS:
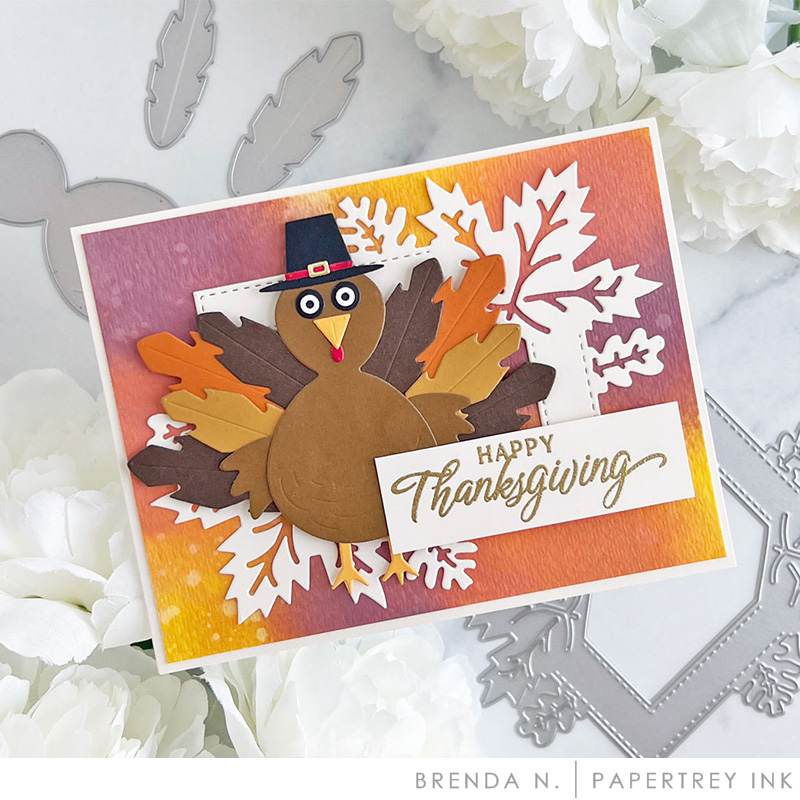
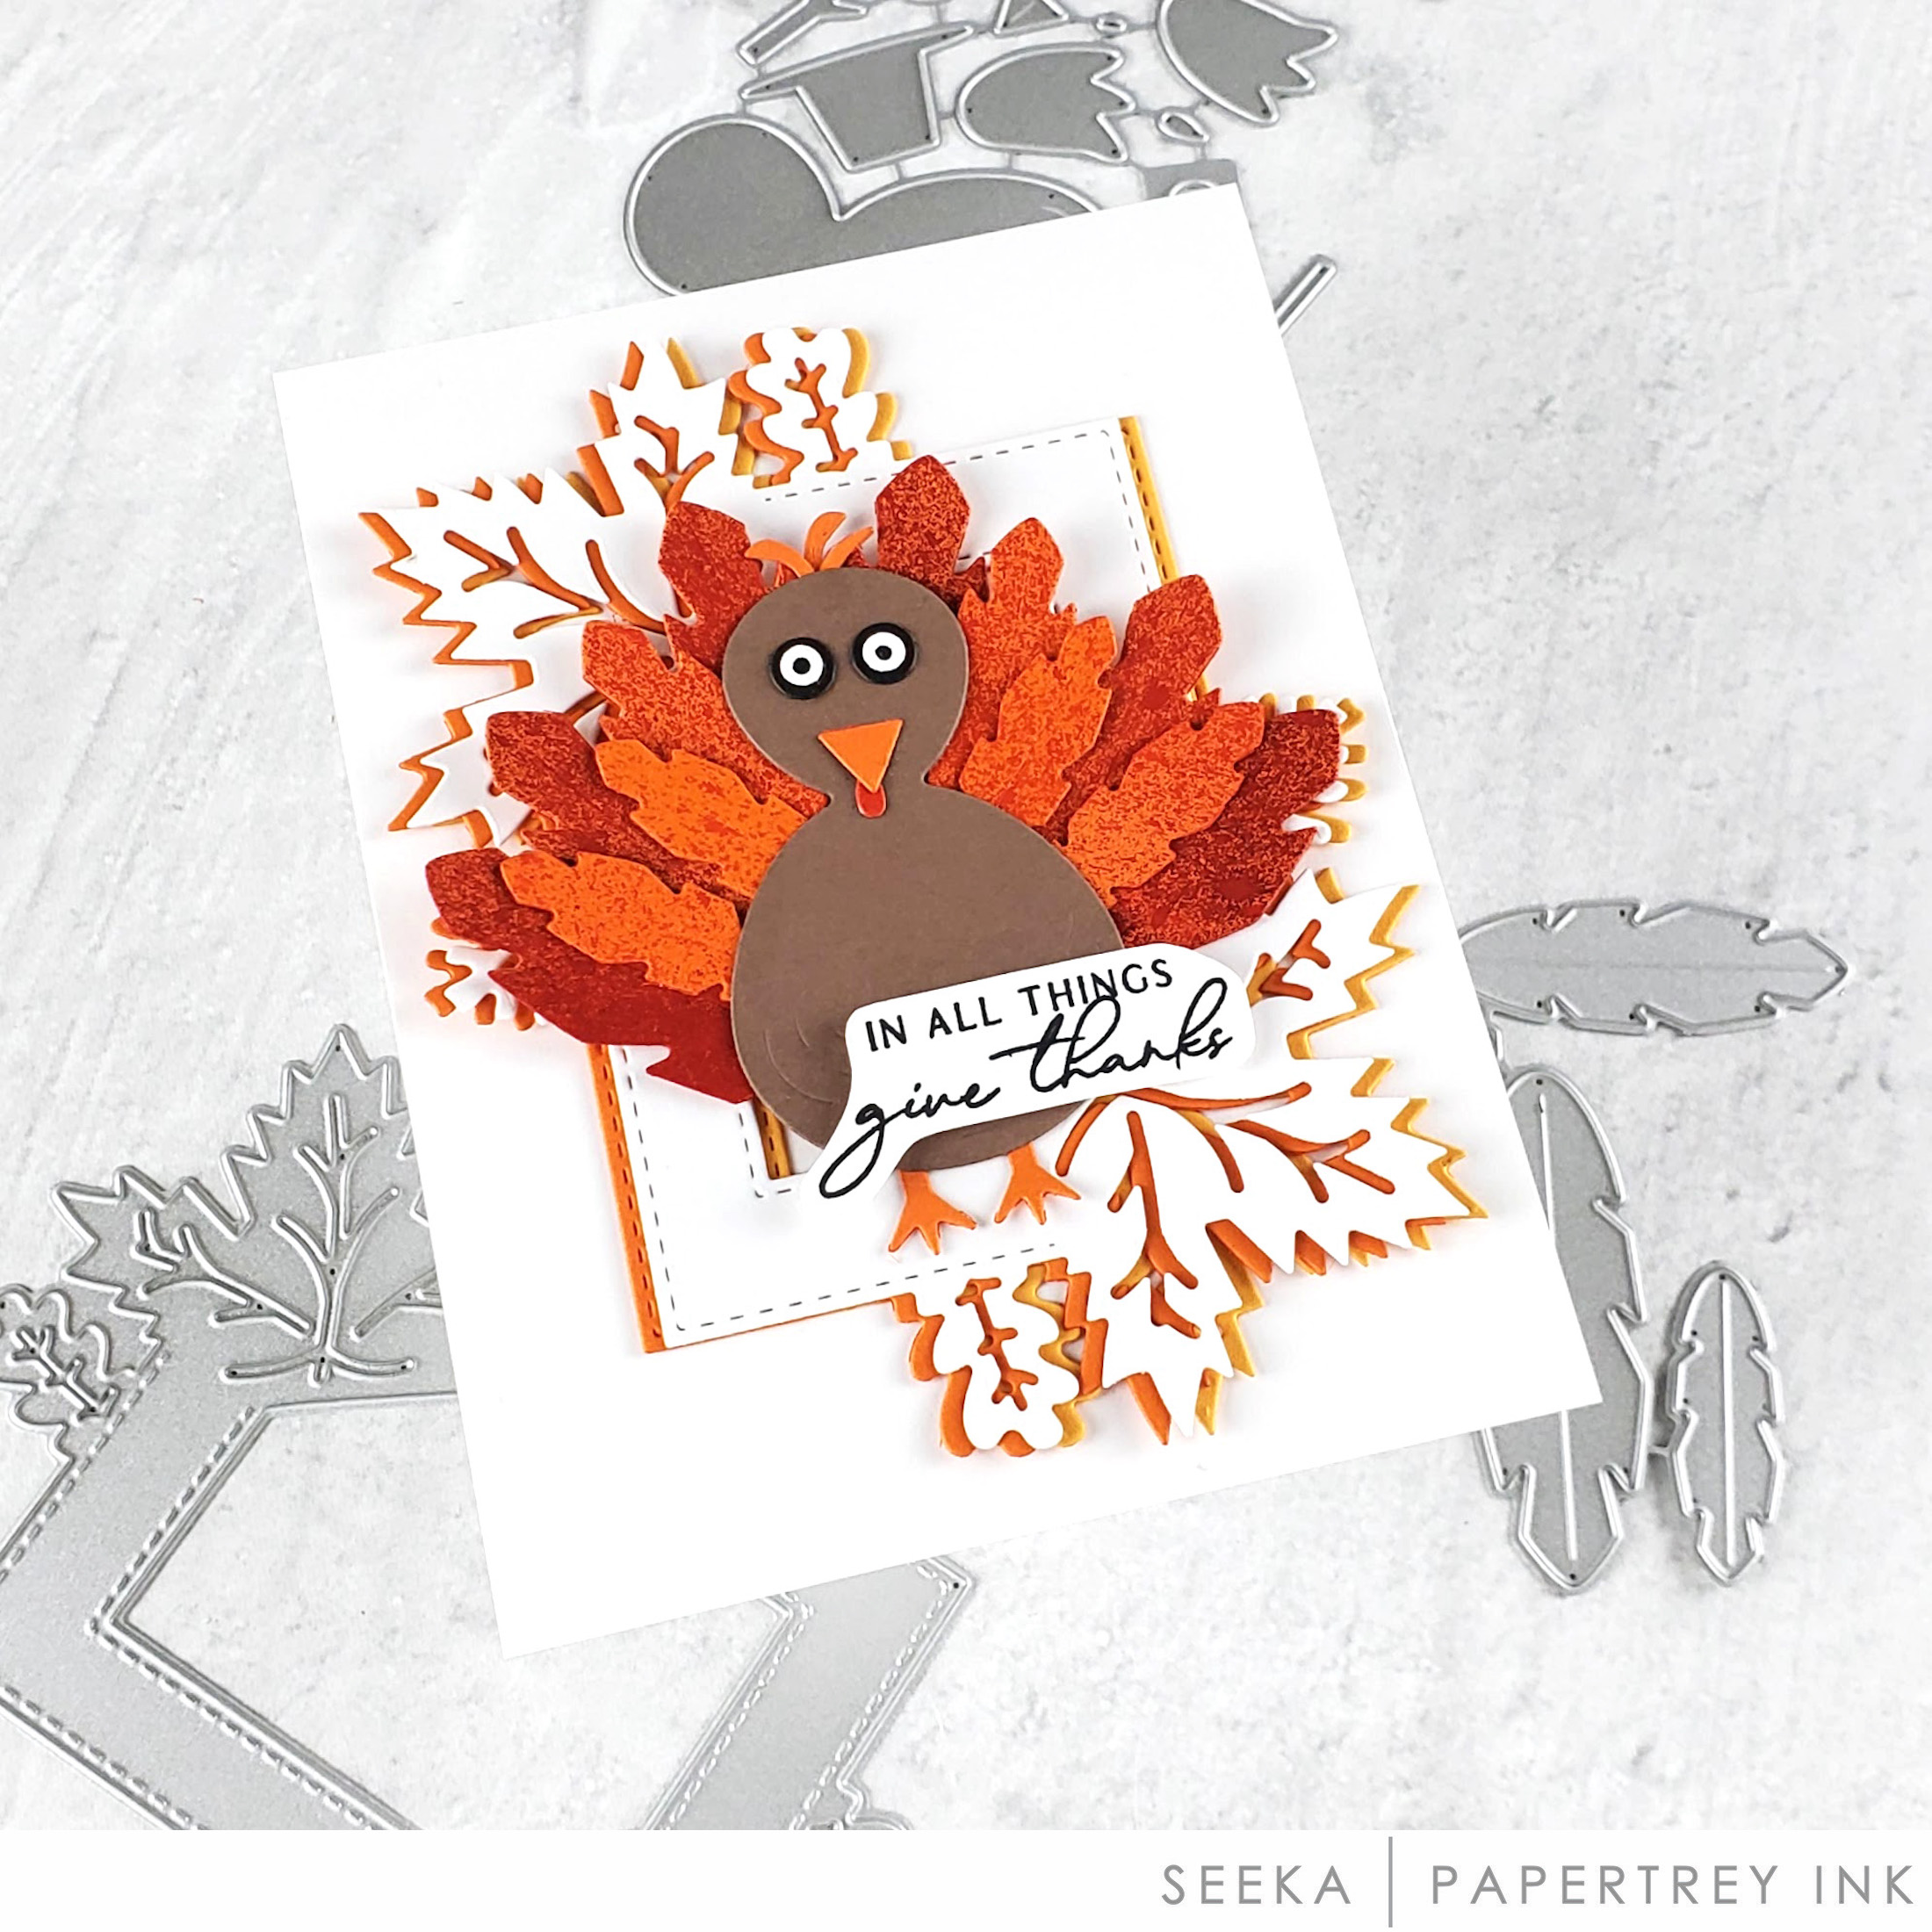
- This 5″ X 7″ card is made from a warm gray cardstock with a teal and black watercolor wash strip in the center for the background. I cut the background frame from a warm brown/gray cardstock and glued it to the the teal watercolor background.
- The body of the turkey was cut from a metallic coper cardstock and the feathers from a watercolor wash of yellows and oranges. I cut the beak and hat accent from white cardstock and colored the beak using Copic markers YR07. YR15 and Y19 and the hat detail in R89, R46 and YR07. The legs and hat were cut from a gray/brown cardstock. Everything was glued together to create the turkey. I hand colored in the eyes using a white Gelly Roll pen and black fine-tip marker.
- I added a 1/4″ black strip below the watercolor strip and added white faux stitching. I stamped the “Happy Thanksgiving” sentiment in black on white cardstock, fussy cut it out and attached it over the black strip.
- Lastly, I cut out the wheat stalks from a warm gray cardstock and added the cuts to the turkey/frame design and attached the inverse cut to the bottom of the card to finish this look.
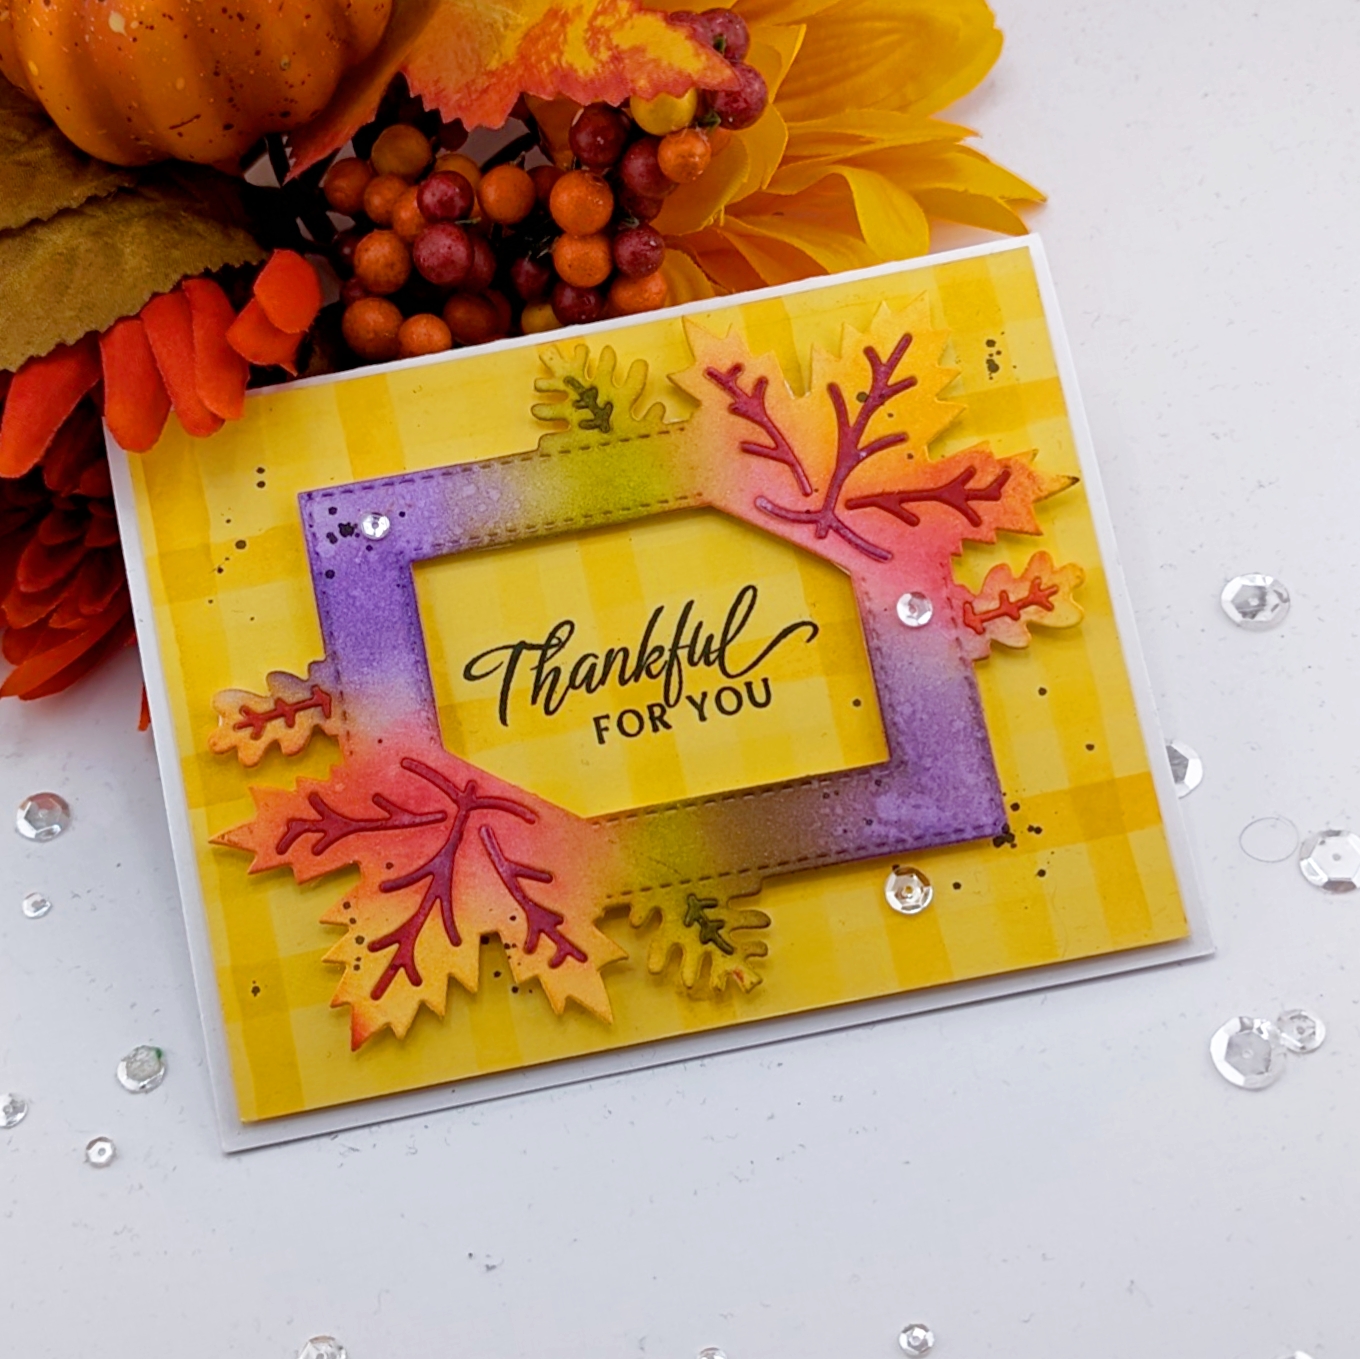
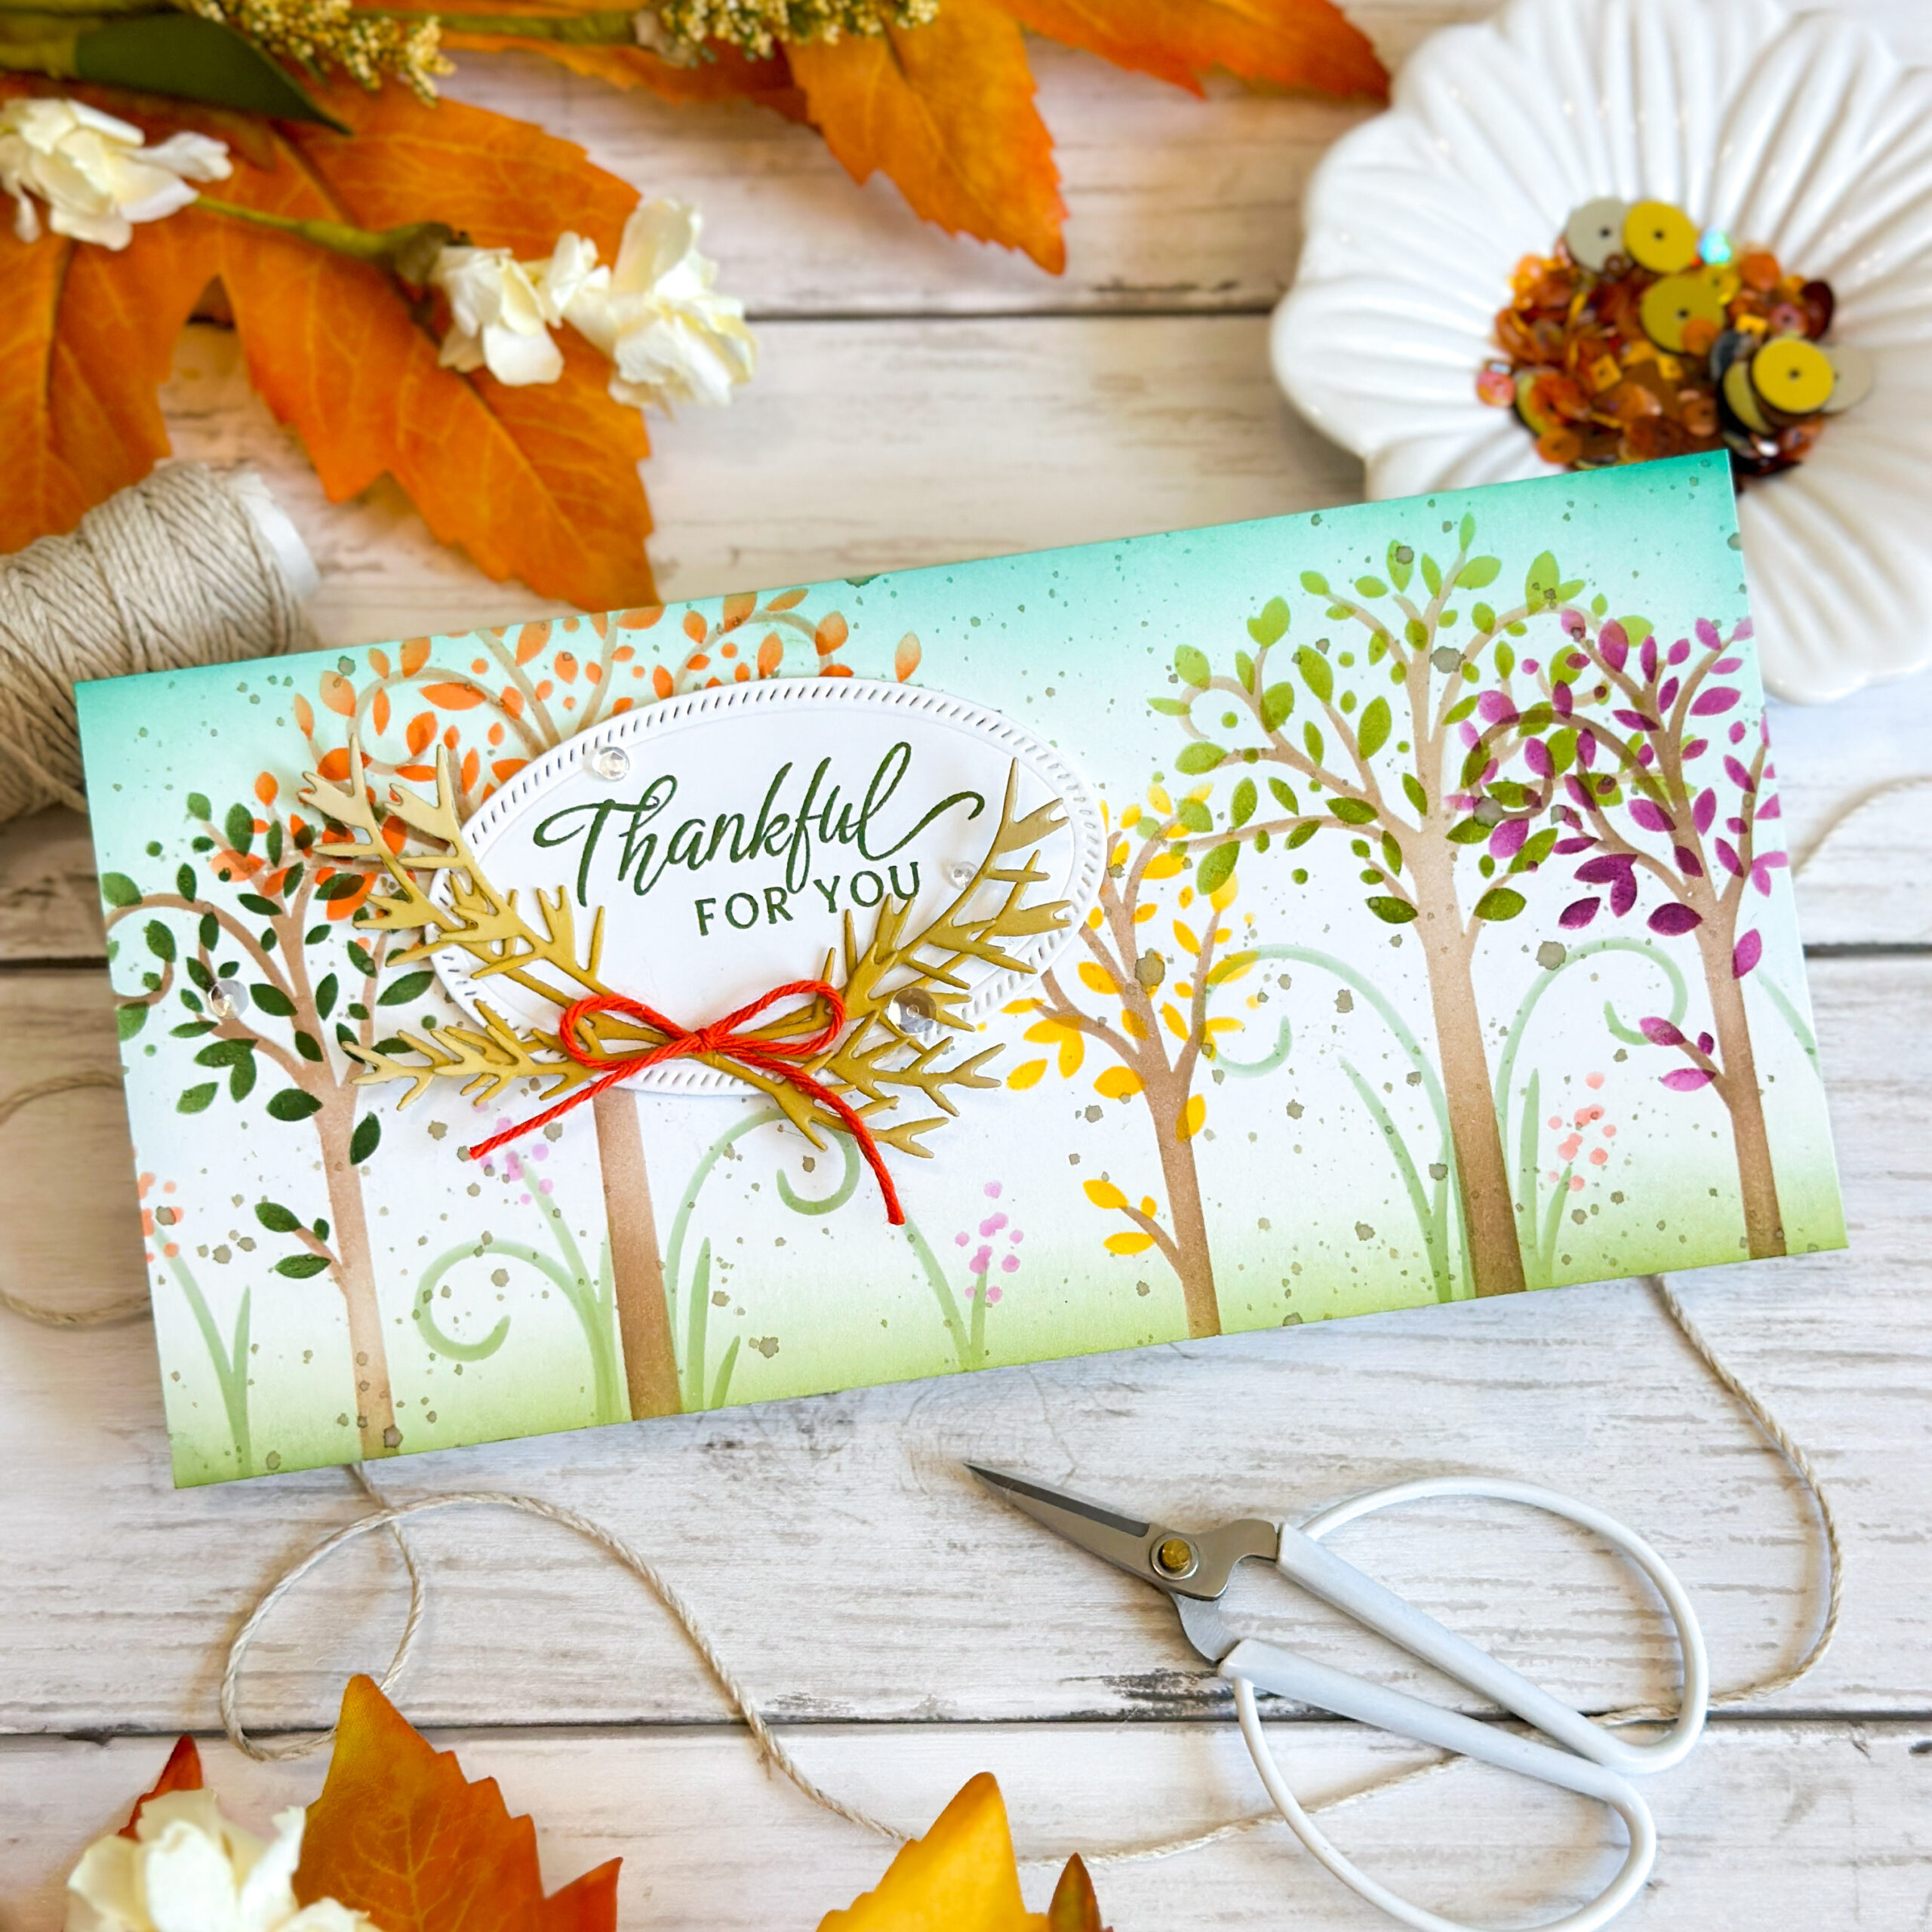
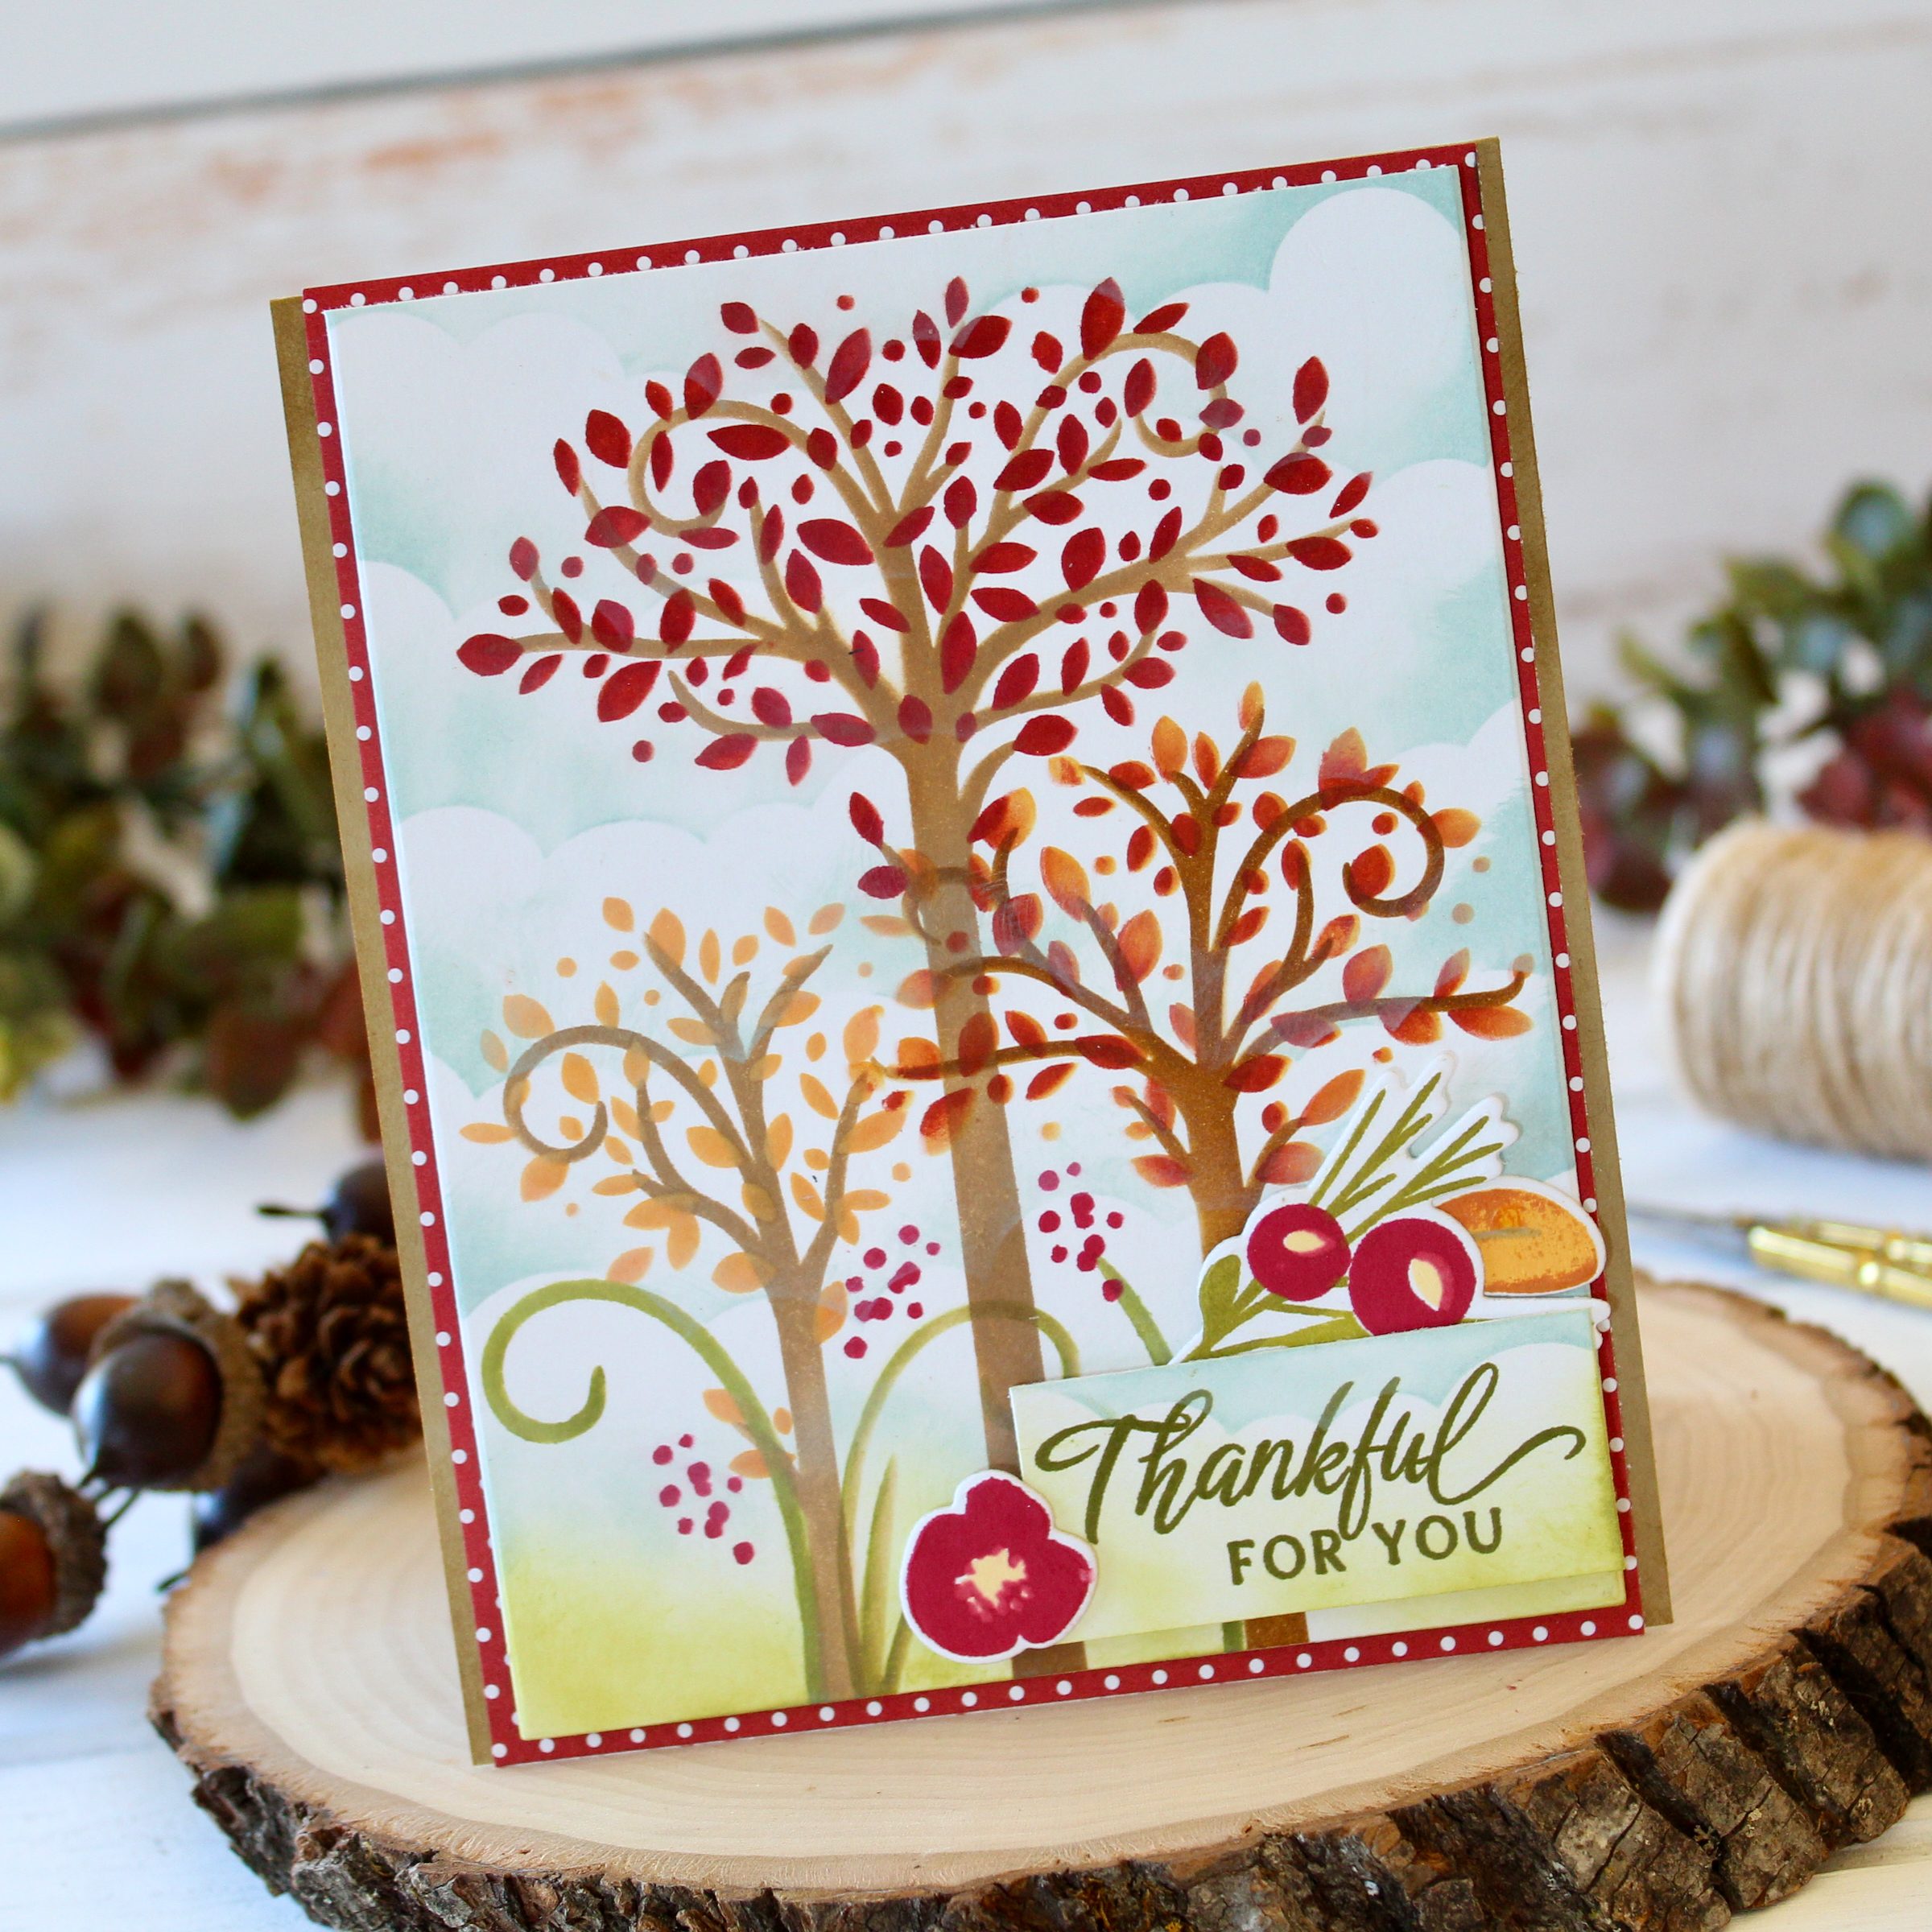
My next card uses the new Give Thanks: Sentiments stamps, the gorgeous Delicate Trees Stencils, and Cornered: Wheat Stalks dies. You’ll adore these new products as much as I do, I’m sure!
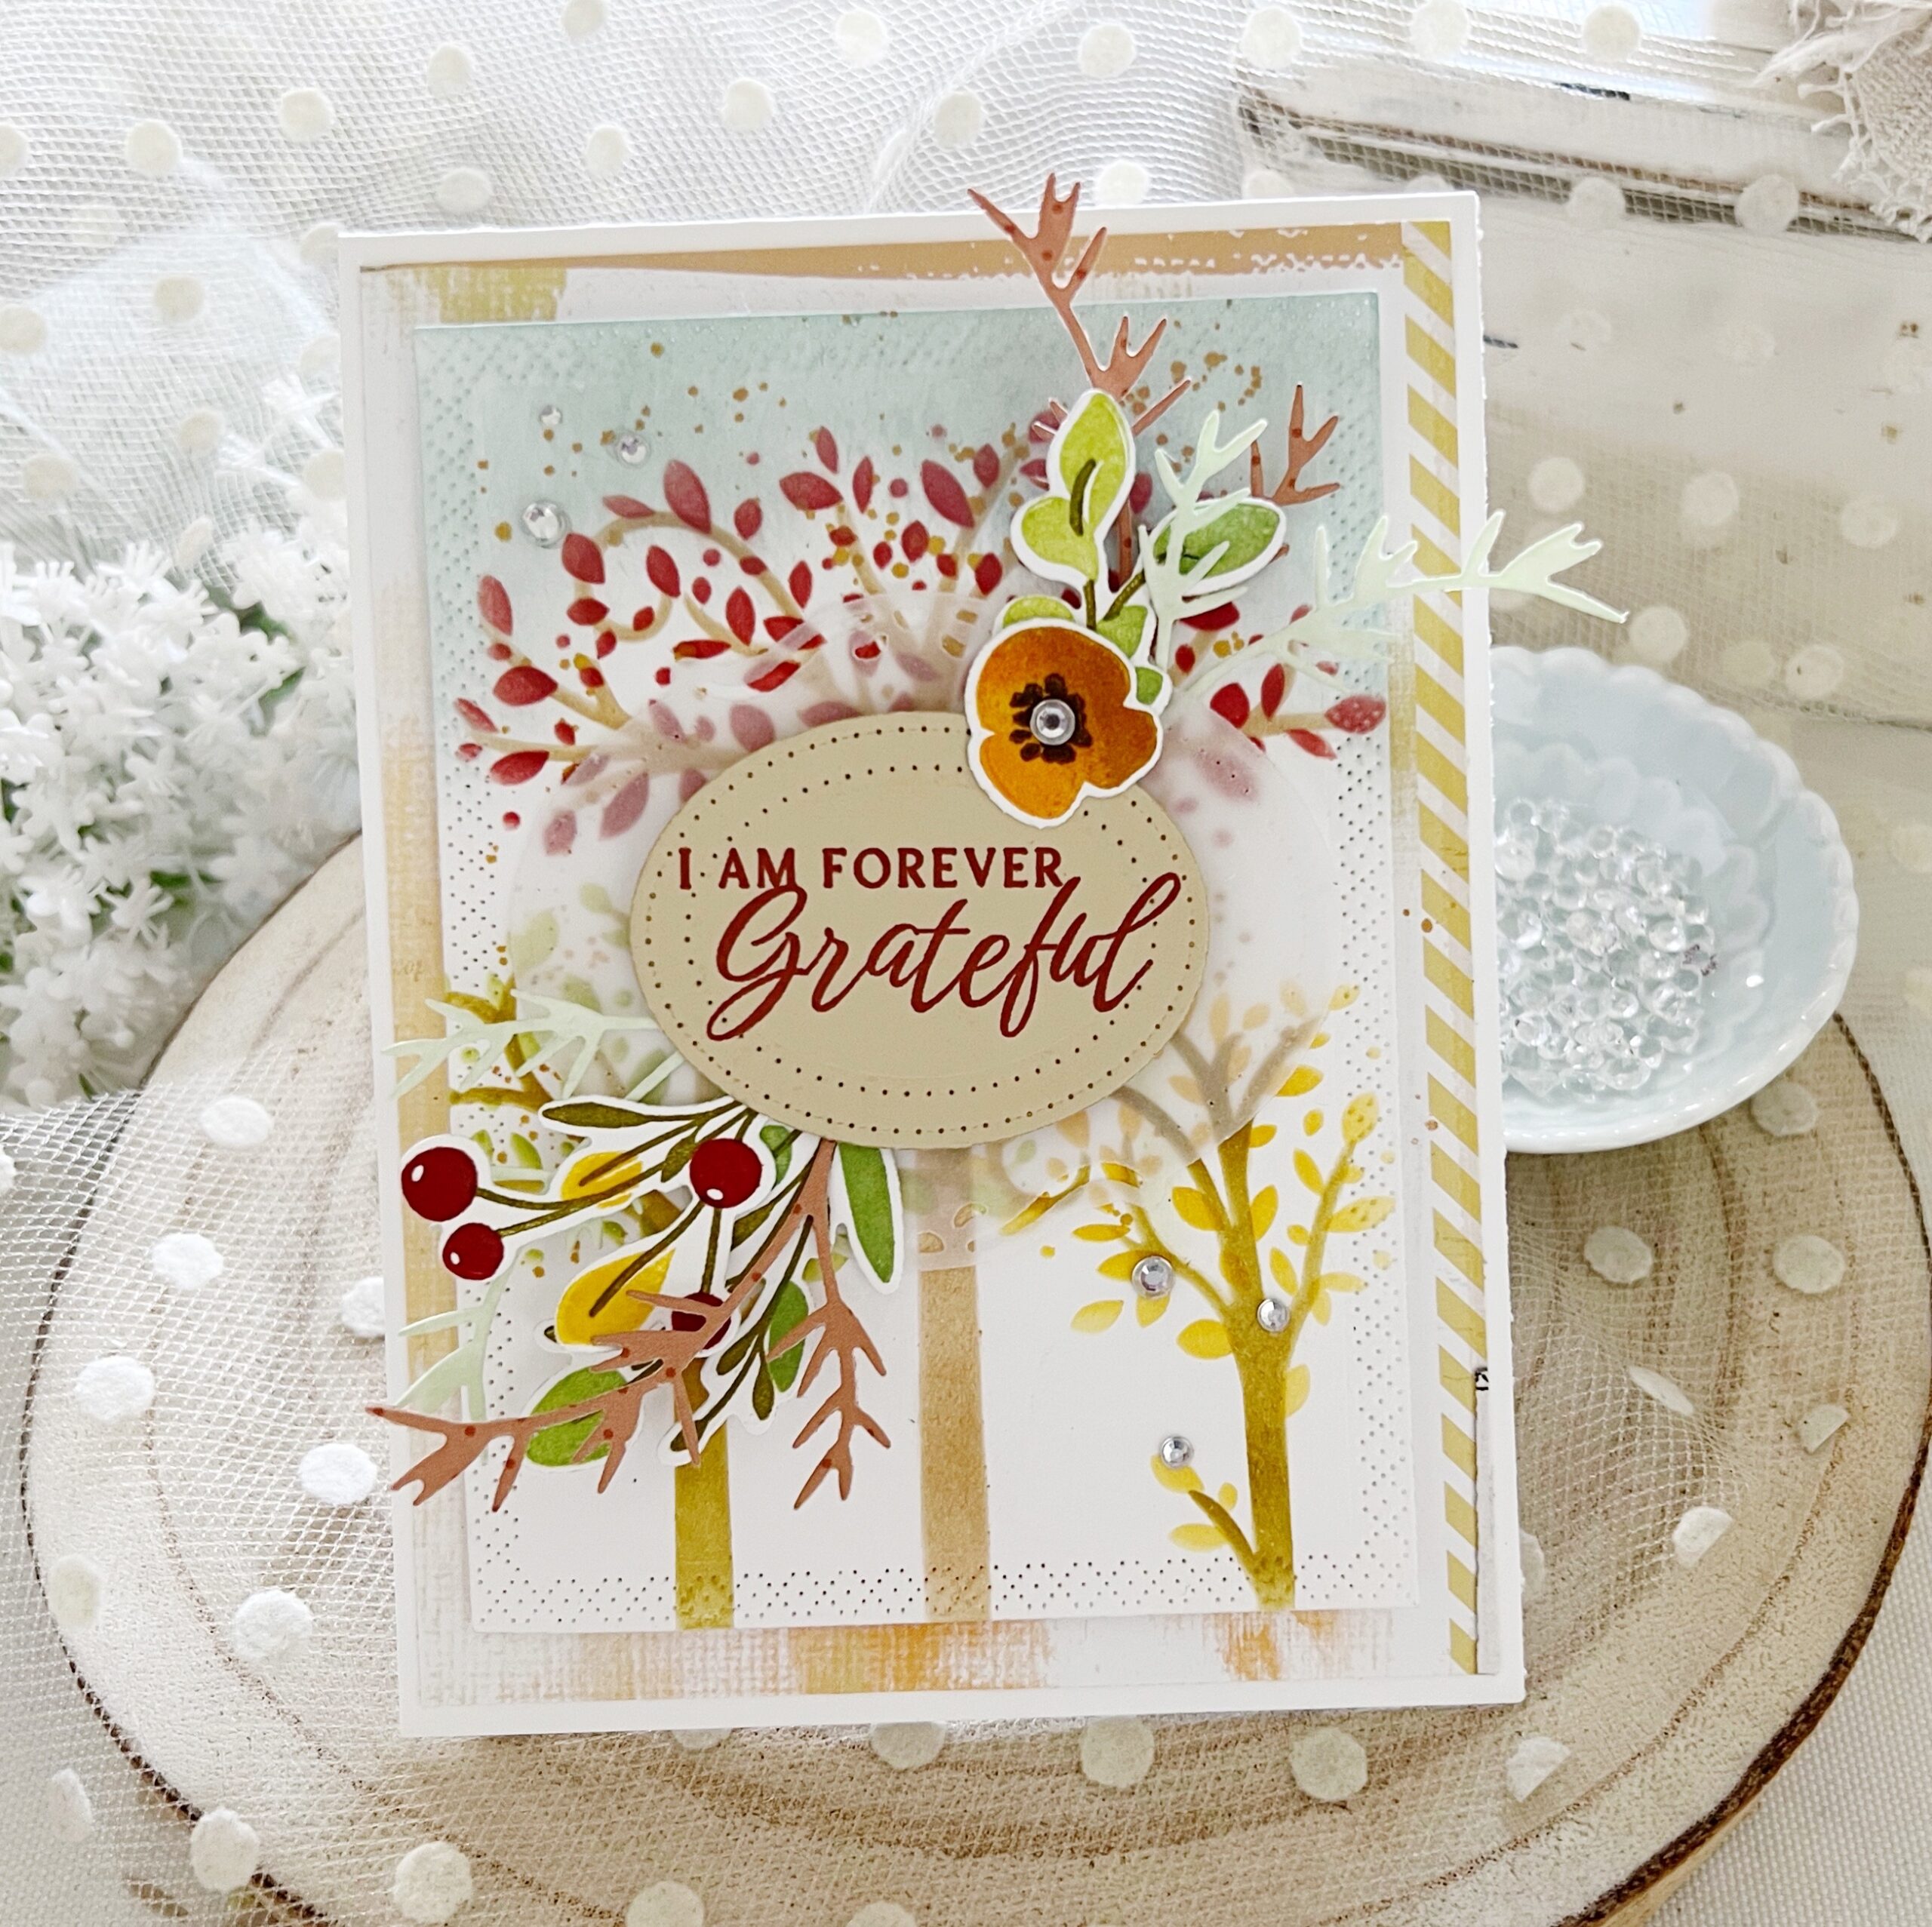
I am so inspired by our new Delicate Trees Stencils. In this collection, you will find multiple different stencils, each a different size, in order for you to build your trees and greenery. I love that they can be layered over one another and used year-round!
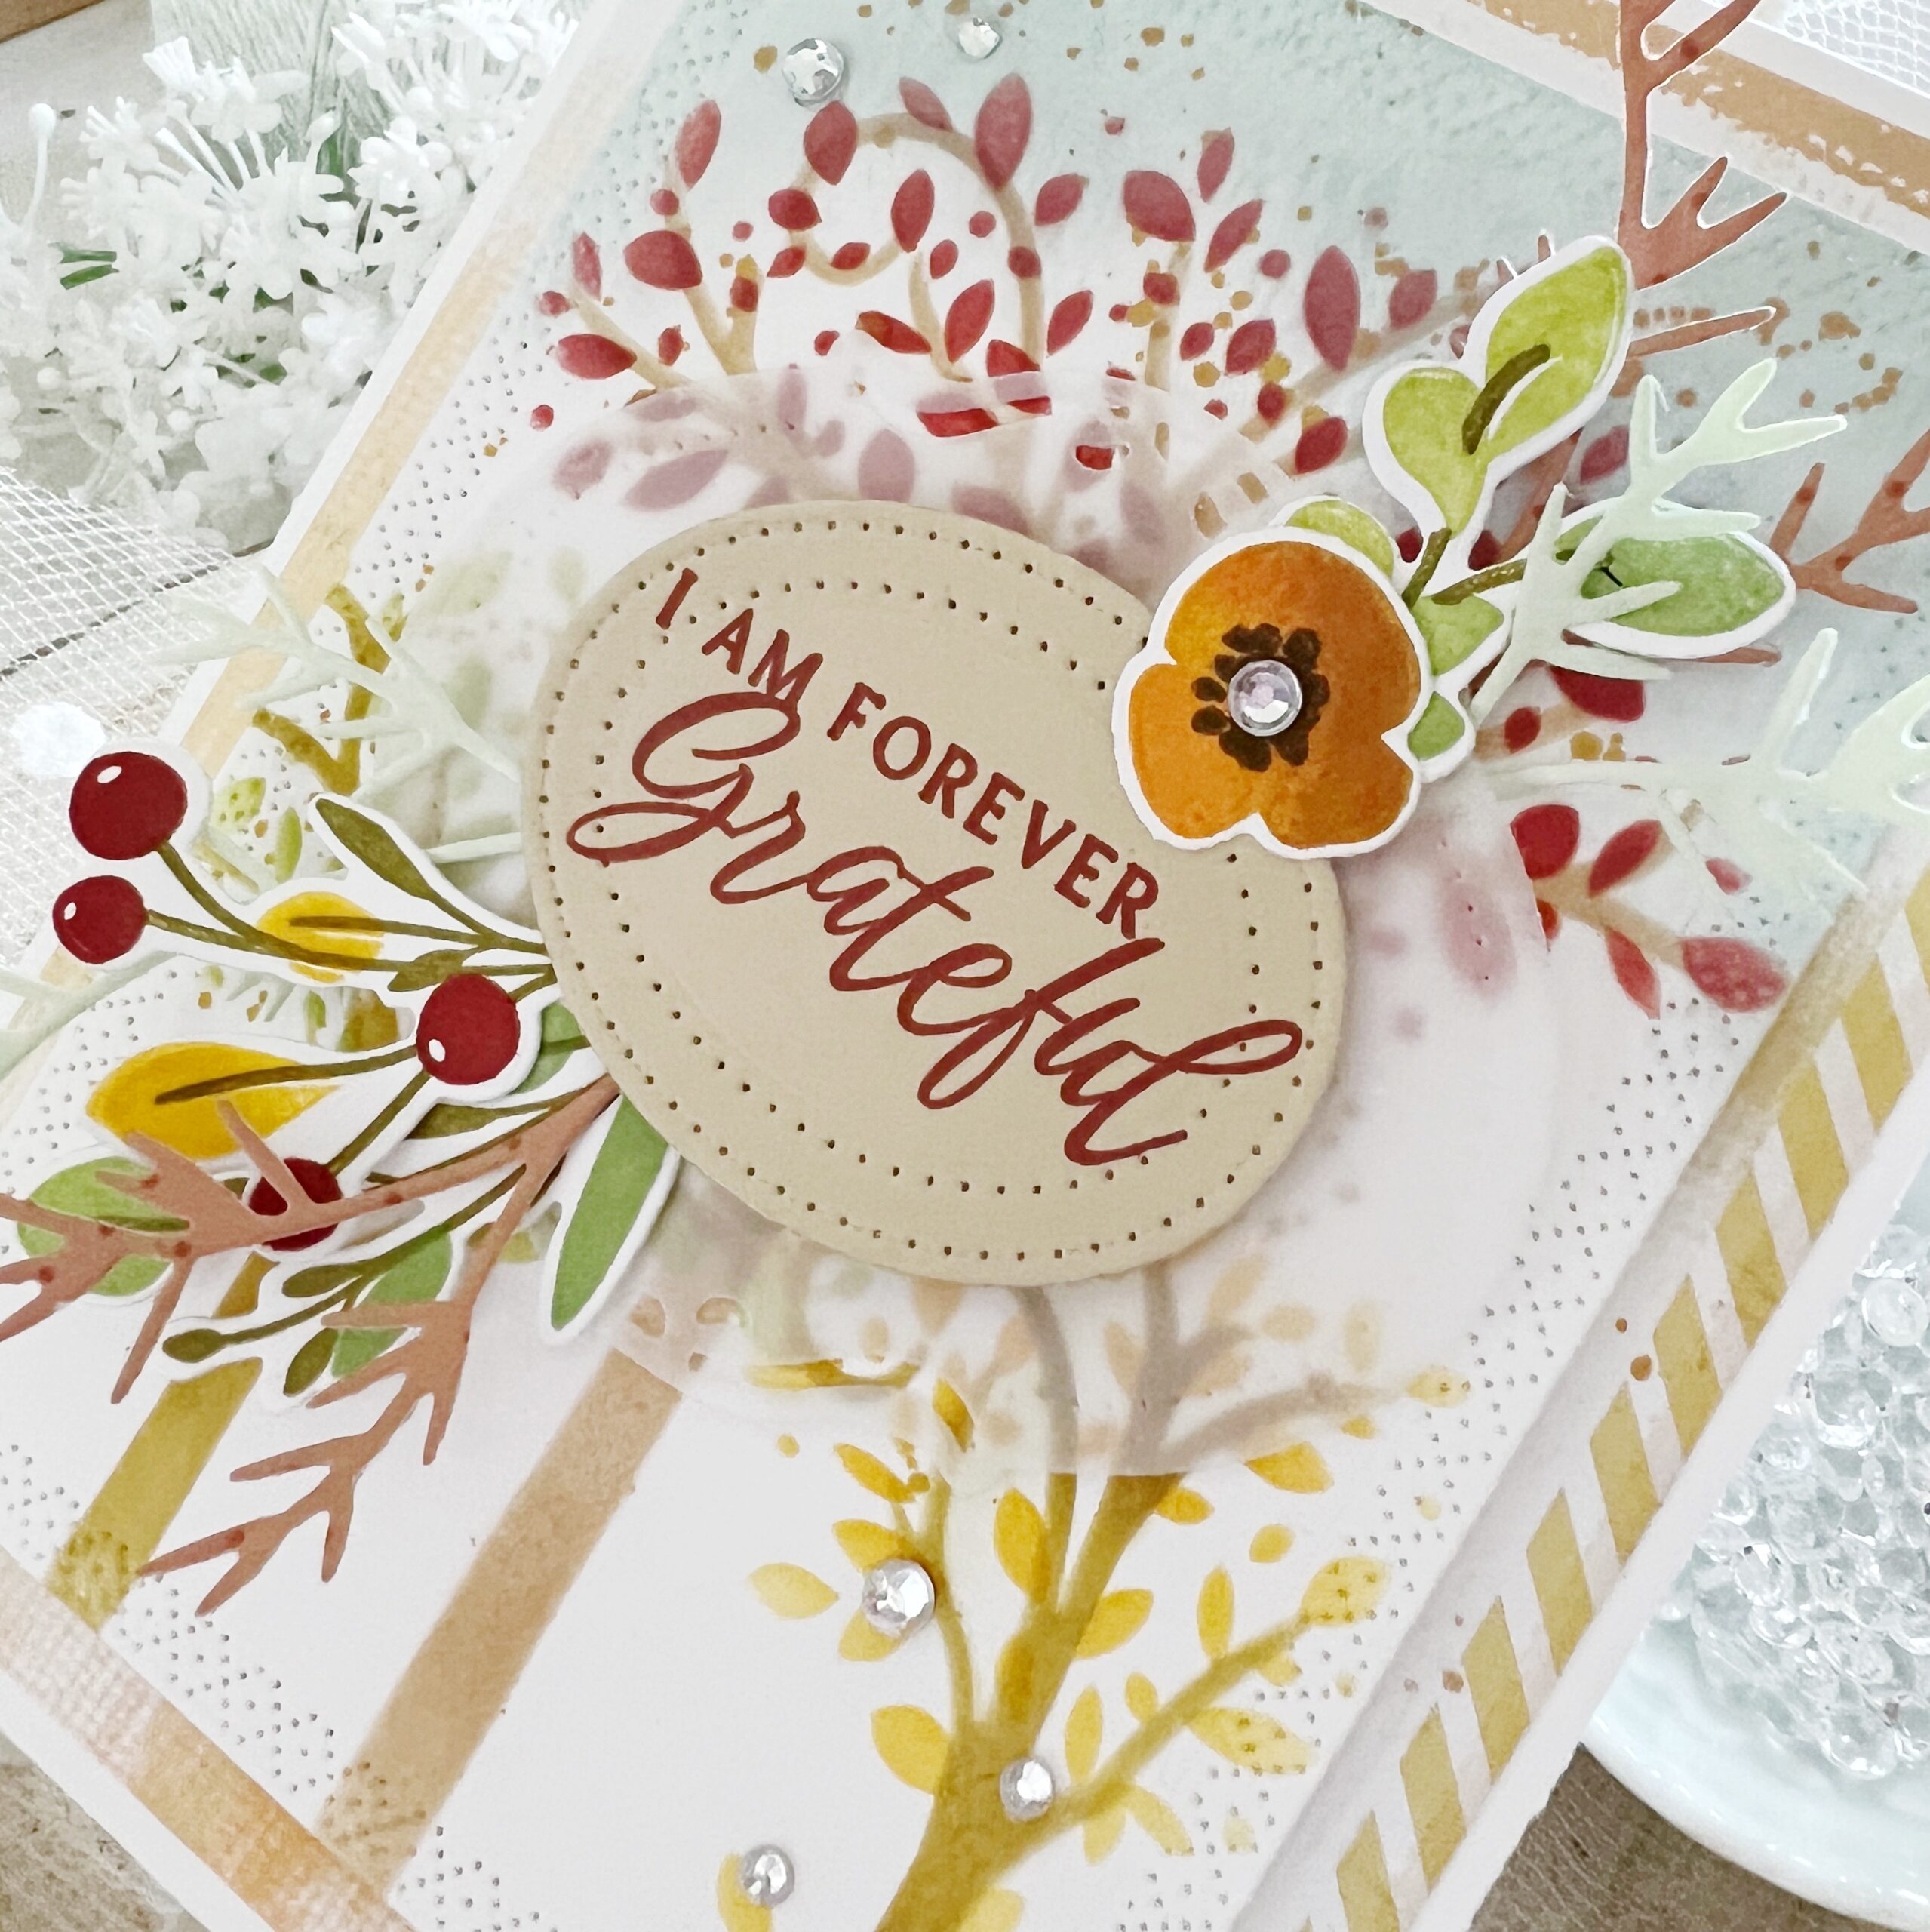
I used a Love to Layer: Rectangle as the base from where I would stencil my three different trees. I used Fine Linen, Saffron Spice, Bright Buttercup, Summer Sunrise, Americana, and Green Parakeet for my trees.
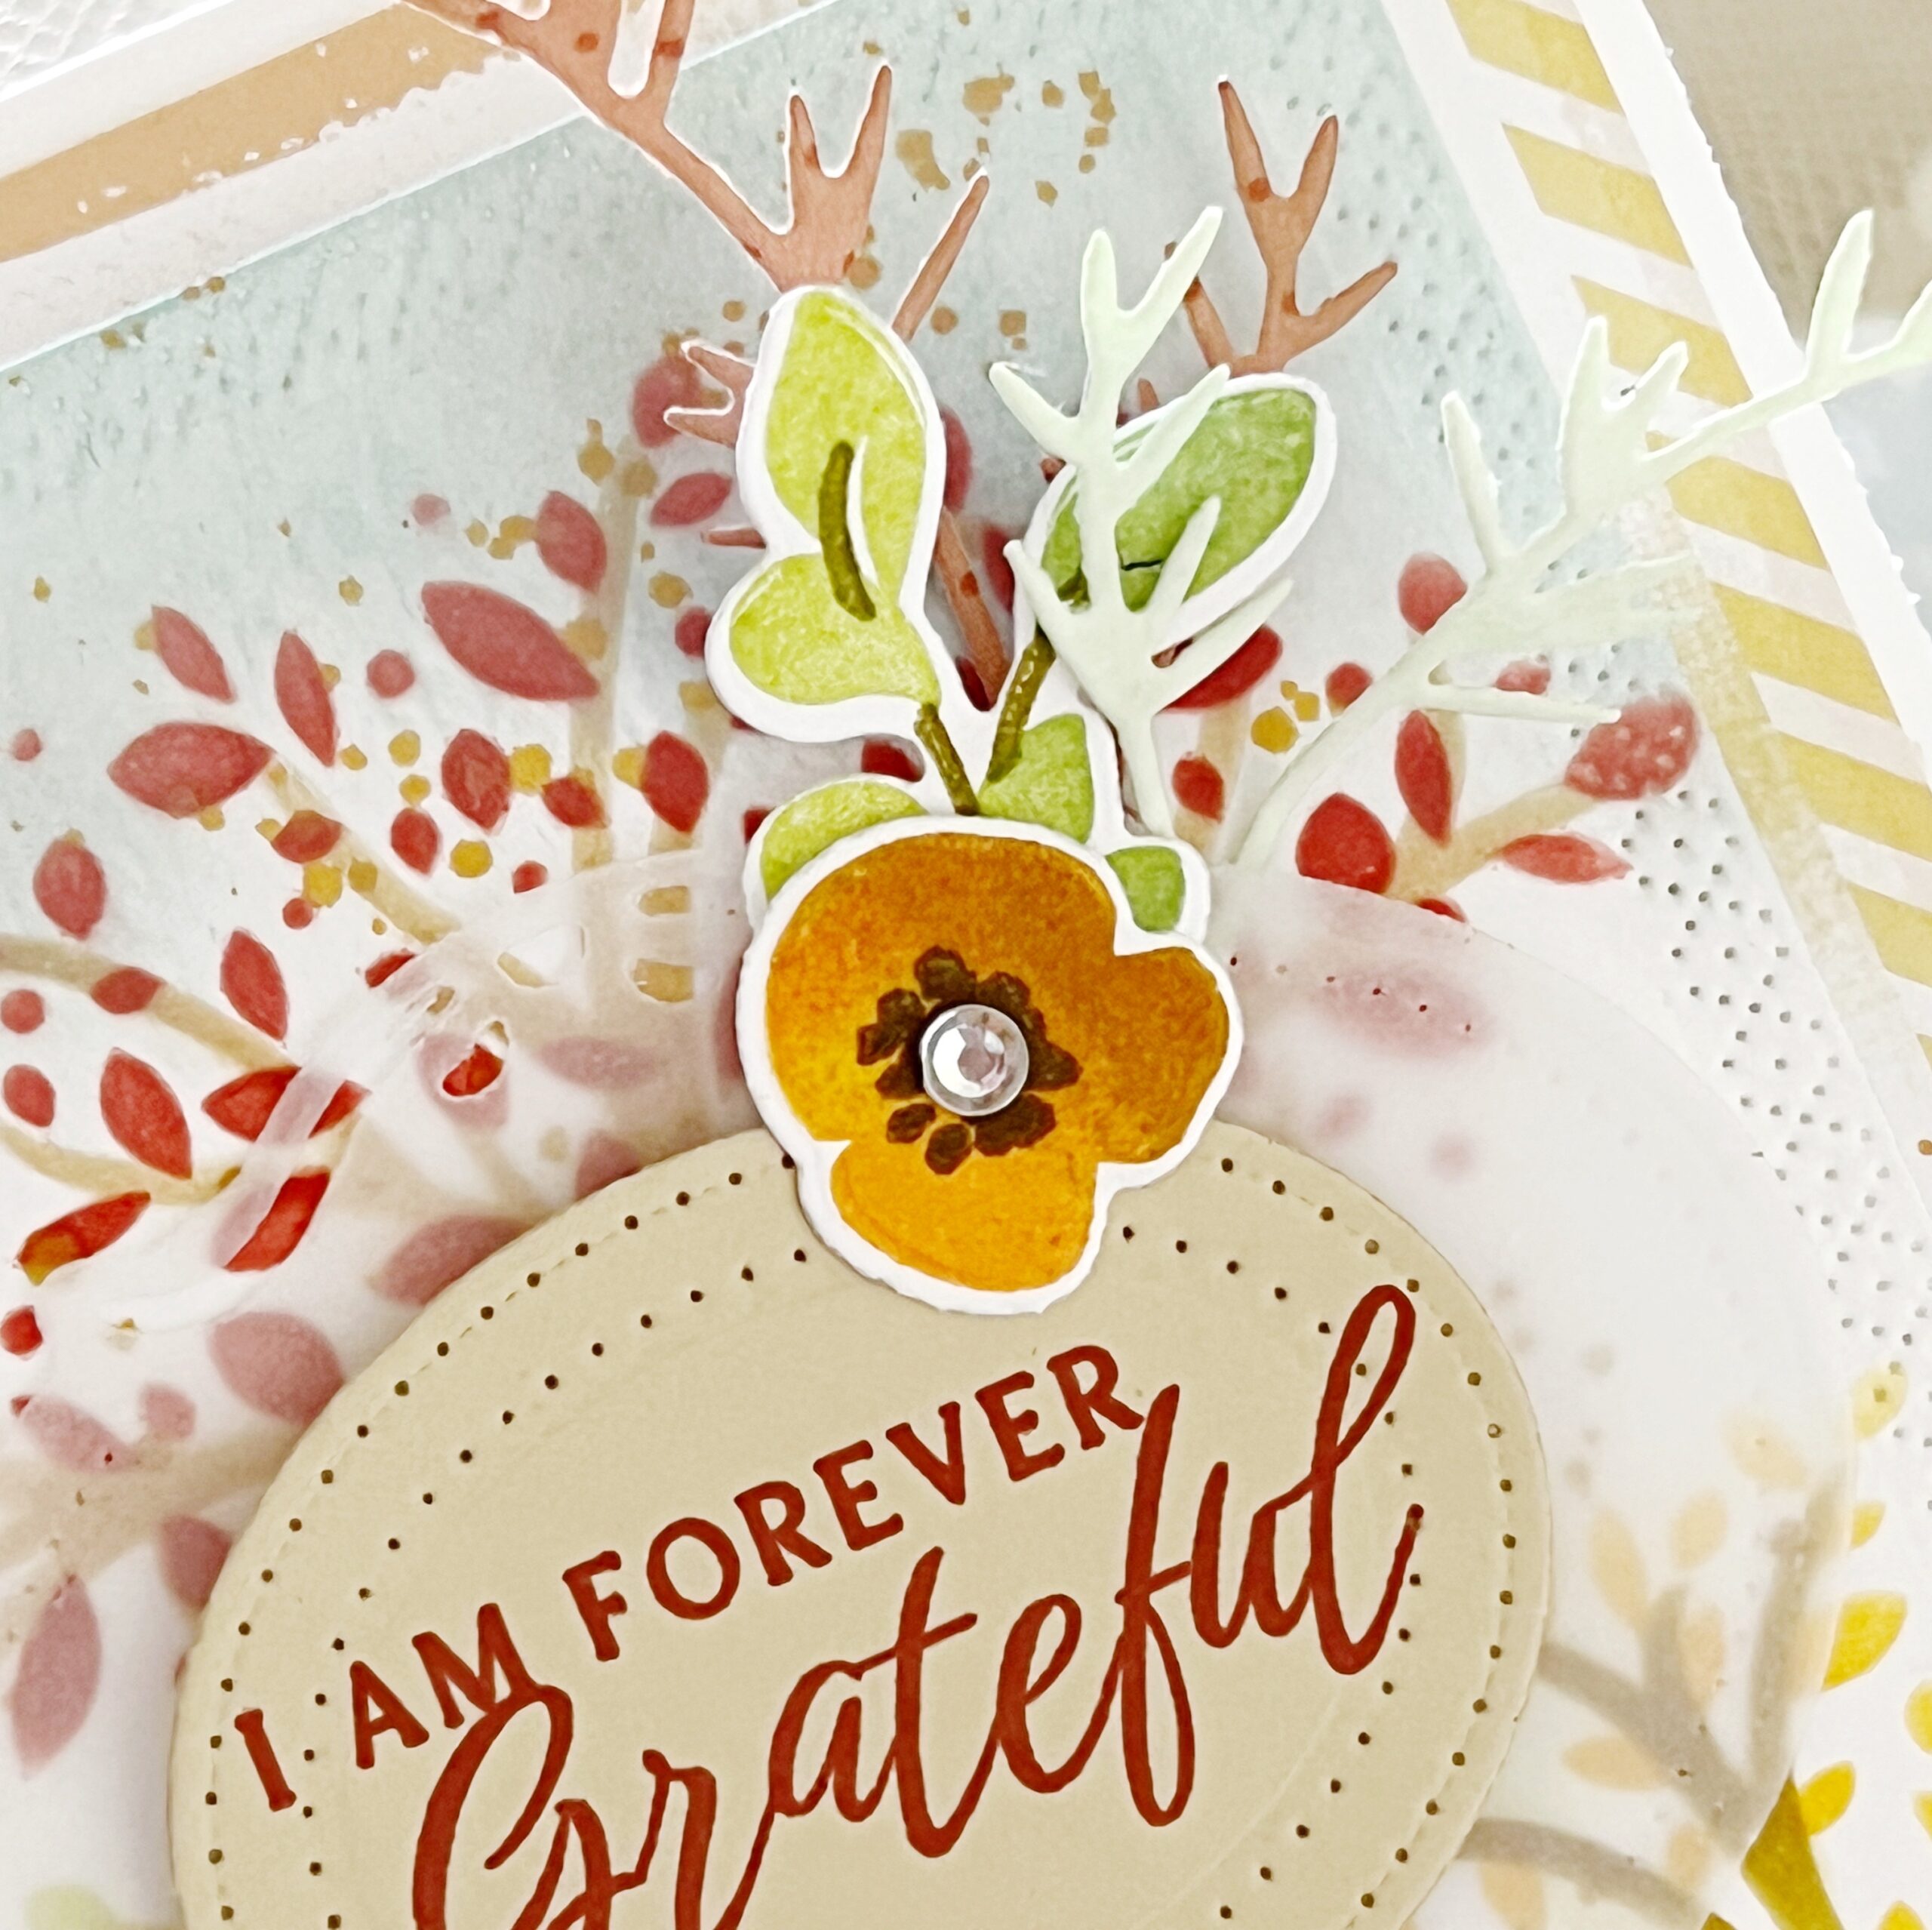
I added a Love to Layer: Vellum Oval die cut to the center of my card and stamped my sentiment from the Give Thanks: Sentiments stamp set on a die cut Love to Layer: Delightful Brackets die. A few Fresh Florals were then added to bring in more color to tie in with my trees, and lastly I used the cut outs from the new Cornered: Wheat Stalks dies as sprigs, tucking them under my florals and ovals. I LOVE our new Cornered: Wheat Stalks dies because of there being two different ways you can use them.
SUPPLY LIST:
STAMPS: Give Thanks: Sentiments, Fresh Florals
INK: Americana, Saffron Spice, Fine Linen, Honey Nut, Summer Sunrise, Bright Buttercup, Green Parakeet, Orange Zest, Ripe Avocado
PAPER: Stamper’s Select White, Sheer Basics Vellum, Fine Linen
DIES: Cornered: Wheat Stalks, Love to Layer: Delightful Brackets, Love to Layer: Ovals, Fresh Florals, Love to Layer: Rectangles
STENCILS: Delicate Trees
OTHER: Patterned paper, adhesive gems


We hope you have enjoyed all the beautiful projects that we have shared with you today! We would love to hear what you think of everything we have introduced! Please leave a comment on this post to tell us what you like the most and why, and you will be eligible to win big!

Leave a comment today and you will be automatically entered to win a $50 Papertrey Ink gift certificate! You have until 10am ET, August 29th to leave your comment and be eligible to win. Only one comment per person please. One randomly selected winner will be posted on the August Release Winners Page by 11 PM ET on August 29th.


Leave a Reply