


Our final day of the Papertrey Ink Countdown is extra sweet. To further our Wispy Tree series, we have the new Cornered: Wispy Trees dies. They create the most beautiful decorative corners and MORE as you’ll see our designers share. Also, today we’re sharing the new Inside Greetings: You’re On My Mind stamps. Let’s get started!

I love the soft effect the new Cornered: Wispy trees dies added to my card. I cut them from a Sweet Blush base and layered it over a Vintage Cream card base. These new dies can also create a gorgeous, bold, contrasting look to your cards. Notice how Kelly and Teresa both used these lovely dies. I am smitten!

My sentiments stamped on a die cut Love to Layer: Ovals die, uses one of the three touching sentiments found in the Inside Greetings: You’re On My Mind set. I can’t tell you enough how useful these sentiments will be! Surrounding my sentiment I die cut and stamped images from the Eucalyptus Elegance stamp set. Aren’t these leaves so beautiful and lifelike?

I embellished my eucalyptus wreath using butterflies clipped from the Cover Plate: Flutter Frame die. I am so happy you can use the butterflies in that die in a variety of different ways, such as separating them from their frame. I tucked in die cut greenery from the Into the Blooms: Dahlias die set. I’ve used the Vintage Blooms die to create my photo corners, cutting them from chipboard and painting them with ivory paint to create a shabby look and feel.
Enjoy the beautiful creations our designers have ready to share with you!
You’ve Been On My Mind Card
Supplies used:
STAMPS: Eucalyptus Elegance, Inside Greetings: You’re On My Mind
INK: Ripe Avocado, Spring Rain, Melon Berry, Autumn Rose, Spring Moss, Olive Twist, Honey Nut
PAPER: Vintage Cream, Stamper’s Select White, Sheer Basics Vellum, Sweet Blush
DIES: Cornered: Wispy Trees, Eucalyptus Elegance, Cover Plate: Flutter Frame, Love to Layer: Ovals, Into the Blooms: Dahlias, Vintage Blooms, Border Bling: Skinny Diagonals Frame
OTHER: Patterned Paper, Chipboard, Stickles Glitter, Enamel Dots, Moonshine Sequins


TIPS:
- Try layering corner dies to add more interest.
- Use the adorable scissors stamp/die to add a fun action “cut”.
- Add large foam dots behind the “cut” flaps to give more dimension.


TIPS:
- Let the corner dies have a dry embossed look by carefully turning over the paper after die cutting and apply tape to the back to prevent the small leaves from falling out.
- Give the doily die some pizzazz by also cutting it from black card stock then inlaying the black “leaves”.
- Angle a second tag that is cut from patterned paper to add more visual interest.


TIPS:
- Choose to inlay a different color into the leafy corner die cut.
- Use an adhesive sheet for the backing of the die cut panel to avoid the messiness of using glue to adhere the tiny pieces.
-
Using vellum helps to soften the look plus it doesn’t cover up as much of the background.
Our final set of products for the July Countdown are the new Dotted Hexagon Stencils. They are pretty irresistible! Just you wait to see the many different ways our designers have used them. Let’s begin with how I used them.

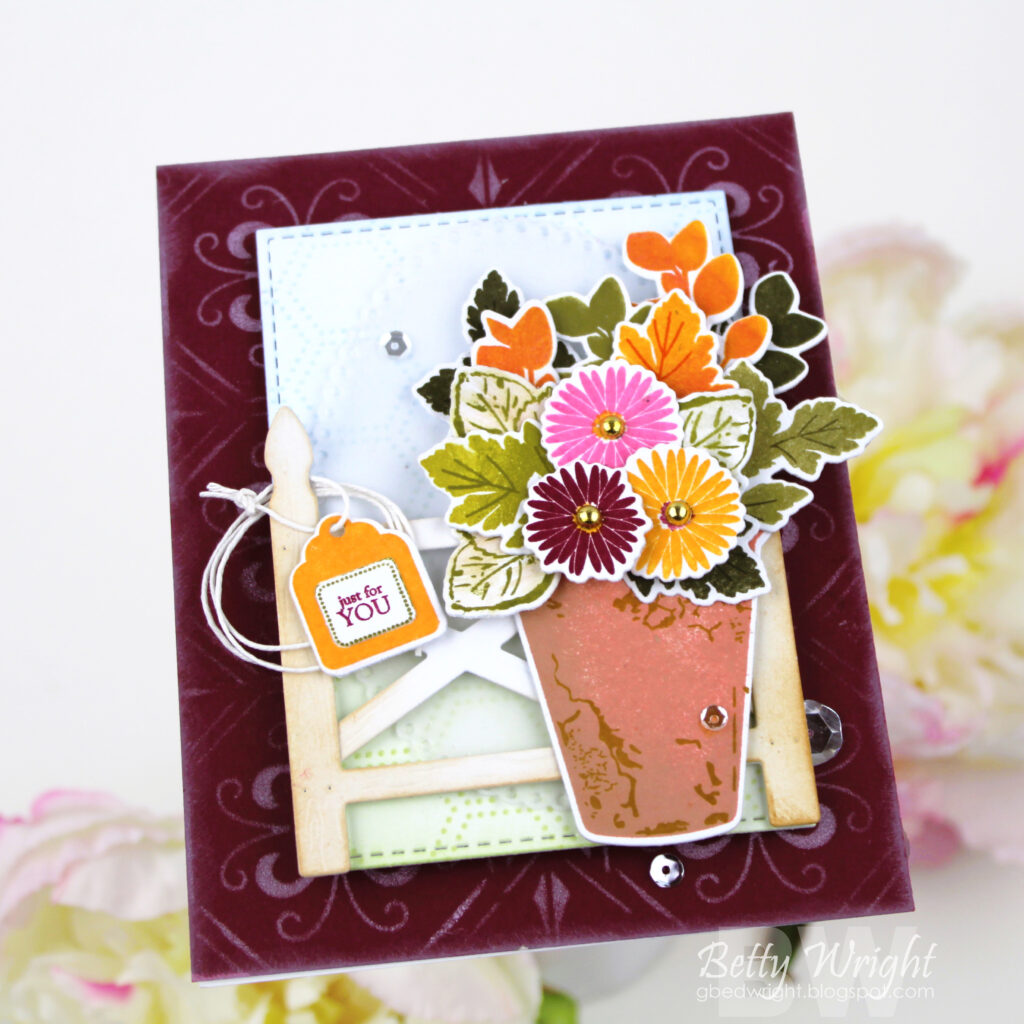
I used the large Dotted Hexagon Stencils to create a background for my sunflower scene. I wanted a bit of soft pattern behind my rays of sunshine and clouds, and they were perfect. I sponged the hexagons on in Spring Moss and Summer Sunrise and then removed the stencil and added more ink blending in the same colors.

I then added a die cut Love to Layer: Notched rectangle. I added cloud stencils and a bit of water to activate the ink. After this came my sunflowers, created using the new Sprigs & Sprays: Fall stamp set. Oh, how I love these flowers! They are stamped over a stenciled Sunburst with a sentiment selected from the Just Sentiments: You’re On My Mind stamp set.

I decided to pot my sweet little sunflowers in a vase from the new Into the Blooms: Orchids die set. I added additional leaves using leaves from this same collection. Behind my sunflowers, I’ve used the adorable Mini Picket Fence dies. This might be my most favorite part of my card….who can resist a cute, little picket fence? Must have, I tell you!
How will you use your Dotted Hexagon Stencils? You’ll have the best time creating with them…I know it!
Thought of You Card
Supplies used:
STAMPS: Just Sentiments: You’re On My Mind, Sprigs & Sprays: Fall
INK: Spring Rain, Hawaiian Shores, Summer Sunrise, Melon Berry, Honey Nut, Bright Buttercup, Cocoa Bean, Spring Moss, Ripe Avocado
PAPER: Vintage Cream
DIES: Love to Layer: Notched, Pierced Feature Frames: Rectangles, Into the Blooms: Orchids
OTHER: Dotted Hexagon Stencil Collection, Clouds Stencil Collection, Sunburst Stencil Collection, Stickles Glitter, Patterned Paper, Moonshine Sequins


TIPS:
- For a subtle and organic background, selectively stencil over the background panel, letting the pattern fade to white.
- Use plain cellophane/Scotch tape to adhere the orchids to the stem and then add dimension to the overall piece using foam tape.
- Add dimension to pieces die cut from color cardstock by using blending brushes to blend a darker dye ink around the edges of the piece.
- The Copic Airbrush System is an easy way to add very fine splatter using ink straight from your Copic Sketch marker.
STAMPS: Just Sentiments: You’re On My Mind
PAPER: New Leaf, Green Parakeet, Stamper’s Select White
DIES: Into the Blooms: Orchids, Mix & Mat: Scallops
STENCILS: Dotted Hexagon Stencil Collection
OTHER: Black Pigment Ink (sentiment), dye inks and blending brushes for ink-blending and stenciling
We hope you were inspired by all of the amazing projects today! What products are you most excited about using right away? Please leave a comment on this post to be eligible to win!

Leave a comment today and be automatically entered to win a $50 Papertrey Ink gift certificate! You have until 7am ET, June 21st to leave your comment and be eligible to win. Only one comment per person please. One randomly selected winner will be posted on the July Release Winners Page by 11 PM ET on June 21st.


Leave a Reply