


It’s the final day of the Papertrey Ink May Release, and we’ve saved some gorgeous new products for last! If you love all things Patriotic, Red, White, and Blue, this post is just for you! Introducing the new USA dies and Wood Plank Background stamps.

The new Wood Plank Background stamp is weathered, rustic, and beautiful. I was inspired to stamp and heat emboss mine over a piece of cardboard. I love the depth and texture that cardboard adds, and wanted the window I cut in the center to reflect that depth. Our new USA die looks so perfect placed over the Wood Plank Background. There are numerous ways to use these products together!

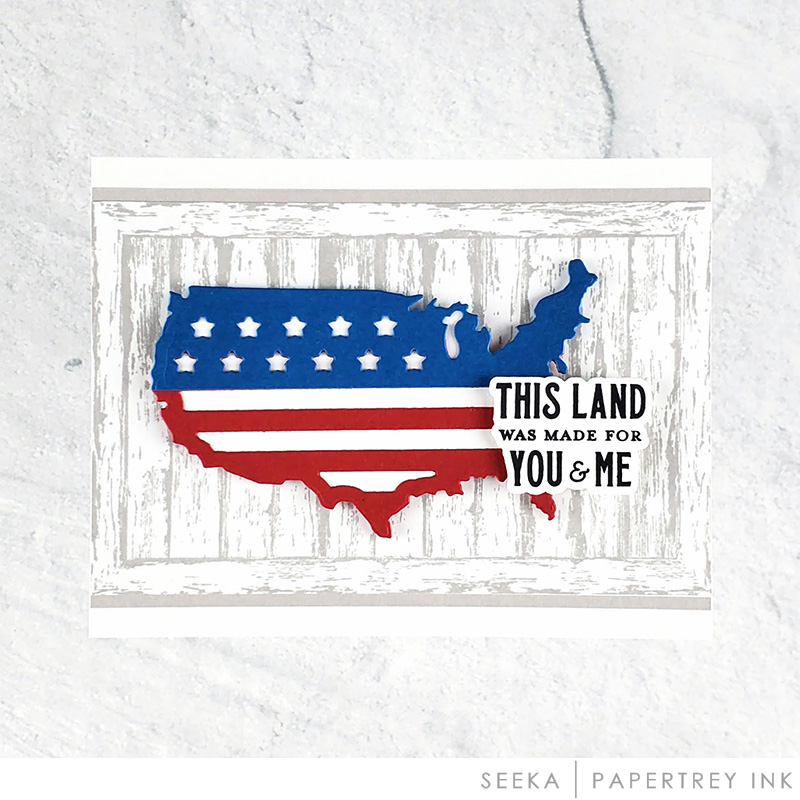
I used the USA die in the center of my stamped Wood Plank Background block. I then peeled edges of cardboard to expose the corrugated center. I added paint in white and aqua to further distress my edges. I then layered this block on a rectangle cut from patterned paper. I love how the shape of the USA die shows through from beneath.

I embellished my card using a metal bookplate, a stamped and die cut sentiment from the Celebrate Freedom stamp set, trim, a printed vintage inspired flower bunch, and a die cut star, cut using the Patriotic die collection. I had so much fun creating this card!
Wait until you see all of the creative ways our designers have used these products. You’ll be itching to create with them too!
Supplies used:
STAMPS: Celebrate Freedom, Wood Plank Background
INK: Weathervane
PAPER: Stamper’s Select White, Bitty Big Scarlet Jewel
DIES: USA, Celebrate Freedom, Patriotic
OTHER: Cardboard, paint, watermark ink, white embossing powder, gold metallic cardstock, button, trim, adhesive gem


TIPS:
- Layer skinny border dies with at least two layers. It makes it easier to adhere to card plus gives dimension.
- The USA die is so easy to inlay different colors.


TIPS:
- Ink blend cardstock with multiple colors before stamping wood plank background stamp for a realistic look.
- Distress edges of stamped background and add splatters.
- Cut USA Die from White Cardstock, remove stars & stripes then tape off and ink blend in blue and red. Add back white stars & stripes.
CLICK HERE TO VISIT TERESA’S BLOG


TIPS:
- Use multiple sentiments and arrange in collage form to create a fun background.
- Tearing and then sponging one side of the wood plank background strip adds a rustic element.
- I cut out three of the USA dies in different colors and offset them just slightly to add interest and dimension.


TIPS:
- Add a sentiment as a small tag when your card front seems full.
- Jute twine, sponging the edges for an aged look and using darker shades of red and blue give a rustic feel to your card.


TIPS:
- Stamp multiple sentiments to create background.
- Cut solid USA die from Stamped Wood Plank Background Stamp.
- Save negative cut out for another card.
CLICK HERE TO VISIT TERESA’S BLOG


TIPS:
- Cut USA Dies from multiple colors of cardstock. Cut in sections and Paper piece together.
- Inlay USA Dies into Wood Plank Background negative from previous card.
- Add Foam tape to Stars and Stripes for dimension and glitter for interest.
CLICK HERE TO VISIT TERESA’S BLOG
It’s time for the reveal of our newest Feathered Friend…are you ready? Any guesses? Introducing the new Feathered Friends 23 stamp set and dies. An eagle to coordinate perfectly with our patriotic-themed products! Let’s check it out!

I layered my majestic eagle over sprigs of greenery, cut using the Into the Blooms: Dahlias dies. These were layering over our new USA die. Isn’t it amazing? There are two parts to the USA die. A solid, bottom layer, and a more detailed top layer, shown here…complete with Stars and Stripes. My stripes are stamped and heat embossed using the Wood Plank Background set. Fun, huh?

I added a die cut and stamped sentiment from the Celebrate Freedom stamp set. It is layered over a star, cut using the Patriotic dies. You can see my use of the Border Bling: Skinny Stars Frames die in the background, cut from cork board…a really fun medium to use with your favorite dies!

I wanted the stars of my USA die to stand out, so I layered this portion of the die over denim ribbon, which ties in perfectly with my Bitty Big Enchanted Evening paper. At the top of my card, I stamped a second Celebrate Freedom sentiment on a die cut tag, stapling it to the top of my card to create a tab, and trimming off the excess. I embellished my tag with a few more die cut Patriotic stars…these are addicting!
Supplies used:
STAMPS: Celebrate Freedom, Feathered Friends Mini 23, Wood Plank Background
INK: Weathervane, Fine Linen, Cocoa Bean, Honey Nut, Saffron Spice, Soft Stone, Olive Twist
PAPER: Stamper’s Select White, Bitty Big Enchanted Evening, Sheer Basics Vellum
DIES: Feathered Friends Mini 23, Celebrate Freedom, USA, Patriotic, Into the Blooms: Dahlias, Border Bling: Skinny Stars Frames, Mix & Match: Scallops, Love to Layer: Aztec
OTHER: Cork board, denim ribbon, adhesive gems, white embossing powder


TIPS:
-
Instead of adding another layer, use a negative space to add depth.
-
To get a weathered wood look, combine brown and gray inks.
-
Get a different look with large background stamps by stamping two images side by side and cutting a custom panel size.

We hope you have enjoyed all the creations that we have shared with you today! We would love to hear your initial thoughts on everything we introduced! Please leave a comment on this post to tell us what you think of the new products, and you will be eligible to win big!

Leave a comment today and you’re automatically entered to win a $50 Papertrey Ink or Ink to Paper gift certificate! You have until 7am ET, May 24th to leave your comment and be eligible to win. Only one comment per person please. One randomly selected winner will be posted on the May Release Winners Page by 10PM ET on May 24th.


Leave a Reply