


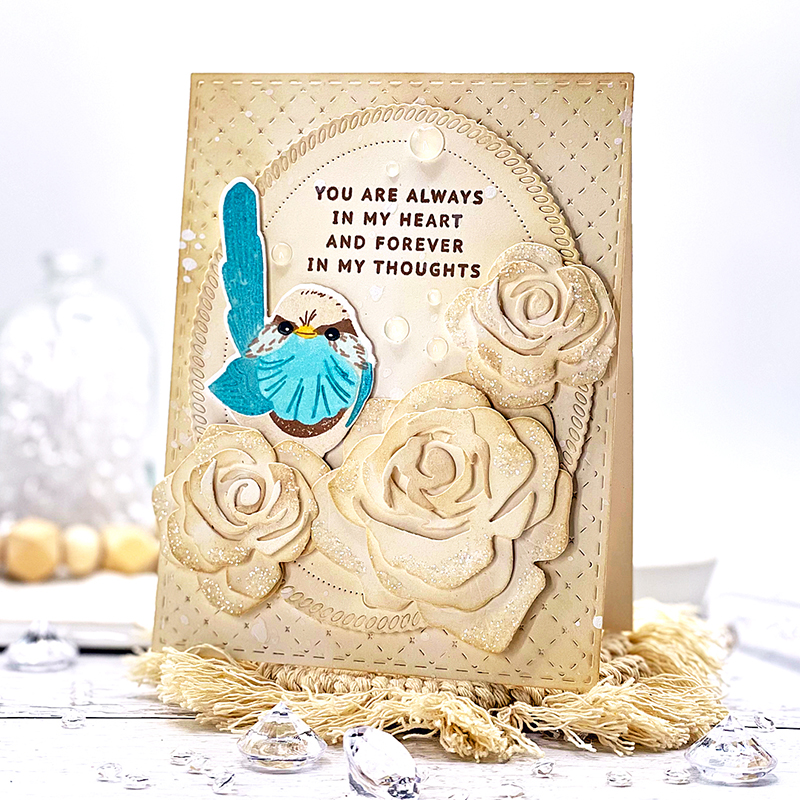
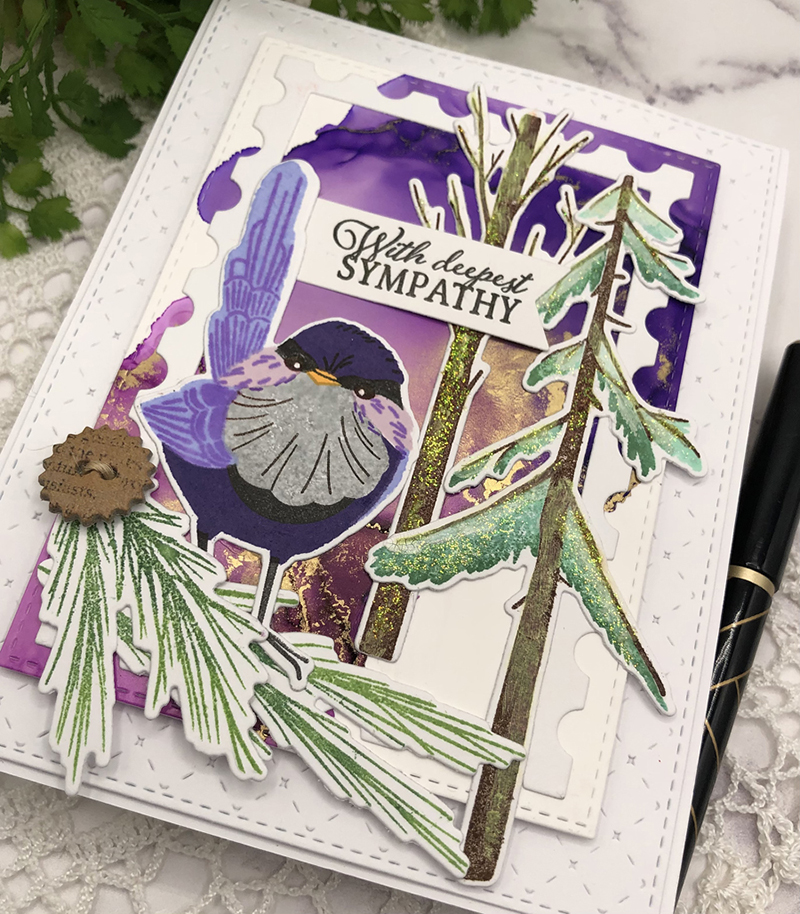
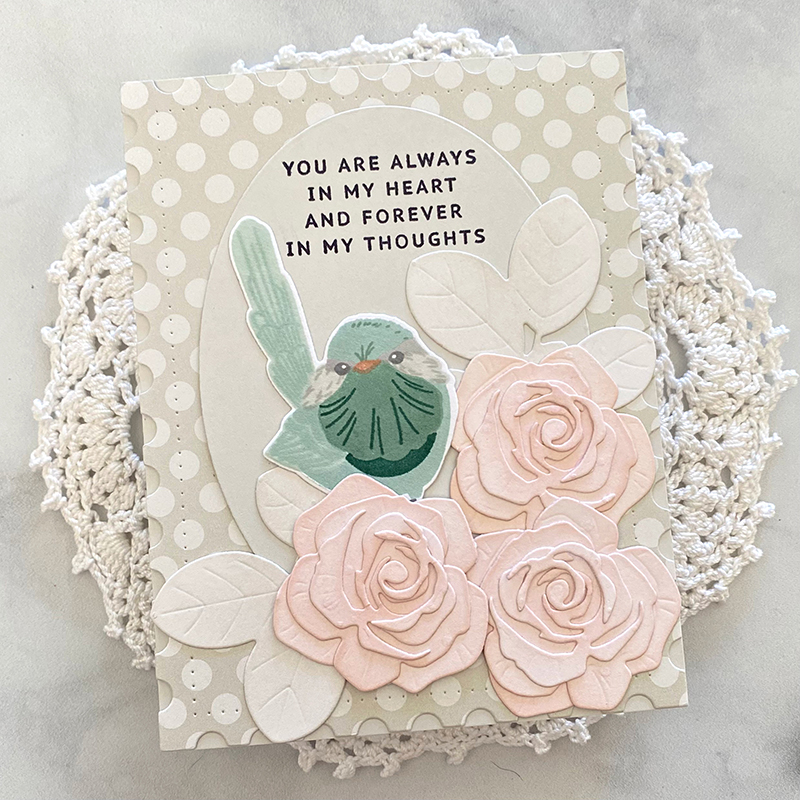
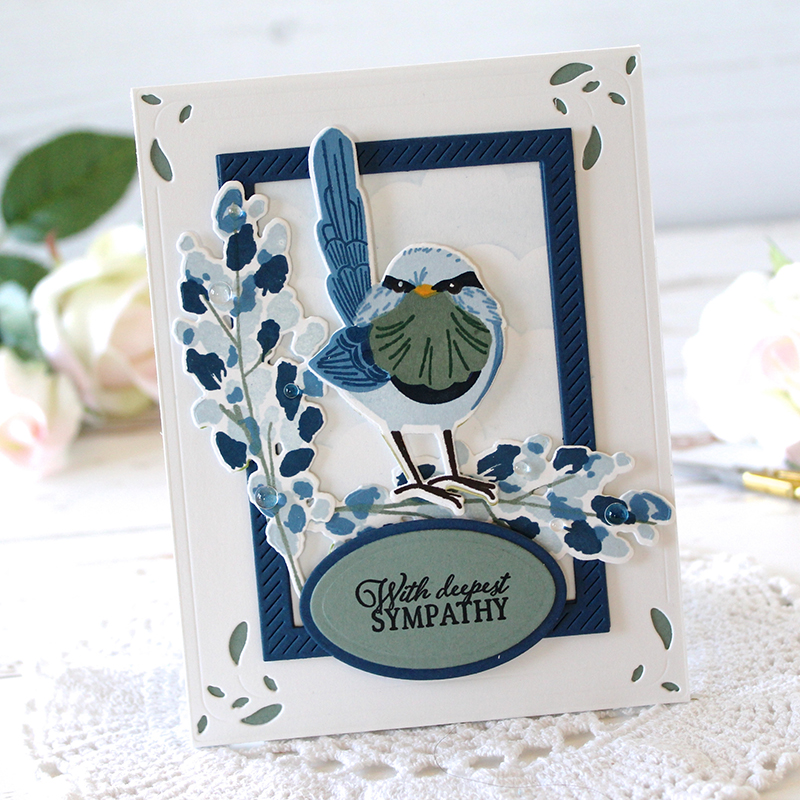
Day 2 is here and you might just fall head over heels with what’s in store today! Introducing the new Feathered Friends Mini 19 stamp set and dies. Isn’t she the sweetest?
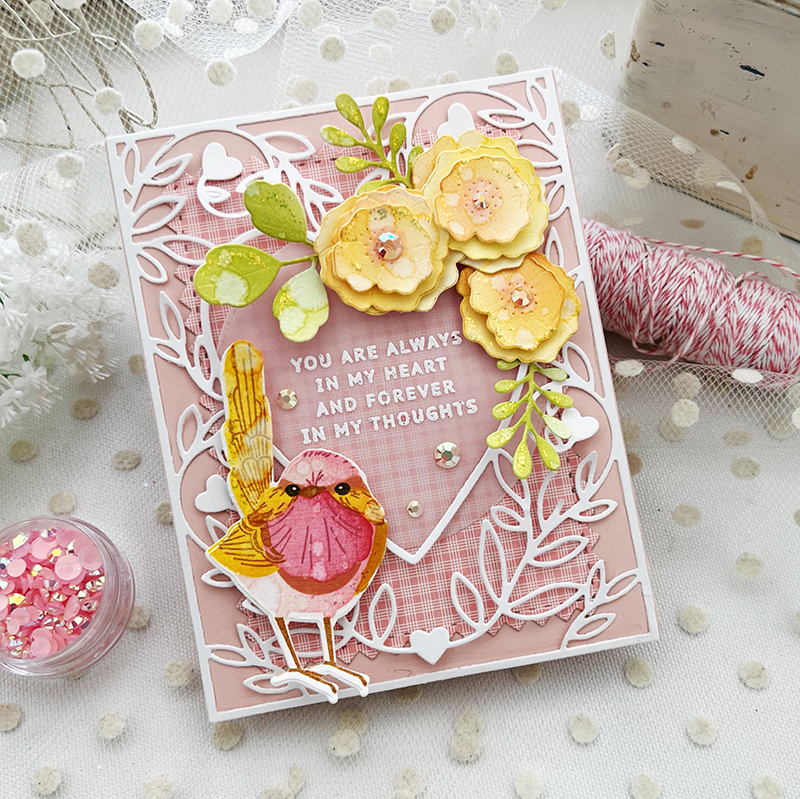
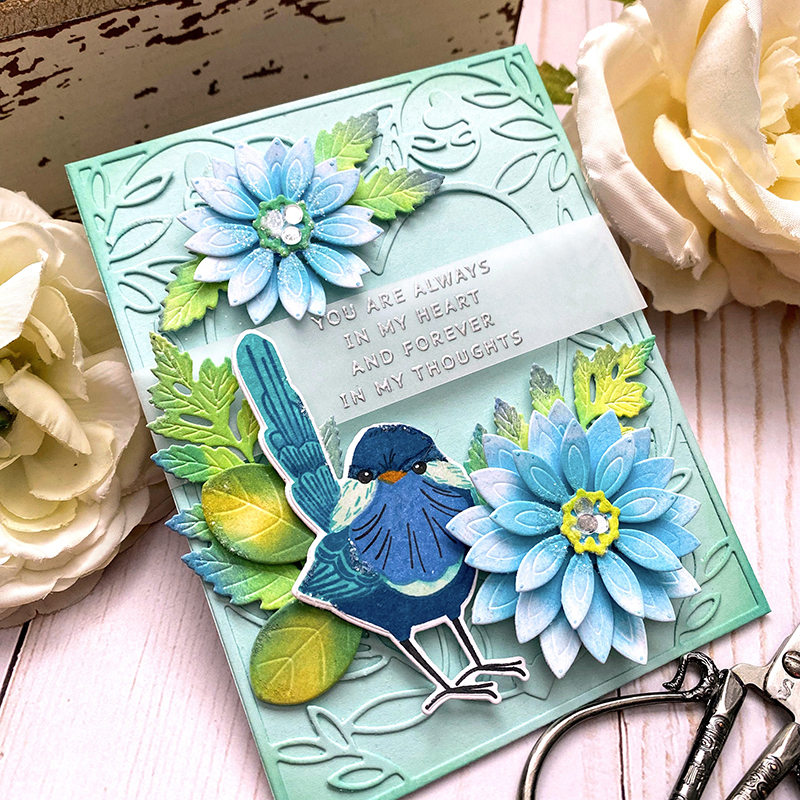
I love the positioning of our new Feathered Friend. She or he most definitely comes to life with each layer you add. I adore this multi-step bird and created her using shades of yellow such as Bright Buttercup, Summer Sunrise, and Honey Nut. I brought in shades of pink including Hibiscus Burst, Sweet Blush, and Pure Poppy.
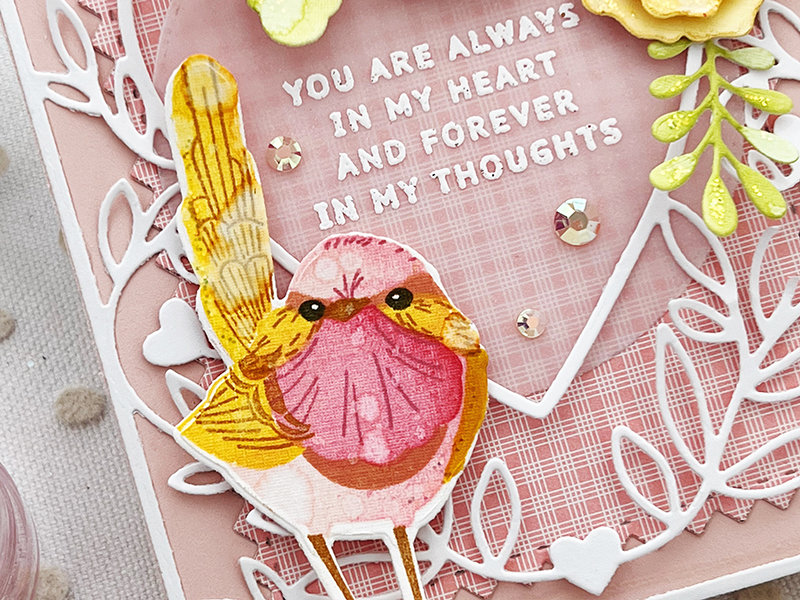
I wanted a delicate background behind my tiny bird, and chose to use the On the Border: From the Heart Frame die. The heart ties in perfectly with my sentiment. Do you struggle when knowing what to say when it comes to creating sympathy cards? I always do, but am not worried anymore. I absolutely love the sentiments chosen for the new Inside Greetings: With Sympathy stamp set. I stamped my sentiment on vellum and heat embossed it using white embossing powder. I always reach for my vellum to soften up my cards.
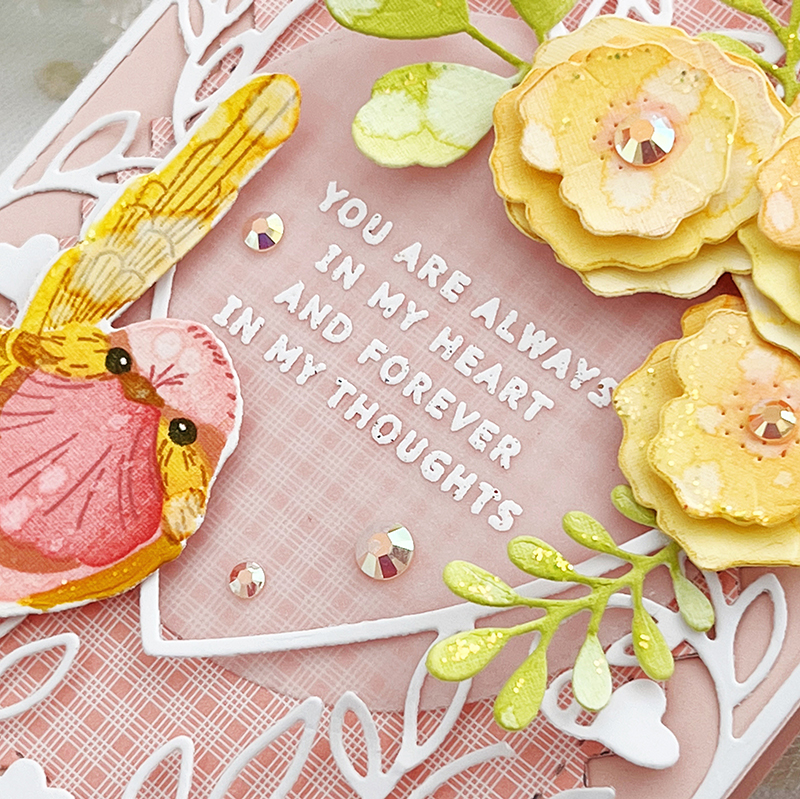
The fun flowers from the Message in a Bottle die collection and leaves from the Sweet Celebration die were just the right, whimsical touch I needed to surround my heart and compliment my Feathered Friend. This card makes me happy!
Enjoy these beautiful projects from our Design Team. You’ll adore each one!
Supplies Used:
STAMPS: Feathered Friends Mini 19, Inside Greetings: With Sympathy
INK: Sweet Blush, Hibiscus Burst, Pure Poppy, Autumn Rose, Bright Buttercup, Summer Sunrise, Honey Nut, Olive Twist, Green Parakeet, Simply Chartreuse
PAPER: Sweet Blush, Stamper’s Select White, Sheer Basics Vellum, Bitty Big Sweet Blush
DIES: Feathered Friends Mini 19, On the Border: From the Heart Frame, Message in a Bottle, Sweet Celebration, Mix & Mat: Pinked Edge, Love to Layer: Scalloped Circles
OTHER: white embossing powder, watermark ink, adhesive gems


TIPS:
- Blend ink over die cuts to bring out the textures
- Use the “rule of 3” when adding flowers or other embellishments. Odd numbers are more attractive to the eye.
- Use Rustic White or Rustic Cream cardstock for flower and animal cards

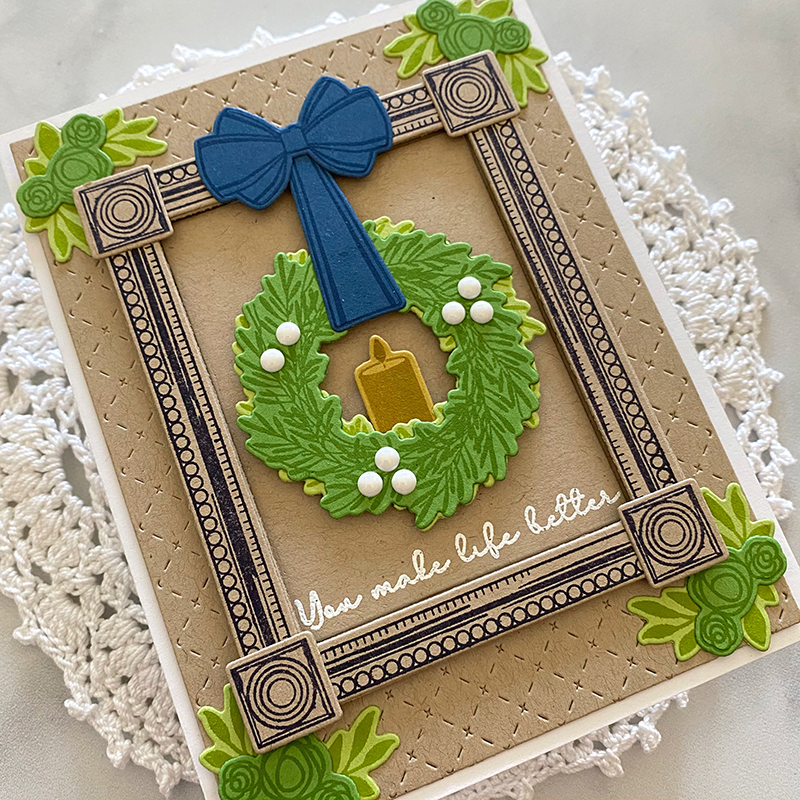
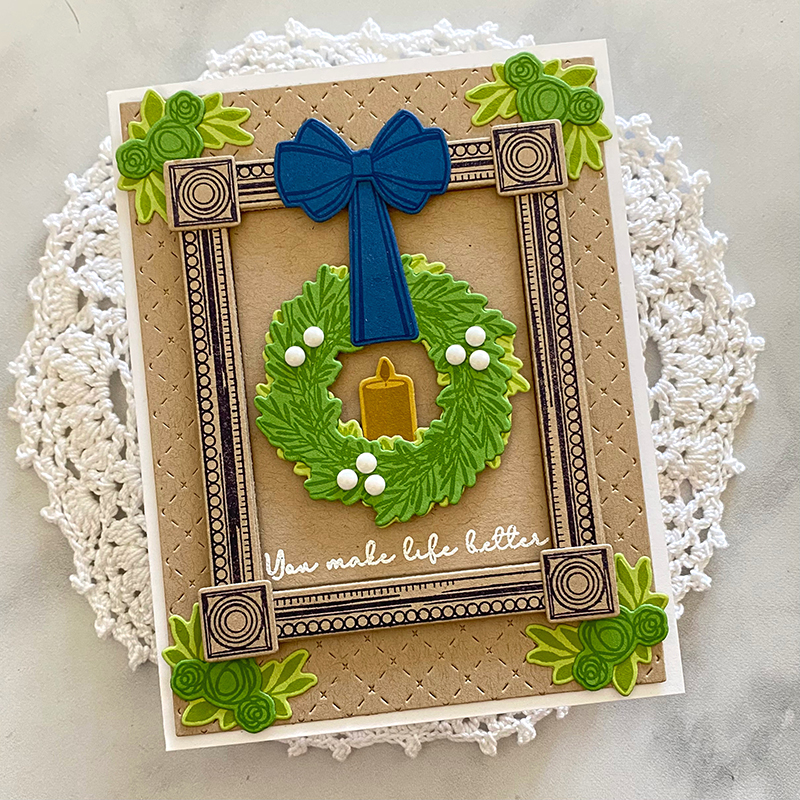
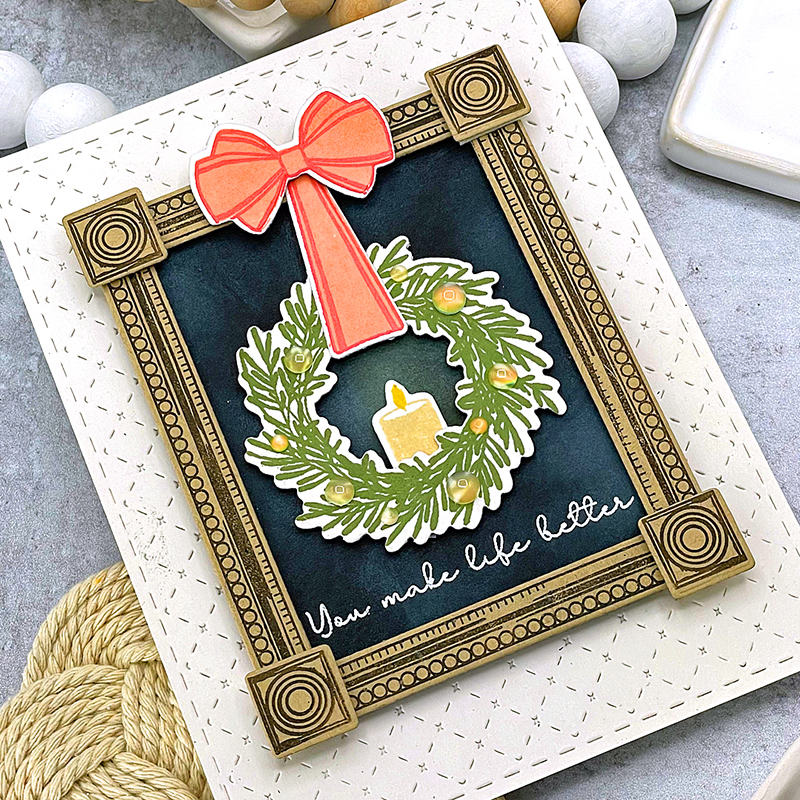
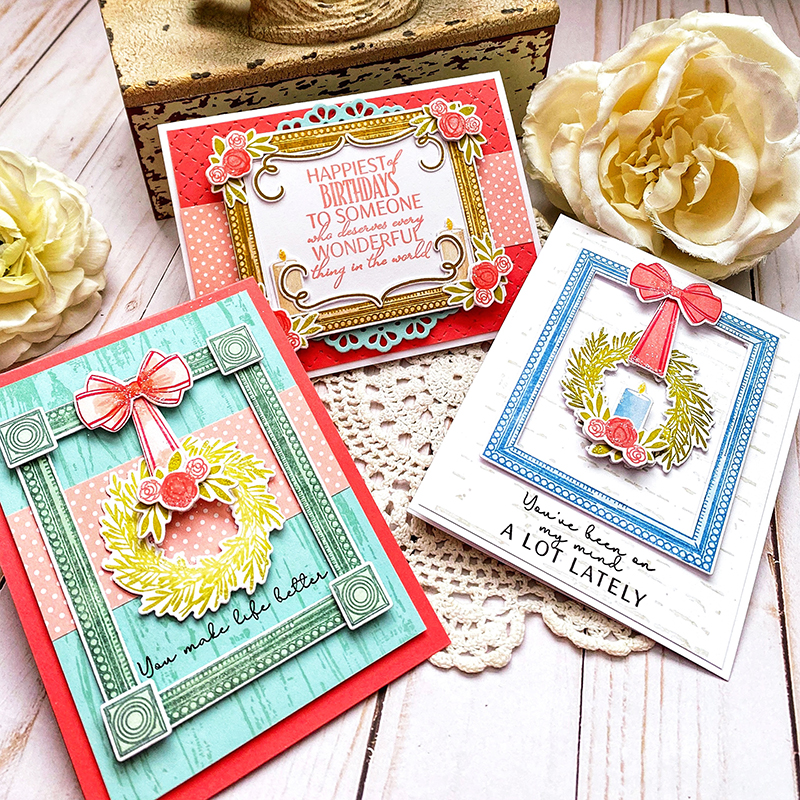
Introducing the new Frame Decor stamp set and dies. Isn’t this new set cozy and sweet? Wait until you see all of the fun things you can do with it.
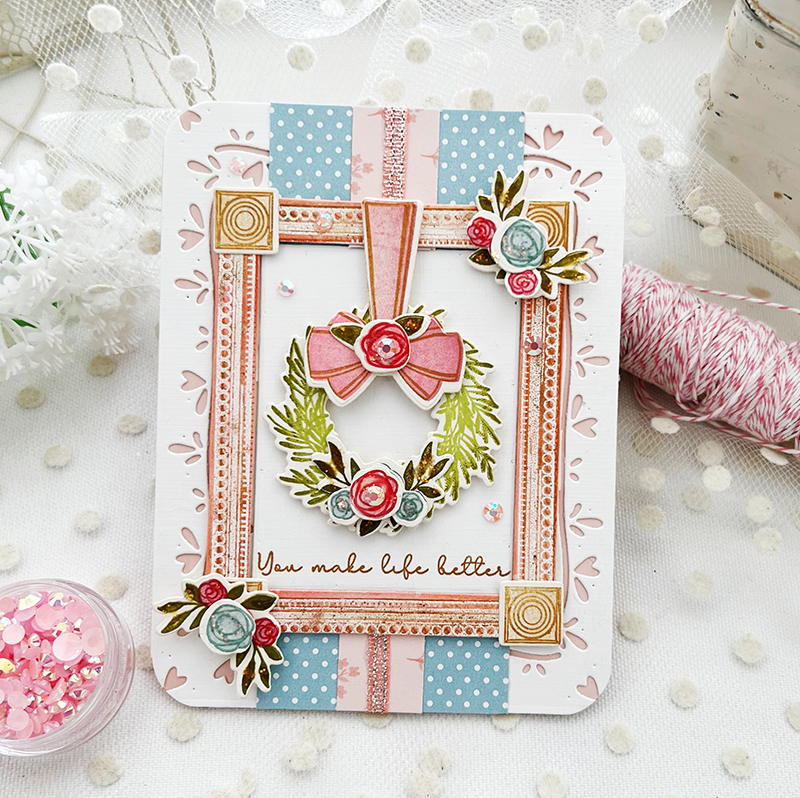
The frame in this set is so elegant and classic. I wanted to shabby my frame up a bit so I cut it from Sweet Blush cardstock and then stamped the image using watermark ink. I then heat embossed it using white embossing powder. To create the aged feel, I used a bronze metallic crayon from the Tim Holtz Metallic Crayons Distress Set. I gently swiped the crayon across a paper towel and then rubbed it over the embossed areas. I love how it turned out.
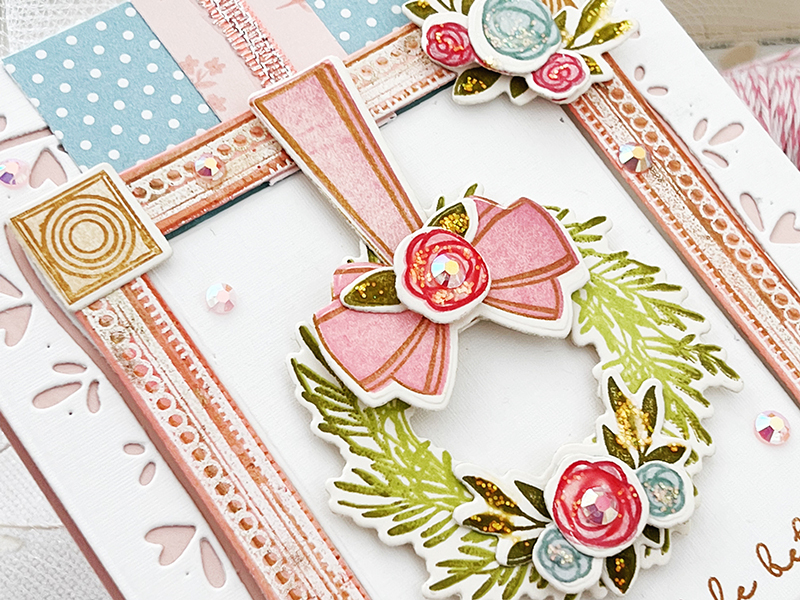
I think you’ll love the tiny roses, wreath, and leaves just as much as I do. You can layer them, stamp then in a single layer, and mix and match their sizes. This delightful set also comes with candles you can place inside the wreath, scrolls to add more detail, and more.
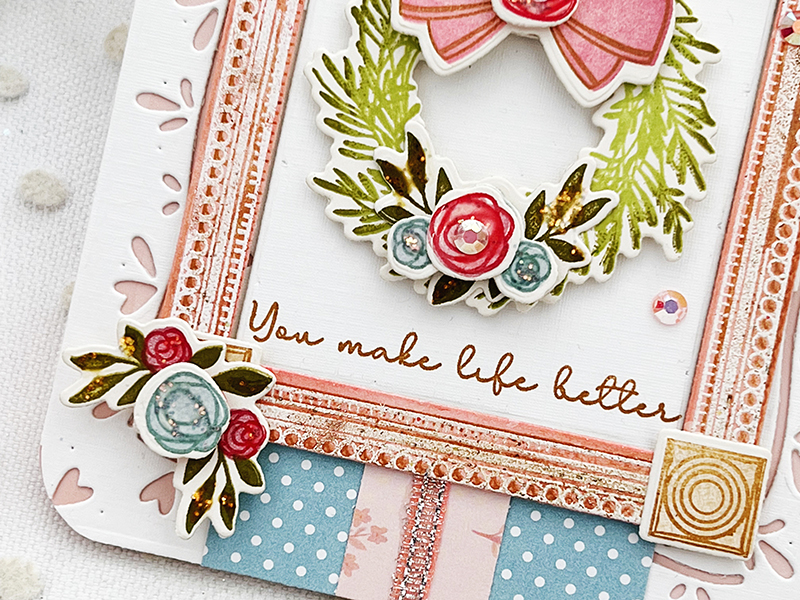
It’s kind of hard to pick which sentiment from this set to use…they’re all so beautiful and sweet. I selected this simple phrase to fit beneath my wreath. And you might notice that I can’t put down my Border Bling: Blooming Hearts die…it’s just irresistible. I used it once again in the background and added a strip of Bitty Big Spring Rain paper down the center of my card to tie in all of the colors used in my flowers.
Sit back and enjoy what our designers have ready for you…you’ll adore each one!
SUPPLIES USED:
STAMPS: Frame Decor
INK: Spring Rain, Autumn Rose, Sweet Blush, Honey Nut, Green Parakeet, Ripe Avocado, Hibiscus Burst, Ocean Tides, Pure Poppy, Fine Linen
PAPER: Sweet Blush, Stamper’s Select White, Bitty Big Spring Rain
DIES: Frame Decor, Border Bling: Blooming Hearts
OTHER: ribbon, adhesive gems, Tim Holtz Distress Crayons, corner rounder, watermark ink, white embossing powder

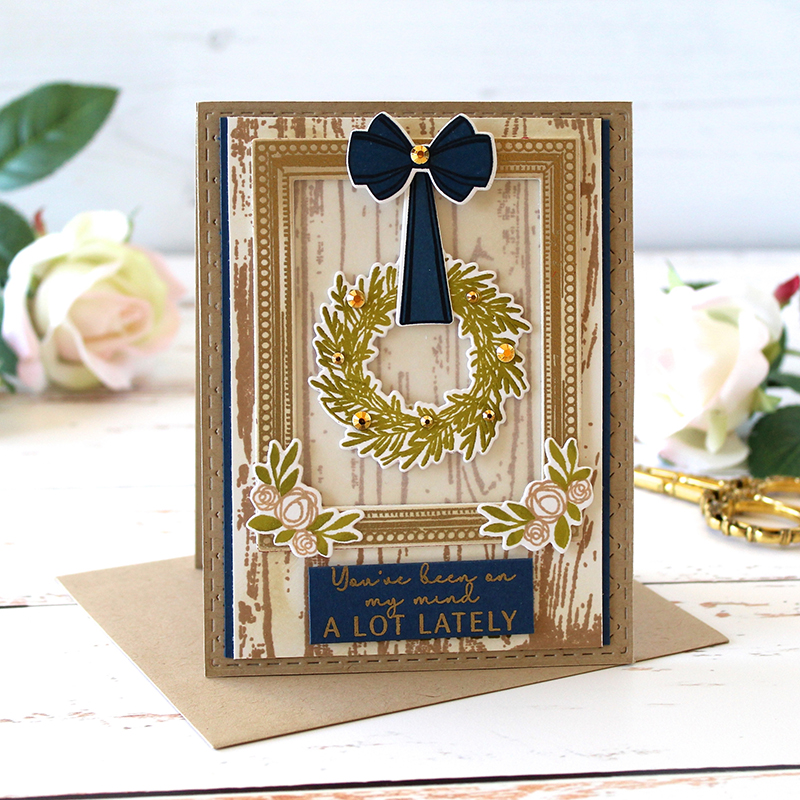
TIPS:
- Use colored cardstock and coordinating ink to create a tone-on-tone look.
- Add foam adhesive behind your frame and wreath to give it some dimension and depth.
- Add white enamel dots (or another color) to your wreath to look like berries.
- Use the small flowers and leaves included in the set to frame your card panel or your frame.

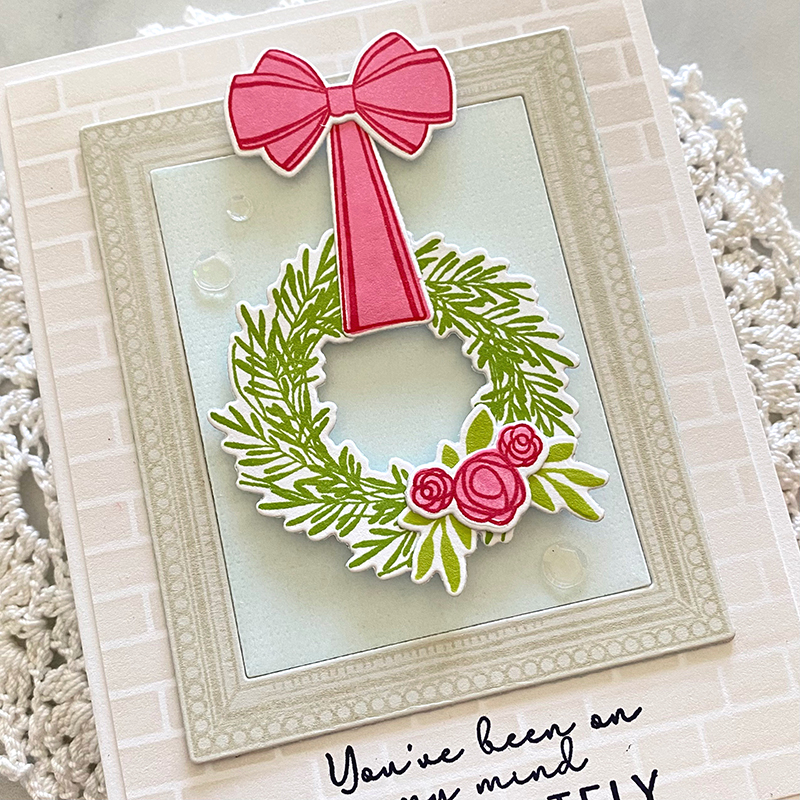

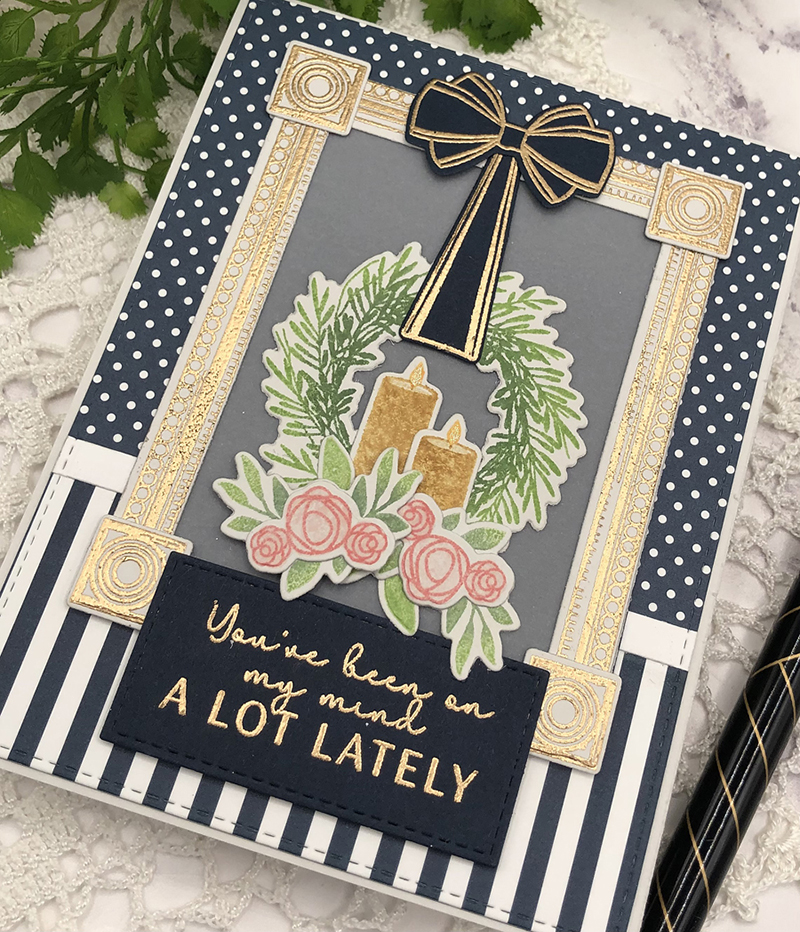
TIPS:
- Use a brick stencil to create the appearance of a wall for your card panel.
- Die cut your frame from Soft Stone cardstock and stamp the detail of the frame with Soft Stone ink for a tone one tone look.
- Ink blend the inside piece of your frame with Hawaiian Shores ink. Layer it with a piece of vellum to give it a softer look.
- Add clear sequins to your card for an added detail.
We hope you have enjoyed all the creations that we have shared with you today! We would love to hear your initial thoughts on everything we introduced! Please leave a comment on this post to tell us what you think of the new products, and you will be eligible to win big!

Leave a comment today and you’re automatically entered to win a $50 Papertrey Ink or Ink to Paper gift certificate! You have until 7am ET, January 24th to leave your comment and be eligible to win. Only one comment per person please. One randomly selected winner will be posted on the January Release Winners Page by 10PM ET on January 26th.


Leave a Reply