


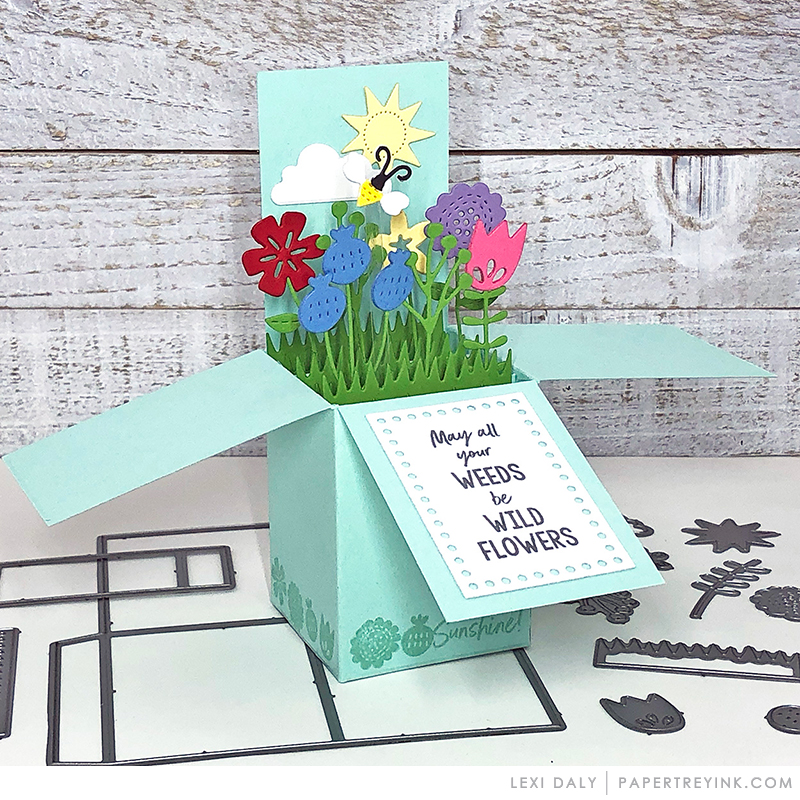
 “In this class you will create a paper garden in a pop-up box card. Folded flat for mailing, the recipient will be able to open the card to a 3D garden of die cut flowers – a colorful way to say thank you, happy birthday, or a happy hello. No weeds here, just whimsical wildflowers!”


- 2 large box halves + 2 box tabs in aqua mist*
- 1 long panel + 1 small panel in white*
- 6 grass strips in new leaf and/or green parakeet
- an assortment of stems in new leaf and/or green parakeet
- an assortment of flowers
- a bee and/or butterfly
- a cloud and a sun
- a narrow strip of clear cardstock or scrap acetate
1. Add score tape to the flaps on the box halves and tabs and pre-fold score lines except for one that will become the back panel. For me, this was one of the panels next to a tab, and will become the third panel in the next step.
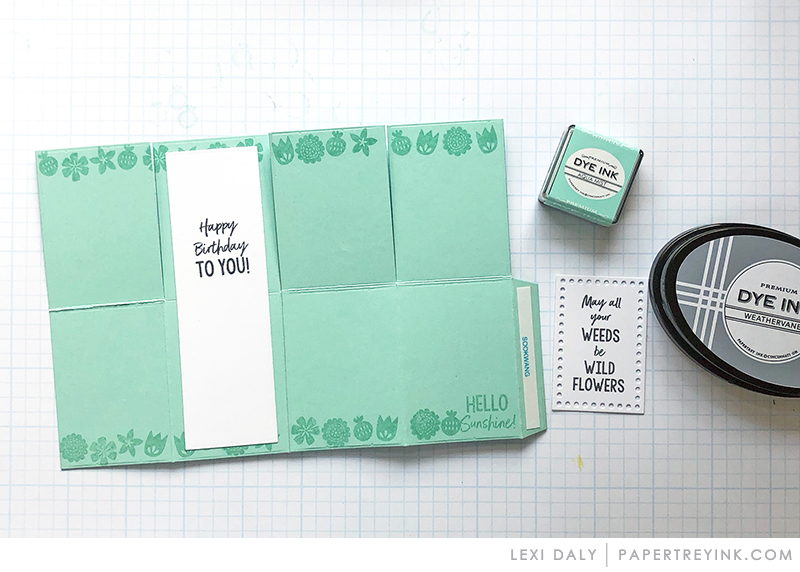 2. Line up and adhere one box half to the other – with one tab only for now. Stamp outside if desired. This is also a good time to stamp and add the long white panel to the back of the back panel. This keeps the back from folding and is also where you might sign the card. Set aside.
3. Assemble flowers onto stems. I like to layer the stem between two flower tops for stability and a more finished look.
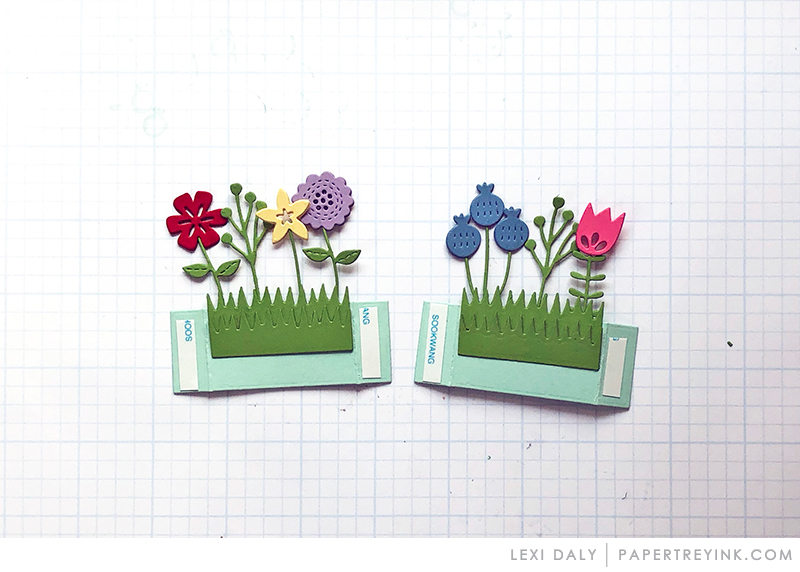 4. Add score tape across both tabs – line up flowers above them as desired. Once the layout is decided, stick them into the score tape. Pay attention to height – you want a good portion of the stem to be attached to the tab. Once set, adhere grass over the stems on the tab. I like to layer two offset for interest and maximum coverage.
 5. With the box open flat in front of you, adhere grass to match your tabs over the fold. When flat, the back panel should be the third one. Fold the left side of each tab and adhere only that side of each to the box equally between the folds of the second panel, with the top of the tab lined up carefully just below the horizontal fold line.
6. Fold the left panel over to the middle. You should now have three tabs lined up pretty evenly on the right. Remove the adhesive covers and carefully fold the right panel on top of the open adhesive and press firmly.
7. Open gently and fold carefully on the opposite fold, which should also fold flat, and will be the front of the folded box.
 8. Adhere a cloud and sun near the top of the back panel. Then attach a bee and/or butterfly to a thin strip of clear cardstock and decide on placement now that your garden is assembled. The clear cardstock allows the insect to fly above the flowers! Add score tape to the end and gently press into place behind the desired tab, then fold box to press into place more firmly.
 9. Fold flat to fit in standard envelope, open to pop up and enjoy!
- Garden Whimsy Box Die Collection
- Garden Whimsy Mini Stamp Set
- Miscellaneous Cardstock
- cut in 1/2 sheets – 2 aqua mist, 1 new leaf, 1 green parakeet
- small pieces to cut flowers – pure poppy, orange zest, summer sunrise, lemon tart, bright buttercup, blueberry sky, winter wisteria, hibiscus burst, white, etc.
- cut in 1/4 sheets – 1 clear or extra acetate inserts
- bone folder
- markers (to color bee and add details to flowers if desired)
- ink pads or cubes (for sentiment panels)
- adhesive
- 1/2″ score tape
- 2 way glue pens
CLICK HERE to visit Lexi’s blog
 CLICK HERE to view our live broadcast from Cincinnati!

- Now it’s your turn! Create a pop-up card project. You can choose to re-create the exact project from Lexi above or design your own using the same concepts. Your project must also incorporate at least one Papertrey product.
- Post your project on your blog, in your gallery, Instagram or on any other photo-hosting site (such as photobucket or flickr).
- Add your project to the InLinkz list below.
- You will have until 7am ET, Thursday, August 30th, to add your link to the list to be eligible to win. One project per person please.

- One randomly selected winners will be chosen from all of the InLinkz entries on this post on Thursday, August 30th. The winner will be posted on our Stamp-A-Faire 2018 Winners Page after 9pm ET on Thursday night . The randomly selected winner will get a $20 PTI gift certificate to spend however they like!
- One randomly selected winner will be chosen from the comments of this post on Thursday as well. You will have until 7am ET, Thursday, August 3oth to add your comment and be eligible to win. The randomly selected winner will get a $10 PTI gift certificate.
Leave a Reply