
Hi folks! It’s Rebecca back with you today and I have a colorful and kid-friendly packaging post for you this time around. I’m talking about confetti and kids’ presents! From boys to girls of all ages, I’ll show you some quick and easy–and super-fun!–ways to wrap for the kids.

The basics of the following gift wrap examples involve lots of circles–the confetti pieces, if you will. I used a 1/4″ hole punch, along with a 1/2″ and 1″ hole punch. You don’t have to stick to my sizes–there are lots of circle dies in Papertrey Ink’s catalog that will also accomplish this task. Also, don’t feel that you need to use only circles; try hearts, stars, and other basic shapes (or not so basic if you wish). Because I was punching the circles out, I actually let my 7-and 5-year-old help me with this task. (We punched a couple hundred circles altogether, probably, so it was nice to have the help!)

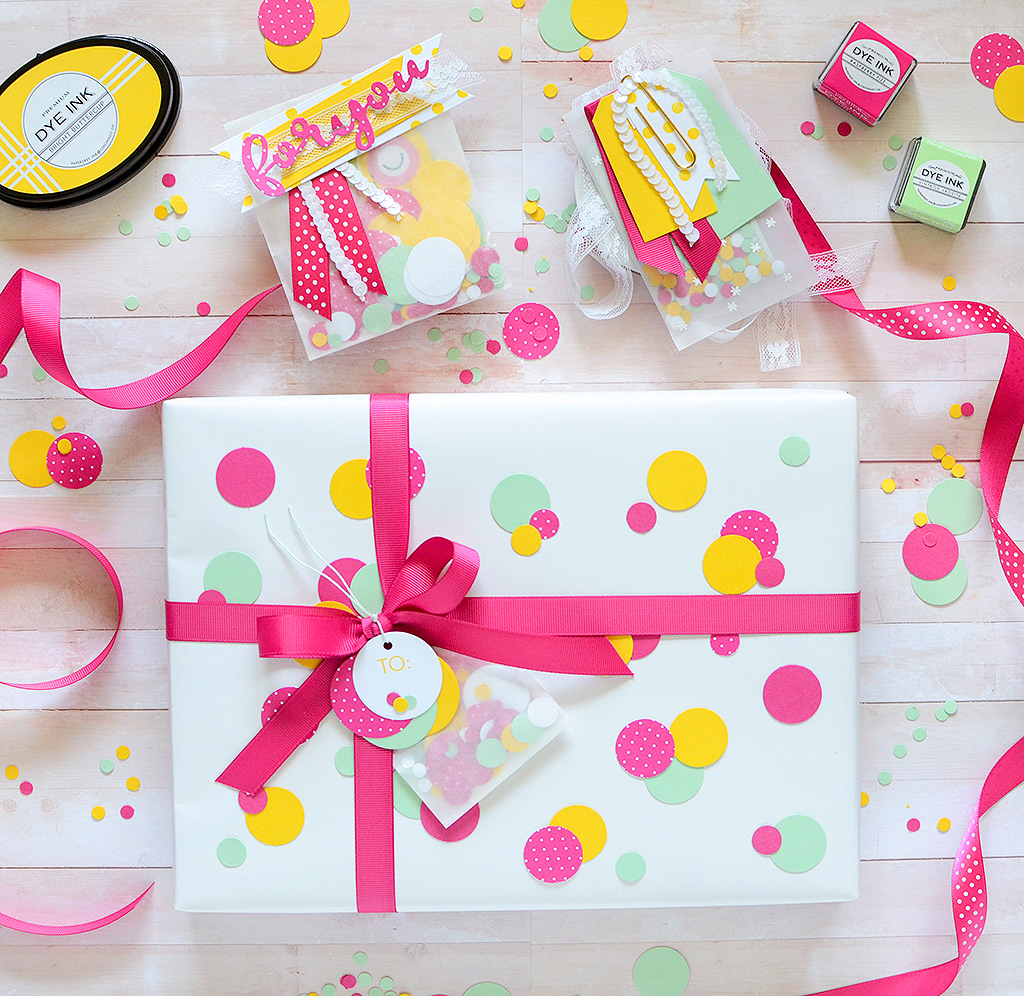
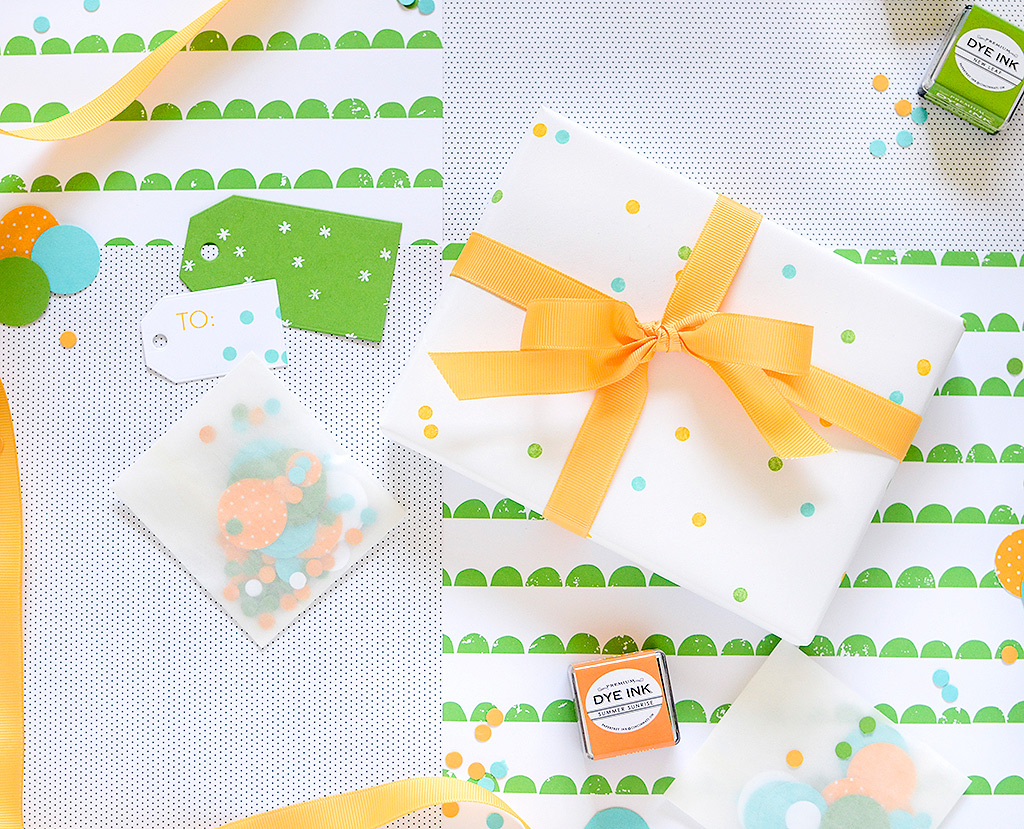
Gift #1: Gift Box With Confetti Wrap
This technique is great because it works with any gift. Not all gifts are small and fit snugly into cute bags or tiny boxes, especially when you’re trying to wrap toys! Start by wrapping your box (any size) with plain wrapping paper. I used white, but any solid color will work. Cut your confetti shapes, whatever they may be, and however you choose to do it, whether you use dies or punches. How many you need will be based on the size of your gift. I cut roughly 10 circles in each size and paper color. For all the girls’ gifts today, I’ve chosen a palette of Bright Buttercup, Raspberry Fizz, and Vintage Jadeite. I punched circles from those three cardstocks, as well as Stamper’s Select White, and some RF Bitty Big paper.
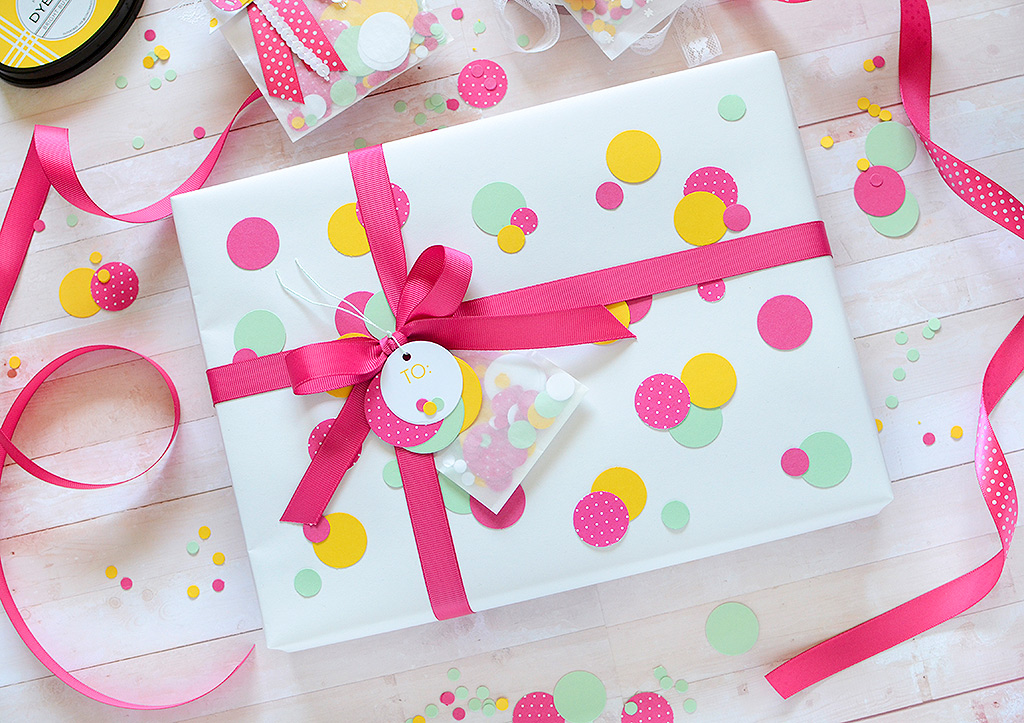 I laid out a pattern of circles on the top of my box, sticking to the 1″ and 1/2″ size circles only. (This is your preference, though.) Then I adhered them in place. I used general craft glue for this.
Tip: Let your children or grandkids help you or do this themselves. They’ll love it!
While I was waiting for the circles to dry, I filled a 3″ x 4″ glassine bag with some more circles. I then simply folded the bag closed and secured with a strip of washi tape. This is meant to be part of my gift topper. I set it aside for a minute.
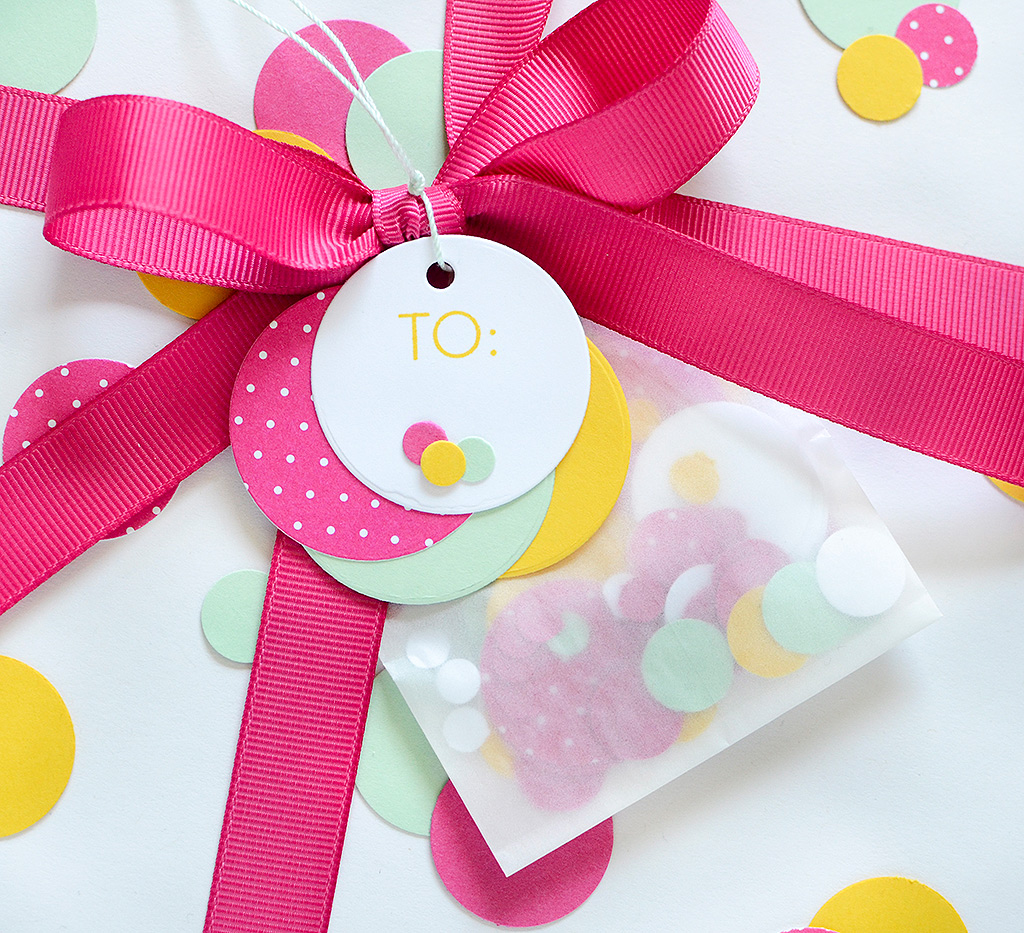 I die cut 4 circle tags from BB, VJ, White, and RF Bitty Dot papers. (The die I used is the one that came in my Good Tidings Gift Wrap Kit.) On the white tag, I stamped ‘TO’, using a stamp from the Keep it Simple: To & From set. I chose that font specifically because the ‘O’ happens to be a perfect circle! I then adhered three 1/4″ circles near the bottom of the tag. Following that, I adhered the four tags together in a confetti-ish layout, then set it aside.
Back to my gift box, I wrapped Raspberry Fizz grosgrain ribbon around it and tied it in a bow. I slid the small glassine bag of confetti underneath, adhering it to the box with a small glue dot. Lastly, I tied on my circle tags with some string.
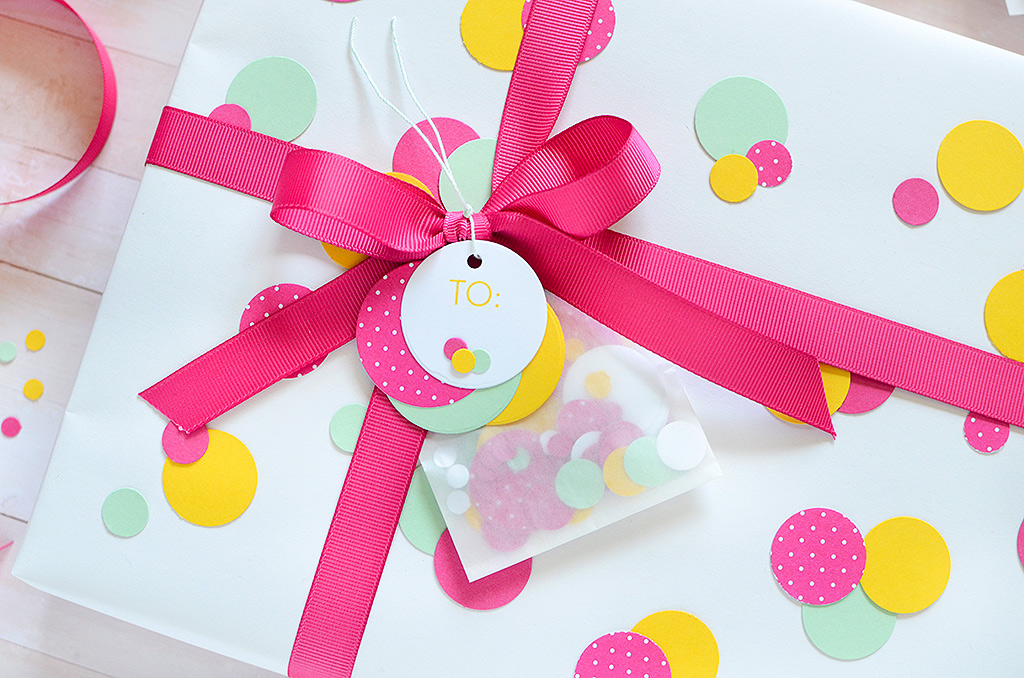 This is a fun way to wrap a gift, and you can even get the kids involved! It works with any size box and you can choose any color scheme and shape theme that suits you.
Supplies:
Stamps: Keep It Simple: To & From
Ink: Bright Buttercup
Paper: Bright Buttercup, Vintage Jadeite, Raspberry Fizz, Stamper’s Select White, Raspberry Fizz Bitty Big
Dies: Circle Tag Die (Good Tidings Kit)
Other: Raspberry Fizz Grosgrain Ribbon, small glassine bags, white wrapping paper, 1/4″ – 1/2″ – 1″ hole punches, mint crochet thread
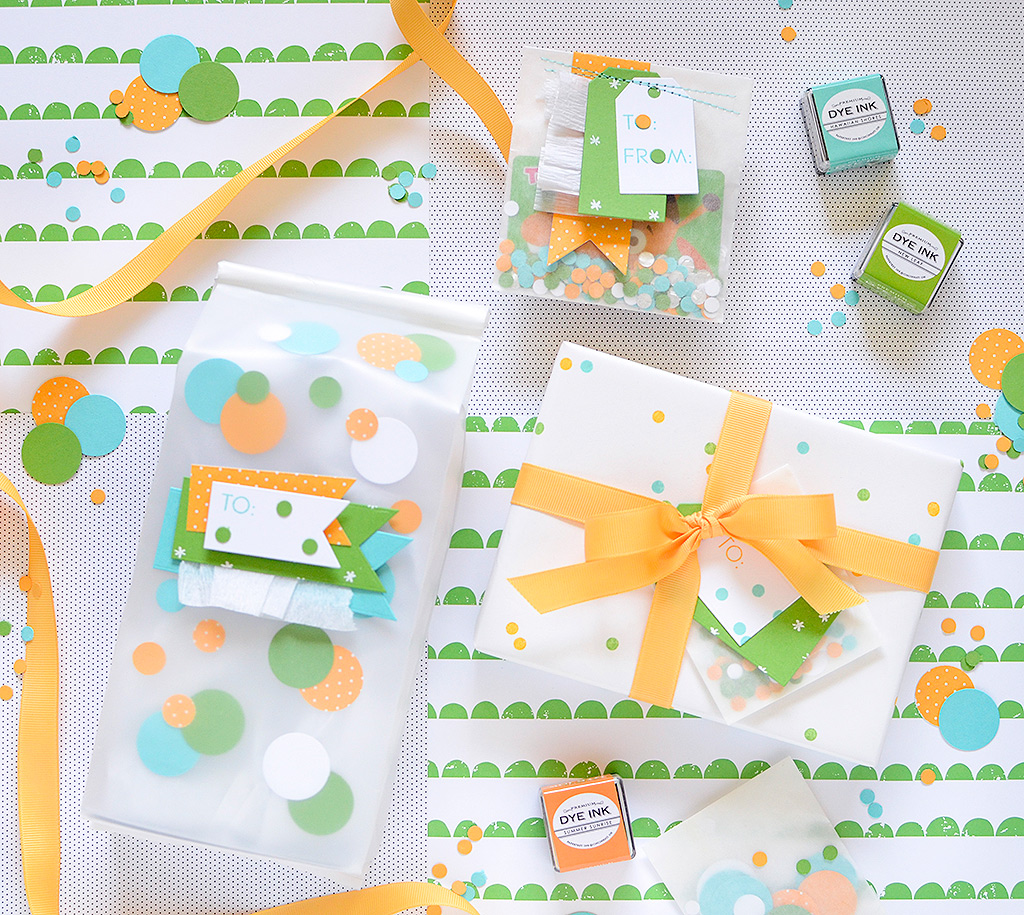
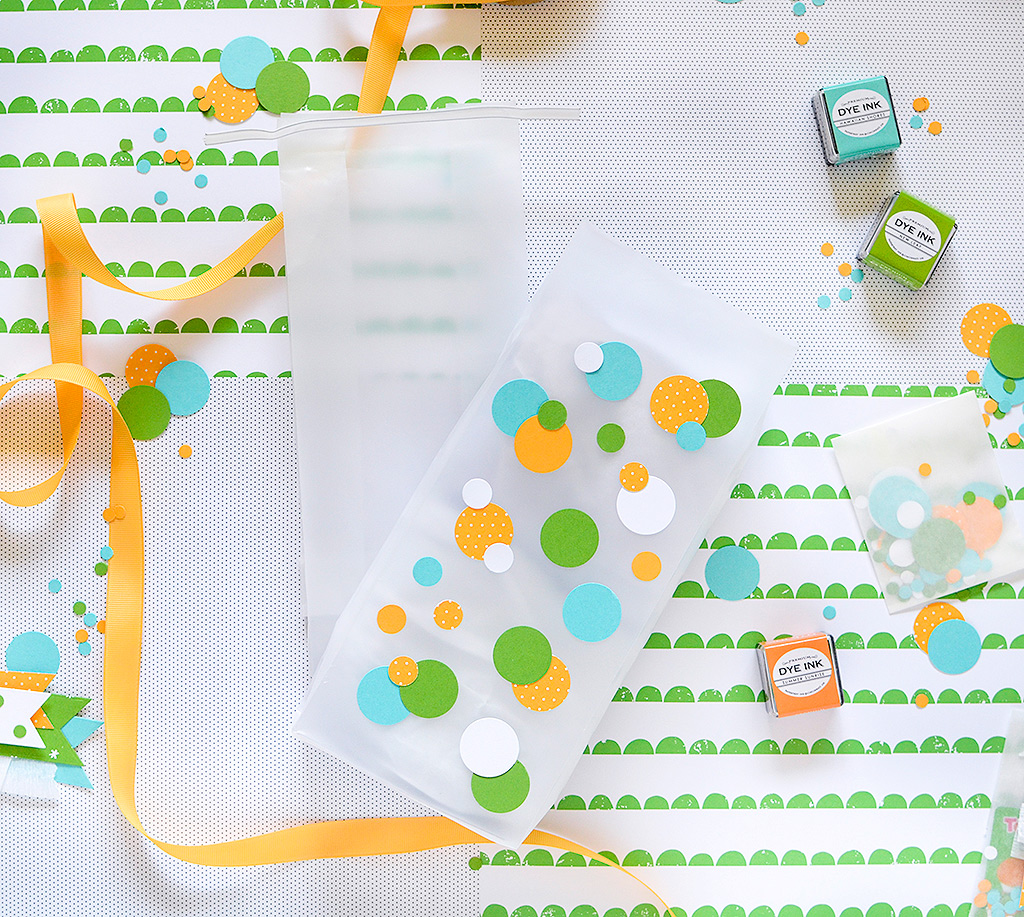
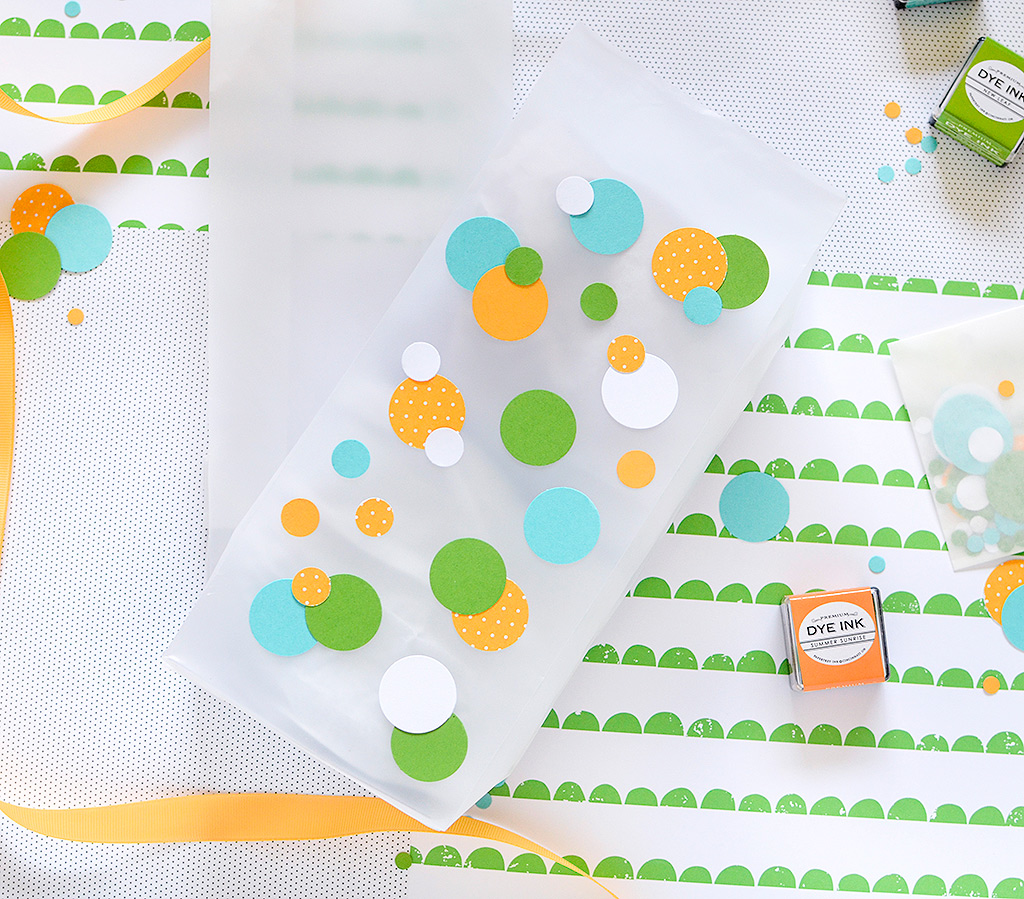
Gift #2: Gift Bag With Confetti Circles
This next gift is a similar concept to the last, but there are some variations. You’ll still be using lots of circles so you’ll need more of them. This color scheme and design is more boyish, but on all of my examples here today, color changes and simple tweaks can be made to suit any recipient. The colors for the boys today are New Leaf, Summer Sunrise, and Hawaiian Shores.
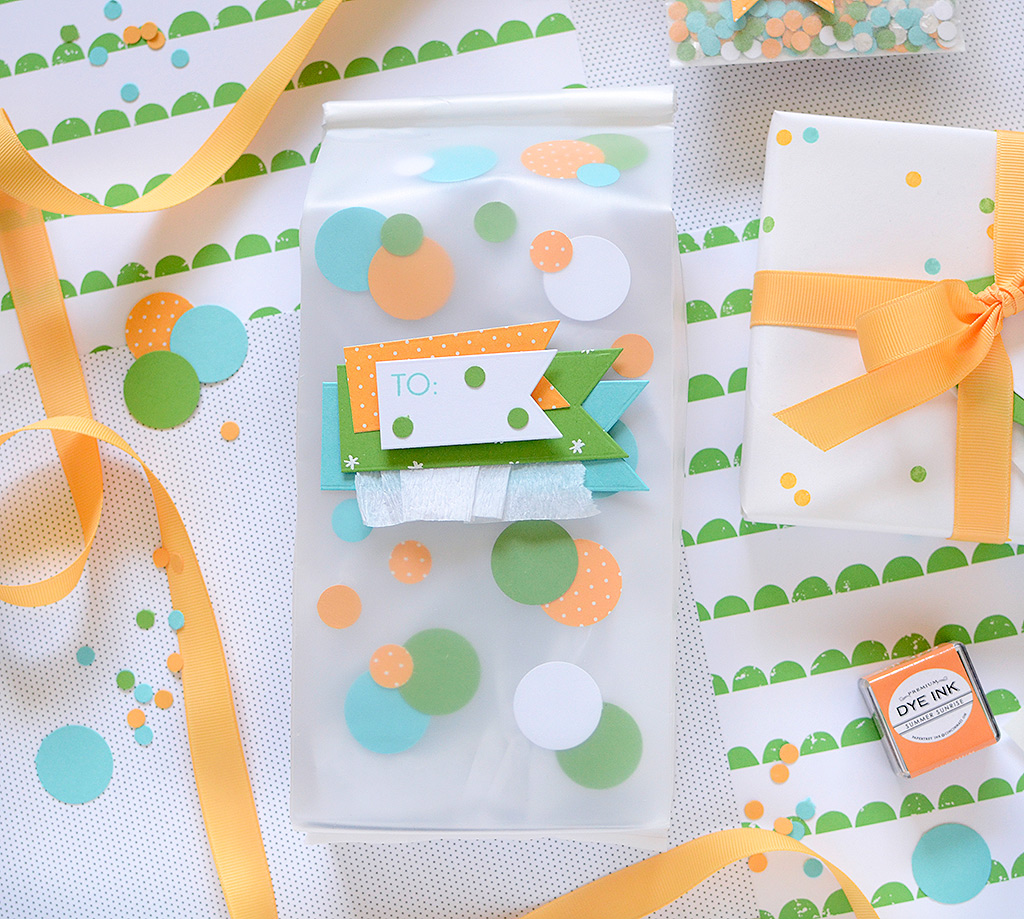 I took 2 large frosted tin tie bags from the PTI shop and removed the tin tie on one of them. It’s not too difficult to remove; there was minor tearing at the top of the bag, but I trimmed it off with my paper cutter for a straight edge. I then decorated that bag by glueing circles to the front of it, much like I did with the gift box. Allow plenty of time for the glue to dry.
When the glue has dried, carefully slide the bag inside the 2nd frosted bag (the one that still has the tin tie on it). You’re double-bagging this, like a brown paper grocery bag. I’ve chosen to double bag it to protect the circles. Since the bag stands vertically, I felt that the circles might fall off more easily than the circles on the box I made. To avoid them getting knocked off, I did it this way instead. I filled my bag with the gift (in this case, it’s art supplies), and folded over the flap.
Tip: Decide how low you’ll be folding your bag over and DON’T add circles above that point!
 To create the tag on the front of the bag, I trimmed some paper flags, using the pointed dies from the Paper & Package Large and Small Bows collection. I trimmed off one edge of each flag at different lengths to create varied sizes. I stamped some small stars and embossed them in white on the New Leaf flag (the stamp is from Dream, Fly, Soar!). The Summer Sunrise tag is more Bitty Dot paper. It is from the 2008 paper pad which is sold out online, and while PTI hasn’t released a Summer Sunrise Bitty Big collection, Orange Zest is available, as is Hawaiian Shores if you’d like to substitute. On the white tag, I stamped ‘TO’ again, and added a trio of 1/4″ NL circles.
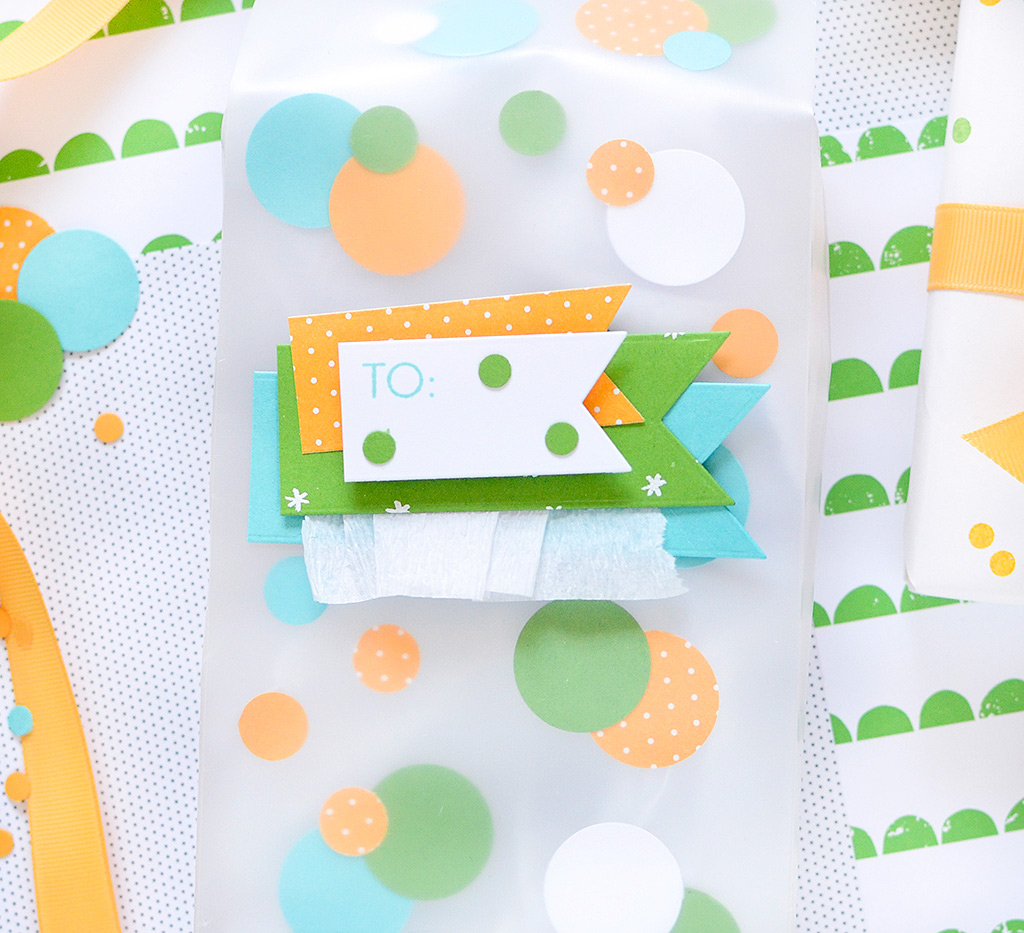 I then adhered them together, sliding in some ruffled white crepe paper for texture, and using 3-dimensional foam dots under the white flag. I didn’t want to add too much more because I didn’t want to cover up the confetti design of the bag.
Supplies:
Stamps: Keep It Simple: To & From, Dream Fly Soar!
Ink: Hawaiian Shores, Versamark Watermark
Paper: Hawaiian Shores, Summer Sunrise, New Leaf, Stamper’s Select White, Summer Sunrise Bitty Dot (2008)
Dies: Paper & Package Large Bow, Paper & Package Small Bow
Other: Large Frosted Tin Tie Bags, 1/4″ – 1/2″ – 1″ hole punches, white crepe paper, white embossing powder
Gift #3: Glassine Bag Gift Card Holder For Girls
The next 3 gifts are gift card holders which I still will often give them to kids, especially the ones I don’t know too well (from school). This means that different options for gift cards is welcomed!
Let’s begin with a gift for girls…
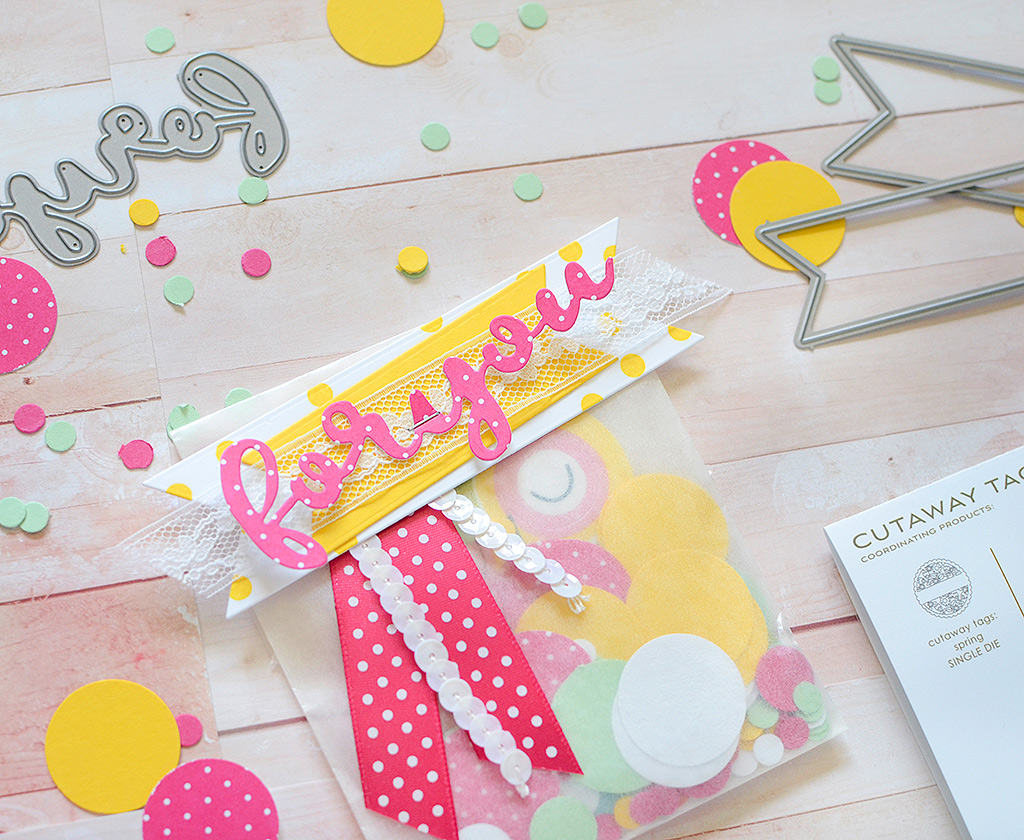
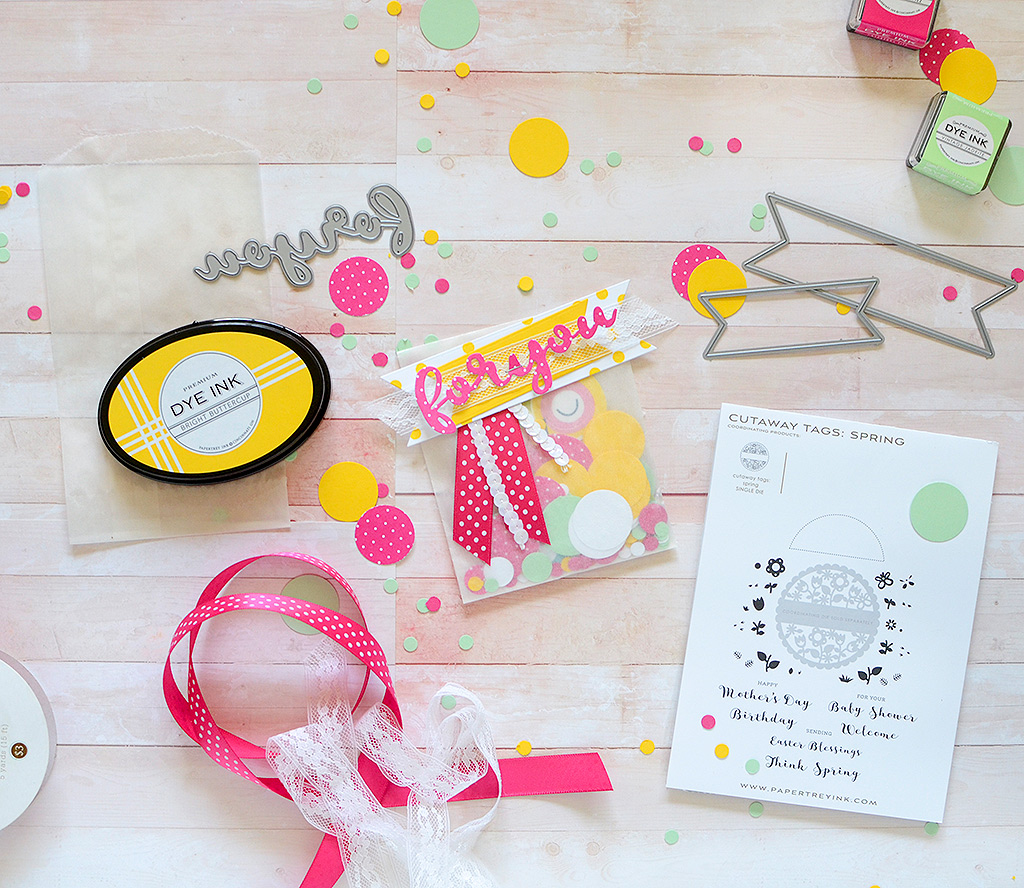
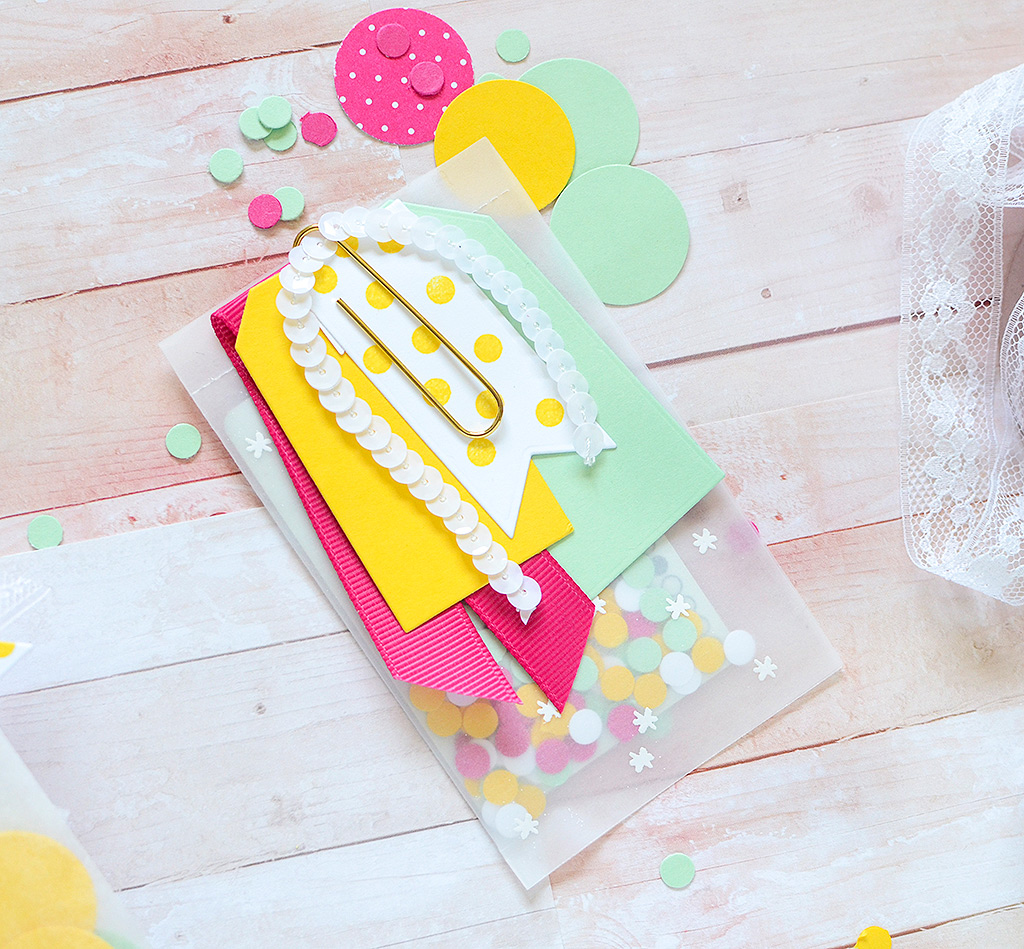
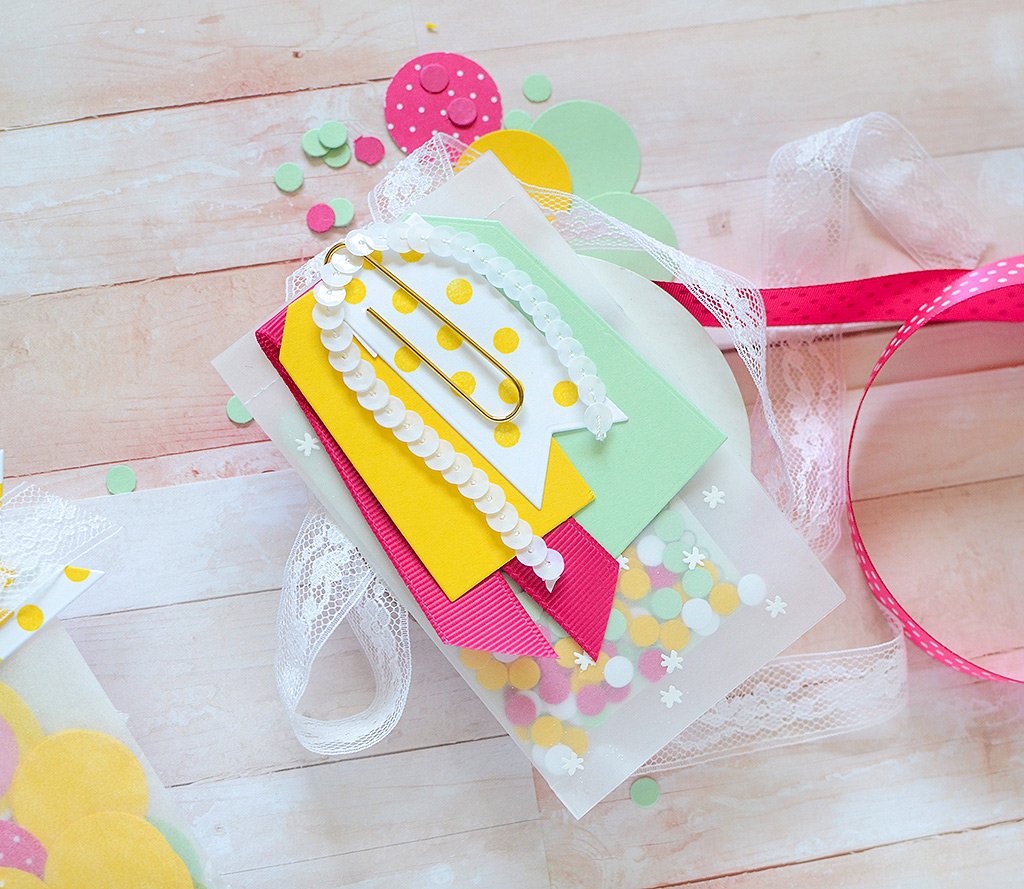
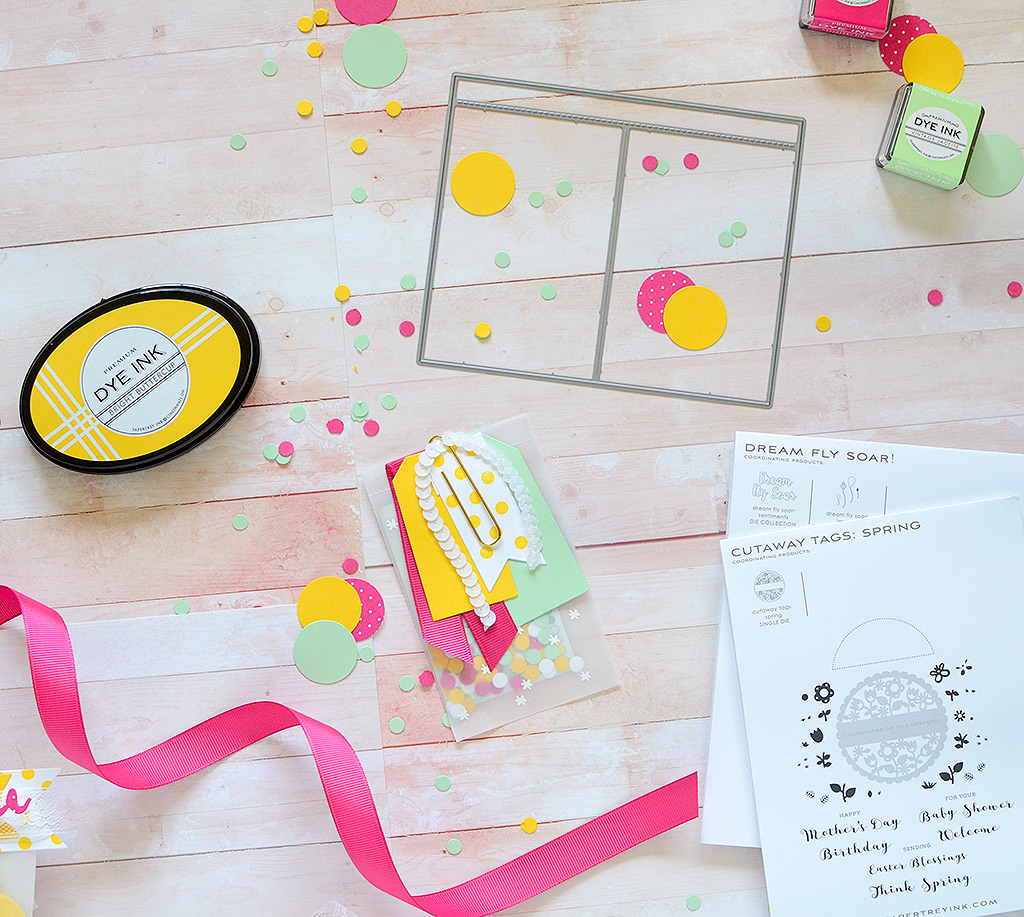
The medium glassine bags from the PTI shop are the perfect size for gift cards. A simple way to liven them up is to fill with your confetti mix (lots of colored circles in this case), add your gift card (Target for the win), fold closed, and decorate.
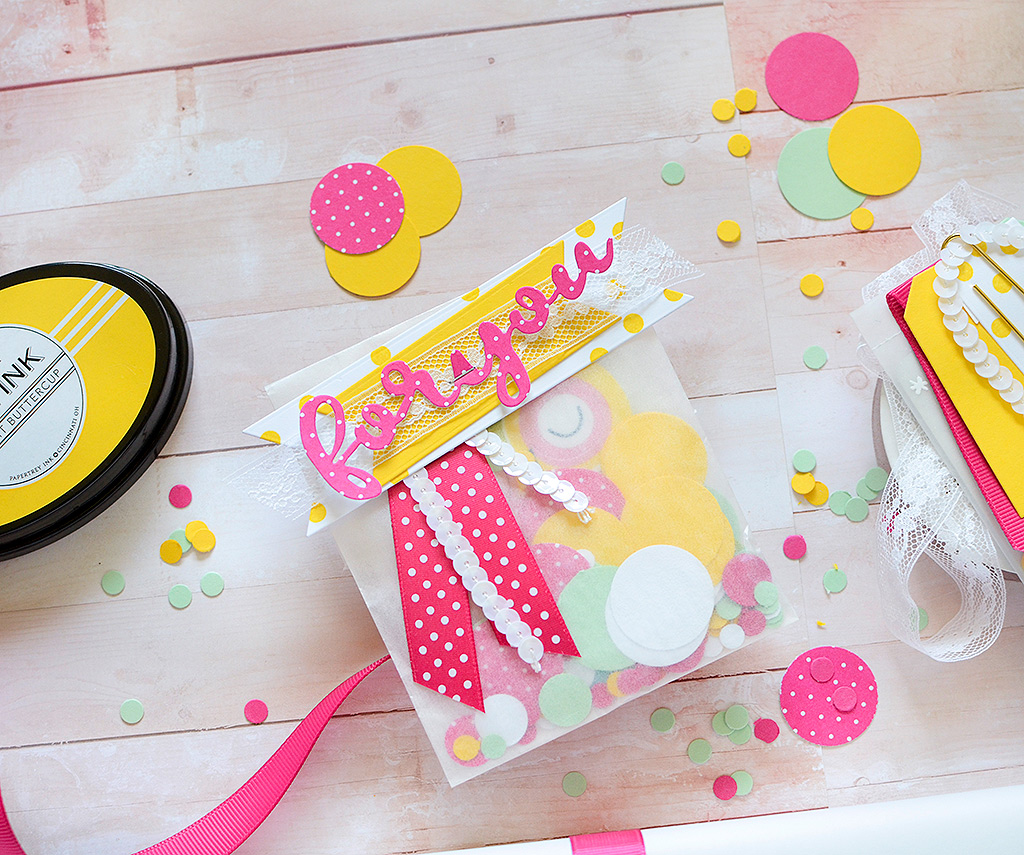
I used more banner flags as a base across the top of the bag, this time with some stamped dots in Bright Buttercup ink. The small dot stamp comes out of the Cutaway Tags: Spring set. I cut a smaller banner out of Bright Buttercup, as well as ‘for you’ out of Raspberry Fizz Bitty Big paper. There are some added trims like RB Swiss Dot satin ribbon, some sequins, and lace.
Supplies:
Stamps: Cutaway Tags: Spring
Ink: Bright Buttercup
Paper: Bright Buttercup, Raspberry Fizz Bitty Big, Stamper’s Select White, Vintage Jadeite, Raspberry Fizz Cardstock
Dies: Paper & Package Large Bow, P&P Small Bow, You Deserve Flowers Sentiments
Other: Medium Glassine Bags, raspberry Fizz Swiss Dot Ribbon, lace, sequin trim, mini staples, 1/4″ – 1/2″ – 1″ hole punches
Gift #4: Glassine Bag Gift Card Holder For Boys
Here I’ve made a similar sample for boys, using the same gift bags. I filled this one with only 1/4″ punched circles instead of using any of the larger ones. In addition to my array of boy-themed hues, I added a few punched tin foil ones, too. (There was quite a bit of sharpening-by-foil going on due to all the paper punching the kids and I were doing!)
 Again, I used the larger banner die, cut from Summer Sunrise Bitty Dot paper, and folded it over the top of the bag. I added a ruffled strip of crepe paper, and then cut a New Leaf tag with the Fillable Frames #9 tag die. I had some embossed NL cardstock left from the previous boy’s gift so I trimmed it out of that. I can’t really add all the pretty ribbons and lace to the boys’ wrappings so the subtle embossed images add interest without taking away from the confetti fun inside the bag.
The top tag is the smallest die in the Paper & Package Essential Tag #1 die collection, and is trimmed from white stock. I stamped ‘TO’ and ‘FROM’ in Hawaiian Shores ink and stuck 1/4″ circles to the O’s–they were the perfect size and I’m always on the lookout for small details like that!
 The final step for this gift card holder was to add some stitching. This is completely optional but, again, I couldn’t add ribbons so this was a way to gain a little more detail and color. I chose a turquoise blue thread from my stash which is very similar in shade to Hawaiian Shores and I made a criss-cross stitch pattern. If you’d rather not stitch, try a clip or a clothespin to hold the items in place.
Supplies:
Stamps: Keep It Simple: To & From, Dream Fly Soar!
Ink: Hawaiian Shores, Versamark Watermark
Paper: Hawaiian Shores, Summer Sunrise, New Leaf, Stamper’s Select White, Summer Sunrise Bitty Dot (2008)
Dies: Paper & Package Large Bow, P&P Essential Tag #1 Collection, Fillable Frames #9
Other: Medium Glassine Bag, 1/4″ hole punch, white crepe paper, thread, white embossing powder
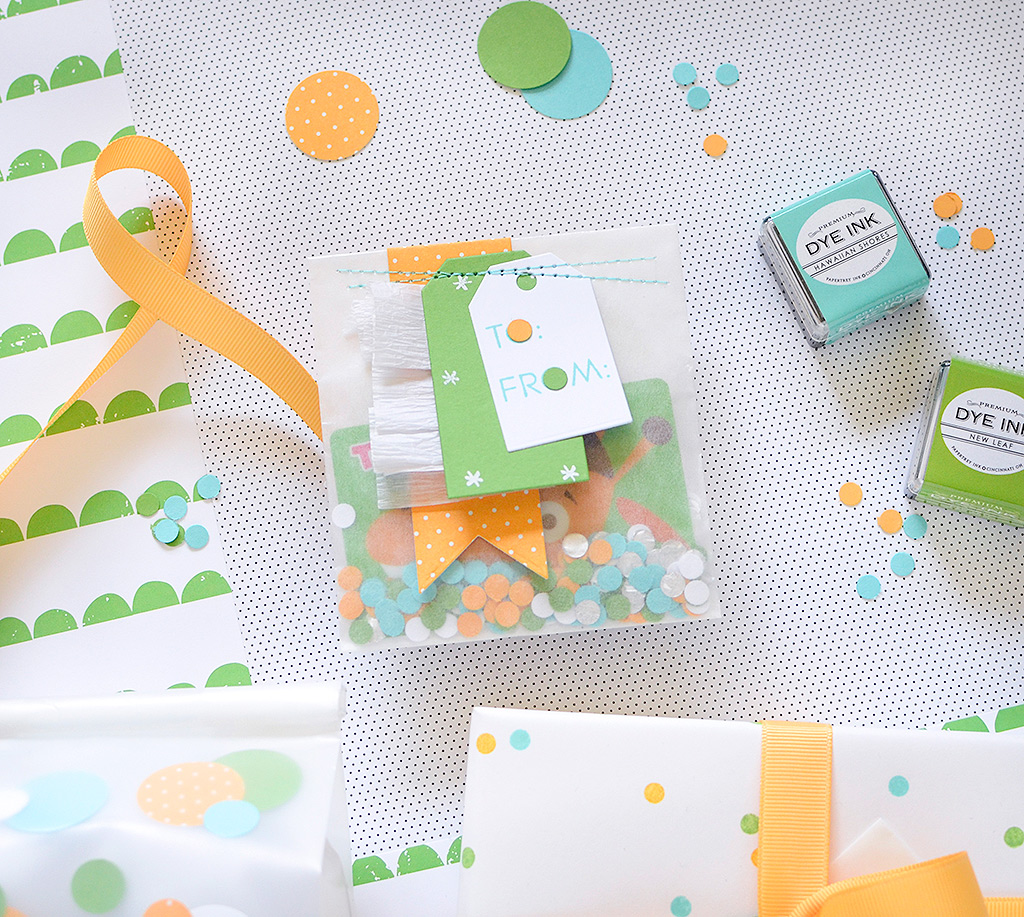
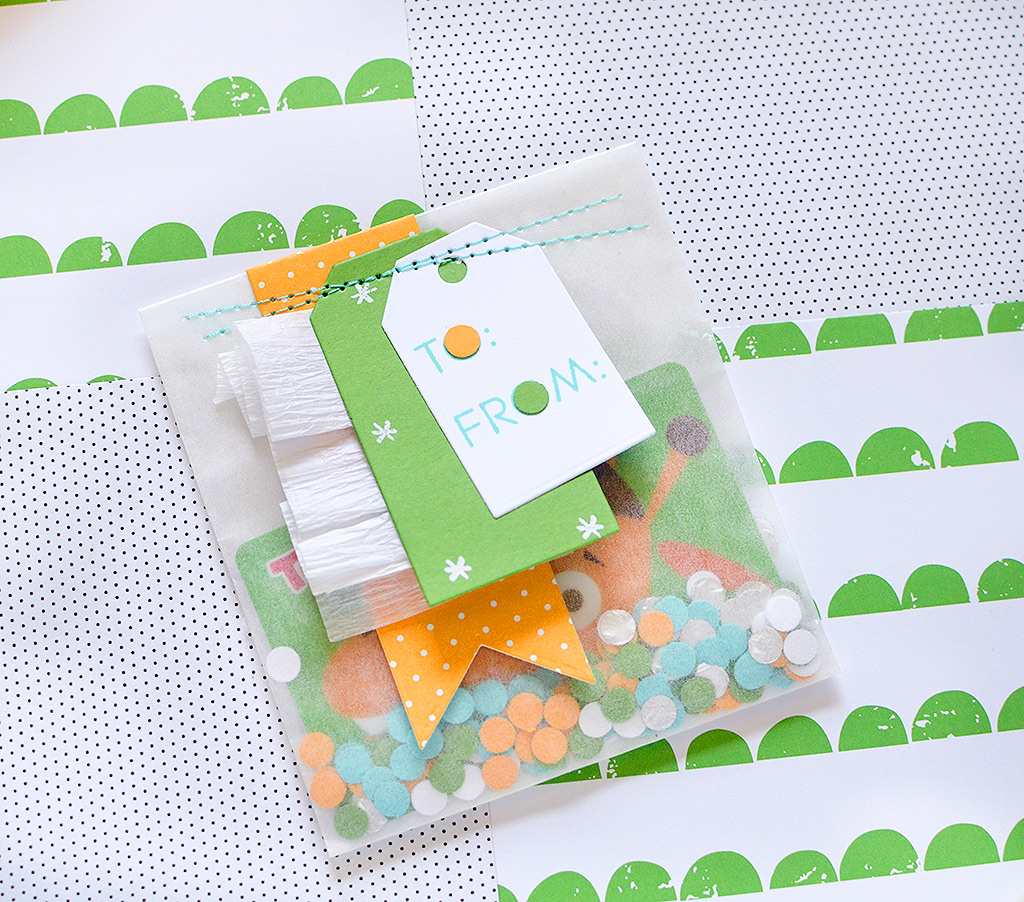
Gift #5: Tearaway Gift Card Holder
I chose to make a Papertrey Ink gift card holder with vellum for this one. It’s along the same lines as the glassine bags, but this is an actual gift card holder. I used the Tearaway gift card holder die that came in the Good Tidings Holiday Kit. I opted to adhere it closed instead of stitching it closed, but remember that that is another option.
 I trimmed the holder from Stamper’s Select Vellum and then stamped and embossed the little star pattern on it like in the previous segment. After filling the inside with a colorful mix of 1/4″ confetti circles and a gift card, I adhered it closed.
 I cut some tags from Vintage Jadeite and Bright Buttercup, followed by a small banner from white paper. I added a few polka dots to it and clipped the set, along with Raspberry Fizz grosgrain ribbon and some sequin trim, to the gift card holder with a gold clothespin. Once I’m ready to give this away, I’ll include the name of the recipient on the yellow tag.
 Supplies:
Stamps: Cutaway Tags: Spring, Dream Fly Soar!
Ink: Bright Buttercup, Versamark Watermark
Paper: Bright Buttercup, Stamper’s Select White, Vintage Jadeite, Raspberry Fizz Cardstock, Stamper’s Select Vellum
Dies: Tearaway Gift Card Holder from Good Tidings Kit, Fillable Frames #9, Paper & Package Small Bow, P&P Essential Tag #1 Collection
Other: Raspberry Fizz Grosgrain Ribbon, 1/4″ hole punch, sequin trim, paperclip, white embossing powder
Gift #6: Hand-Stamped Confetti Dot Gift Wrapped Box
And we’ve made it to the last gift sample! Are you still with me?! This features one of my favorite wrapping techniques, which is making your own gift paper from ink and stamps. I took plain white wrap and used my dot stamp to create a cute pattern in Summer Sunrise, Hawaiian Shores, and New Leaf inks. You don’t have to stick to the small dots, either–use circles in a variety of sizes, or even the Confetti Toss set from PTI.
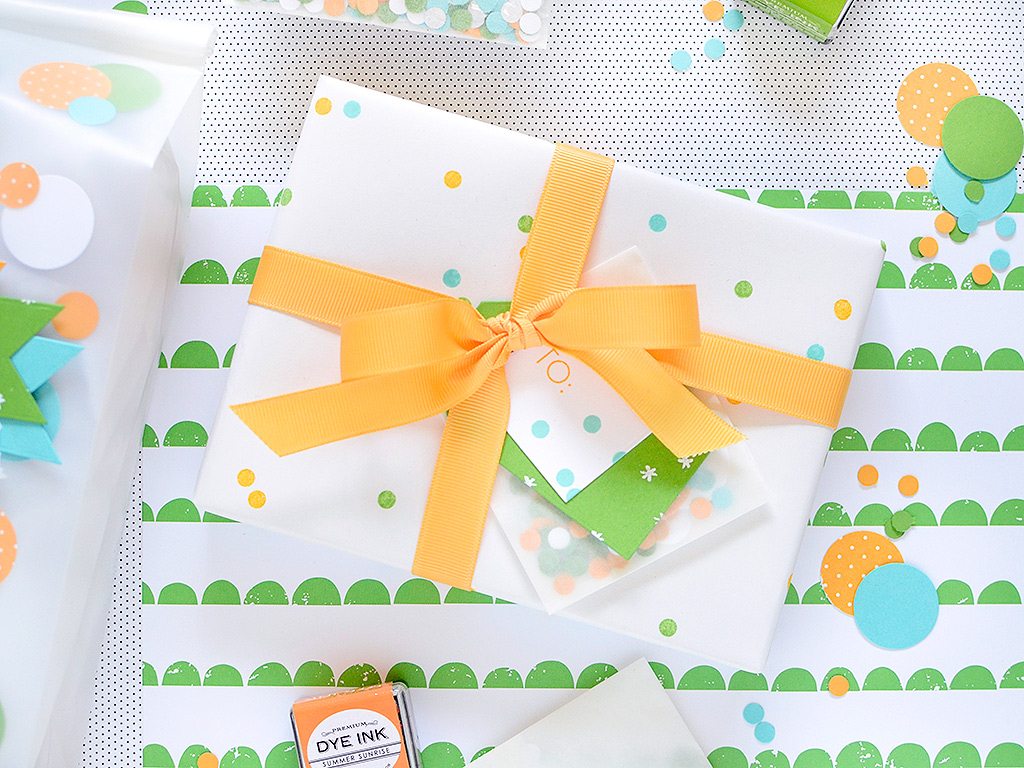
After I wrapped up the box, I tied Summer Sunrise grosgrain ribbon around it and slipped a small confetti packet under it. I did this with the first box, as well, but this mix is made of the boy shades instead. After that, I added another embossed New Leaf tag, as well as a small Essential Tag in white. On that tag, I stamped ‘TO’ is SS and polka dots on the right half of the tag in HS. I could have used all the colors for my dots to match the wrapping paper, but with the green tag and orange ribbon, HS felt under-represented!
Supplies:
Stamps: Keep It Simple: To & From, Cutaway Tags: Spring, Dream Fly Soar!
Ink: Hawaiian Shores, Summer Sunrise, New Leaf, Versamark Watermark
Paper: Hawaiian Shores, Summer Sunrise, New Leaf, Stamper’s Select White
Dies: Paper & Package Essential Tag #1 Collection
Other: Small Glassine Bag, Summer Sunrise Grosgrain Ribbon, 1/4″ – 1/2″ – 1″ hole punches, wrapping paper, white embossing powder
Are you ready to wrap up some fun kids’ gifts now?! Don’t forget to try and put your own spin on this wrap, too:
– Choose different shapes and sizes; you can make confetti out of ANYTHING!
– Add in some extras like sequins, buttons, beads, or glitter (just be sure it’s going to be age-appropriate as those things shouldn’t be in the hands–or mouths–of very young children)
– Check out the Shakers & Sequins Collection for some more great ideas!
– A fun color scheme will make your packages POP!
That’s it for me today. As always, thank you for stopping by Papertrey Ink on the 6th every month. Your comments are always appreciated! Take care and I’ll see you again in June.

Rebecca!! I LOve waking up to your gorgeousness! So bright, beautiful, and FUN! You make ‘making your own paper’ seem like the normal [and best] thing to do! any tips on where to find this wonderful white wrapping paper?
=]
How pretty and FUN! But I might need to borrow your kids:)
Absolutely darling, festive projects!
Very festive and fun. Who wouldn’t want to receive a gift from you ?
So bright and cheery! Who wouldn’t want to receive these packages! Well done, Rebecca!
I love your cheerful, clever packaging and how you stage your gorgeous photos. Who’d have thought simple circles could be so much fun! Thanks for the inspiration and how-tos!
Just received email today on your most recent wrapping. Love this idea. I have a huge pack of legal size copy paper I bought at a yard sale that I can use. Perfect for small gifts. Thank you. Always nice to find another way to use favorite stamps and paper.