• Skip to primary navigation
  • Skip to main content
  • Skip to primary sidebar
  • HOME
  • SHOP
  • BLOG
  • TEAM
  • Nav Social Menu

    • Email
    • Facebook
    • Instagram
    • Pinterest
    • Twitter
    • YouTube

Papertrey Ink Blog

Clear Stamps, Dies, Paper, Ink, Kits

  • HOME
  • SHOP
  • BLOG
  • TEAM

Feathered Friends 7 + Feathered Friends Mini 7

Just Sentiments: Milestones + Numbers + Just Sentiments: Established + Inside Greetings: Established

Vintage Flair + Vintage Flair Print + Big Balloon + Big Balloon Sentiments + Cover Plate: Big Balloon + Big Balloon Stencils

SAF 2017: Nichole Heady

August 26, 2017      Nichole Heady      106 Comments

6-Nichole

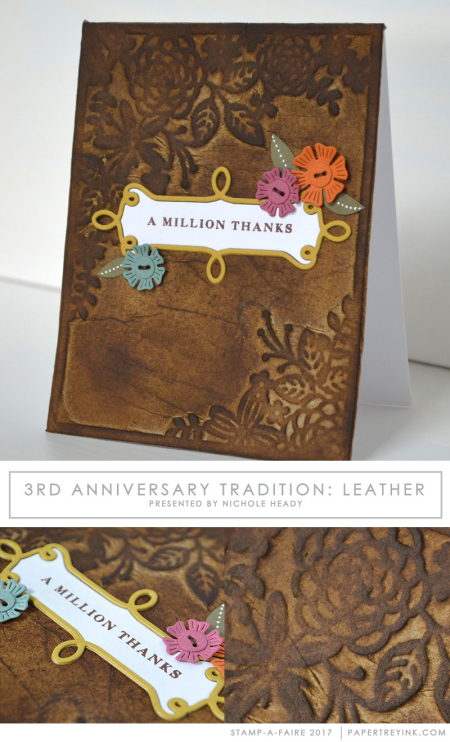
"There is a certain richness and earthiness to embossed leather that makes you want to reach out and touch it, but this type of decorative textile is often very cost prohibitive. Now you can easily and inexpensively recreate this stylish look with your favorite intricate die-cuts and the mere addition of tissue paper! You aren't going to believe how simple this is, and I can't wait for you to see how amazing the results are in person. You're definitely going to want to try this for yourself!"

3rdanniversary_nheady

Instructions

  1. Die-cut two of the floral frames from the Garden Gild mini using brown tissue paper. Adhere them together and attach them to a piece of A2 cardstock.
  2. In a small bowl, mix together about 1/4 cup of water and a little over a tablespoon of Elmer's School Glue or other water soluble glue.
  3. Lay a piece of tissue paper over the die-cut frames and lightly brush the glue water over it, making sure to get even coverage. Go back over the floral areas and lightly tap with the brush to help get the tissue paper down into the grooves. Repeat the same process with three additional layers of tissue paper.
  4. Lightly press a paper towel over the surface of the tissue paper layers to help remove some of the moisture and press the tissue paper deeper into the grooves of the design. Allow to air dry for about 1-2 hours.
  5. Trim edges of tissue paper, leaving about a 3/4" overhang, mitre the corners. Fold the edges onto the back of the cardstock and tape down with washi tape or something similar.
  6. Using an ink blending sponge tool, generously apply Cocoa Bean ink to the pattern, getting a bit heavier with your application around the edges of the designs.
  7. To embellish the card, die-cut the smallest frame from Delicate Details twice from Saffron Spice cardstock and adhere the two layers together. Cut it one more time from white cardstock and reserve the center portion of the frame to add to the Saffron Spice frame. Stamp the sentiment from Infinity Frames Sentiments in Dark Chocolate ink.
  8. Using the Bitty Button Stacks dies, cut flowers from Canyon Clay, Ocean Tides and Autumn Rose cardstocks. Layer together and attach the centers using embroidery floss, tying it off in the back where it won't show. Adhere around the frame using Scor-tape. 
  9. Cut a few small leaves by hand from Olive Twist cardstock and adhere around the flowers. To help offset the bold white of the sentiment frame, add some white dot accents to the leaves using a white gel pen.


Supply-list

  • STAMPS: Infinity Frames Sentiments
  • INK: Cocoa Bean, Dark Chocolate
  • PAPER: Cocoa Bean, Canyon Clay, Autumn Rose, Ocean Tides, Olive Twist, Saffron Spice, Stamper's Select White
  • DIES: Make It Market Mini Kit: Garden Gild die, Bitty Button Stacks die, Delicate Details die, 
  • OTHER: Elmer's School Glue, Tissue Paper, Wide Flat Paintbrush, Paper Towels, Ink Blending Tool, Embroidery Floss, 2-Way Glue Pen, White Gel Pen


The-Challenge

  • Now it's your turn!  Create a project featuring faux embossed leather.  You can choose to re-create the exact project from Nichole above or design your own using the same concepts. Your project must also incorporate at least one Papertrey product.
  • Post your project on your blog, in your gallery, Instagram or on any other photo-hosting site (such as photobucket or flickr).
  • Add your project to the InLinkz list below.
  • You will have until 7am ET, Thursday, August 31st, to add your link to the list to be eligible to win. One project per person please.

The-Fine-Print

  • As a reminder, you will have until 7am ET, Thursday, August 31st, to add your link to the list to be eligible to win. 
  • One randomly selected winners will be chosen from all of the InLinkz entries on this post on Thursday, August 31st. The winner will be posted on our Thursday night Stamp-a-faire winners page after 9pm ET.  The randomly selected winner will get a $20 PTI gift certificate to spend however they like!
  • One randomly selected winner will be chosen from the comments of this post on Thursday as well. You will have until 7am ET, Thursday, August 31st to add your comment and be eligible to win. The randomly selected winner will get a $10 PTI gift certificate.

So, what do you think about this technique? Pretty fun, right! And to think you just need a little tissue paper and glue to make it happen! I think this would be gorgeous on the cover of a journal or the top of a gift box as well! What dies do you think you might use with this technique? There are so many pretty detailed designs that would look pretty transformed into an embossed leather look. We look forward to seeing your projects!
An InLinkz Link-up

Reader Interactions

Comments

  1. Karen says

    August 26, 2017 at 9:42 AM

    Ok, well I’m not sure about my last leather attempt – I went way overboard on the leather look, lol! It still looks cool, though, and I think it would be a fun challenge to try to make it look feminine. This technique seems like it might be easier to make girly! We shall see. Having fun!

    Karen

    Reply
  2. Kirsty Vittetoe says

    August 26, 2017 at 9:56 AM

    Oh wow, wonderful work, the leather effect is awesome!

    Reply
  3. Debs says

    August 26, 2017 at 10:06 AM

    This is a simple technique…great for kids and I appreciate the long tutorial.

    Reply
  4. Lisa S. says

    August 26, 2017 at 10:27 AM

    Can’t wait to try this leather tutorial!

    Reply
  5. Karen B. says

    August 26, 2017 at 10:30 AM

    What a cool idea. Can’t wait to try it.

    Reply
  6. Terri Trotter Earley says

    August 26, 2017 at 10:32 AM

    This is a fun one. I am off to hunt down some tan tissue paper.

    Reply
  7. Betty Sue says

    August 26, 2017 at 10:33 AM

    Love this technique!! Your card is beautiful!!!

    Reply
  8. jan metcalf says

    August 26, 2017 at 10:34 AM

    This recreates a fashionable look, maybe in pretty color leathers? Like the embroidery on jeans? Lets see what happens….

    Reply
  9. Susan W. says

    August 26, 2017 at 10:44 AM

    Fantastic leather-look, Nichole (and very different from Ashley’s)! I love it! Wonderful Stamp Affair thus far tho I did not get all my goodies ahead of time for each designer. Oh well, have to think out of the box. Thanks so much!

    Reply
  10. Cynthia says

    August 26, 2017 at 10:50 AM

    I love this, it’s next up! Love all the creative techniques!!

    Reply
  11. Kris says

    August 26, 2017 at 10:55 AM

    I remember using this technique some years ago on another project…thanks for the refresher course and memory jog!

    Reply
  12. Sharri R says

    August 26, 2017 at 11:10 AM

    Love this project. Wonderful to have another way to make leather look paper. And, turn it into a girly project.

    Reply
  13. CathyL says

    August 26, 2017 at 11:11 AM

    Looks like a fun technique!

    Reply
  14. Jen Carter says

    August 26, 2017 at 11:21 AM

    That is such a cool look!

    Reply
  15. Tracy L. says

    August 26, 2017 at 11:22 AM

    Thanks for another great technique, I love the look of carved wood.

    Reply
  16. Pat Whitley says

    August 26, 2017 at 11:33 AM

    This is a stunning technique!

    Reply
  17. Deniseinindy says

    August 26, 2017 at 11:37 AM

    That really looks like embossed leather!

    Reply
  18. Melanie Ann MacKenzie says

    August 26, 2017 at 11:37 AM

    Fantastic technique…just love it. Beautiful card. Cheers.

    Reply
  19. Rebecca Ednie says

    August 26, 2017 at 11:50 AM

    Wow, this is such a cool technique! I wonder what dies I have that will work…

    Reply
  20. Sandye Curry says

    August 26, 2017 at 12:07 PM

    Must check out my tissue paper. May have to do red leather. Example is just stunning. Hope mine is to!!!

    Reply
  21. Terri Trotter Earley says

    August 26, 2017 at 12:13 PM

    Starting this one now. So excited!

    Reply
  22. Colleen says

    August 26, 2017 at 12:28 PM

    I was very intrigued to try this technique, it is in the drying stage right now, but I love what you made Nichole!

    Reply
  23. LR says

    August 26, 2017 at 12:45 PM

    Love your card and video, Nichole! Great technique that I would like to try. Great for masculine cards and feminine, as well. Thanks for the inspiration! This Stamp-a-Faire is amazing so far! Very fun! Thank you!

    Reply
  24. Dennisonka says

    August 26, 2017 at 12:55 PM

    Very crafty! Super fun way to add texture to a card … great for masculine cards! Thanks for inspiring!!!

    Reply
  25. Catherine Milne says

    August 26, 2017 at 1:06 PM

    Gosh this technique is so pretty. Love the texture and variation in color.

    Reply
  26. Cindy O says

    August 26, 2017 at 1:06 PM

    Wow, another great leather-style technique! Love this one, too! The tooled leather effect is perfect!

    Reply
  27. Deborah Rosenow says

    August 26, 2017 at 1:15 PM

    The leather technique is great!

    Reply
  28. Aunt Min says

    August 26, 2017 at 1:31 PM

    I think Leaf Prints dies would look awesome with this leather techniquel.

    Reply
  29. lainey says

    August 26, 2017 at 1:44 PM

    I can’t wait to try this technique too! So many things to do, so little time.

    Reply
  30. Ang says

    August 26, 2017 at 1:51 PM

    What a great idea. Thanks for the how to video!

    Reply
  31. Lori Lehanne says

    August 26, 2017 at 2:16 PM

    Oh wow!!! What an incredible technique!

    Reply
  32. Jamie Greene says

    August 26, 2017 at 2:26 PM

    This is a beautifully done technique, can’t wait to try it.

    Reply
  33. Sandy S says

    August 26, 2017 at 2:52 PM

    Waiting for mine to dry, but I might not have a good result. I thought the County Fair cover plate would be good, because it already looks a bit like tooled leather, but I used a slightly thick kraft tissue paper and I don’t think the detail is going to show up. I’ll need to try again.

    Reply
  34. Kathy Mc says

    August 26, 2017 at 2:59 PM

    Great texture, Nichole, and very realistic-looking leather! Might have to buy some supplies to try this one after all. You really are drawing us out of our comfort zones with this SAF! ?

    Reply
  35. Laraine Randall says

    August 26, 2017 at 3:22 PM

    Fabulous! Thanks for the inspiration!

    Reply
  36. AllysonA says

    August 26, 2017 at 3:27 PM

    So, so pretty! I love the leather look with the Garden Gild cover plate. Wishing I had some time right now to try this technique. Beautiful!

    Reply
  37. Janet Ingraham says

    August 26, 2017 at 3:29 PM

    Good heavens! Who knew such an awesome effect could be that simple

    Reply
  38. Becky Green says

    August 26, 2017 at 3:55 PM

    This is SO LOVELY! I see that I am “needing” more than I have with all of these SUPER TECHNIQUES! Will have to figure this one out & see if I can do this with another type of die! Necessity creates Creativity! 😉 Off to CREATE! 😀

    Reply
  39. Sandy Dayhoff says

    August 26, 2017 at 4:13 PM

    Love this “earthly” look with a feminine twist!

    Reply
  40. Bevwilkinson31@comcast.net says

    August 26, 2017 at 4:55 PM

    I tried this using the tissue paper that PTIuses to wrap their sets when they mail them. Must not be the right kind of tissue since it came out all white?

    Reply
  41. LindaM says

    August 26, 2017 at 5:22 PM

    Wow – love the leather look of this card. Great look for making a masculine card. What a super great technique!

    Reply
  42. Pat Ackley says

    August 26, 2017 at 6:20 PM

    Such a pretty card. I love this technique!

    Reply
  43. Susan P says

    August 26, 2017 at 6:33 PM

    What a great technique! I don’t think I will be able to make a card because I don’t have my die cutting machine. But I will remember it when we finish our move! Thanks Nicole!

    Reply
  44. Teddra says

    August 26, 2017 at 7:05 PM

    Looking forward to trying this technique!

    Reply
  45. Lisascreativeniche says

    August 26, 2017 at 7:47 PM

    Ok this is awesome! I’ve never thought to try this, but love the effect and totally must give it a go!

    Reply
  46. Nancy Penir says

    August 26, 2017 at 7:56 PM

    Wow! The front of my card looks like an old journal. Love this! Thanks Nichole!

    Reply
  47. Linda Craig says

    August 26, 2017 at 8:41 PM

    Very cool. Where did you get the light brown tissue paper?

    Reply
  48. Donna Gourley says

    August 26, 2017 at 8:57 PM

    Nichole, this technique was interesting and I appreciated the easily accessible supplies.

    Reply
  49. Lori B says

    August 26, 2017 at 9:49 PM

    Fun technique. Wasn’t sure it would work with the die I used but it did. Great idea for those hard to make guy cards.

    Reply
  50. Noelle says

    August 26, 2017 at 10:43 PM

    Wow, what a neat way to get a pretty, detailed leather look. Thanks for the inspiration Nichole!

    Reply
  51. Pat from sd says

    August 26, 2017 at 10:45 PM

    Wow, love this super technique. The kids can even do it.

    Reply
  52. Ann says

    August 26, 2017 at 10:46 PM

    thanks for sharing such a neat technique for creating the look of leather. Looks fun.

    Reply
  53. Krissie says

    August 26, 2017 at 10:46 PM

    Very pretty card. This technique would be great for creating some masculine cards too!

    Reply
  54. Patty says

    August 26, 2017 at 10:47 PM

    Oh so fun! Thanks for the inspiration.

    Reply
  55. Carmela says

    August 26, 2017 at 10:52 PM

    Can’t wait to give this a try! So pretty and I love the look.

    Reply
  56. Cynthia Johnson says

    August 26, 2017 at 11:52 PM

    This is a super cool technique. Your card looks like an old leather journal, I love it!

    Reply
  57. Manda says

    August 27, 2017 at 1:44 AM

    What an amazing look! I would never have guessed out it was achieved! Thanks for the detailed steps.

    Reply
  58. Imke Ludwig says

    August 27, 2017 at 2:13 AM

    I totally like the leather look but for me, this technique is too time consuming…..

    Reply
  59. Mimi R says

    August 27, 2017 at 5:54 AM

    WOW awesome card!

    Reply
  60. Erin S says

    August 27, 2017 at 9:06 AM

    This is another great leather look. Will have to try it out too!

    Reply
  61. Becca Yahrling says

    August 27, 2017 at 9:15 AM

    What a fabulous and beautiful project and technique. I’d really love to try this.

    Reply
  62. Helen F. says

    August 27, 2017 at 9:56 AM

    This faux leather look is very cool! I wasn’t sure I did it right or if I was using the right tissue paper~it’s white :o) When it dried, I really liked how it came out with the leather-like wrinkles 🙂 Thanks, Nichole!

    Reply
  63. Kate says

    August 27, 2017 at 10:55 AM

    This was fun to experiment with. Had to try it at couple of times but loved the results.

    Reply
  64. Tracy A says

    August 27, 2017 at 11:37 AM

    Very pretty. I love the texture and sort of vintage feeling.

    Reply
  65. Jen shears says

    August 27, 2017 at 12:02 PM

    What a cool technique! Thanks for the details- hoping to get to try it!!

    Reply
  66. Keri says

    August 27, 2017 at 12:38 PM

    Very cool technique. Beautiful card, Nichole! Now to get it to work for me. Been having a bit of trouble, but I will prevail! 🙂

    Reply
  67. Mary W says

    August 27, 2017 at 1:09 PM

    My head is swimming with ideas. I’m thinking an old worn family bible look to the many PTI cover plate dies using gold around the edges and to stamp an embossed sentiment. This is going to be fun. I used to do this with water and toilet paper which after many years, still stays together. But I did pounce deeply into the 5 layers of TP to really work it in – then let dry overnight. I used old buttons and jewelry but now I have wonderful dies to use. Thanks!

    Reply
  68. Leslie L. says

    August 27, 2017 at 3:48 PM

    I planned out a great background and since I didn’t have brown tissue paper I decided to add Dark Chocolate re-inker to my clear water and glue mixture (worked great). However, I am having a heck of a time turning my faux leather piece into a completed card. Maybe something will spark soon and I will be able to post my project.

    Reply
  69. Patt H. says

    August 27, 2017 at 4:22 PM

    Love this awesome leather look! How perfect for all my “men” cards. I’ve done a faux leather look using fun foam but had not seen this technique before. Thanks for sharing.

    Reply
  70. Linda S. says

    August 27, 2017 at 4:40 PM

    Awesome technique. Pretty card with oneach of my favorite cover plates.

    Reply
  71. Virginia P says

    August 27, 2017 at 4:46 PM

    Never tried this technique. It’s so pretty!

    Reply
  72. Jeni says

    August 27, 2017 at 7:48 PM

    Will have to give this a try again. Maybe with a lighter tissue paper. I got it to work alright but my tissue paper didn’t want to stick to my cardstock. I see others had this issue as well so I’m going to try some of the tips given. I’m still happy with my end result though.

    Reply
  73. Angela Person says

    August 27, 2017 at 8:00 PM

    Amazing tutorial! It looks so much like leather.

    Reply
  74. Dana Kirby says

    August 27, 2017 at 9:09 PM

    Absolutely gorgeous!! I love everything about this project!!

    Reply
  75. LaFaunB says

    August 27, 2017 at 9:39 PM

    Very pretty card. Fun embossed leather technique.

    Reply
  76. PT says

    August 28, 2017 at 12:12 AM

    This is so interesting… The texture on the card looks amazing!

    Reply
  77. Marianne says

    August 28, 2017 at 4:04 AM

    Wow, this looks amazing!

    Reply
  78. Annette Snyder says

    August 28, 2017 at 7:07 AM

    I love this technique!! Absolutely fabulous!!

    Reply
  79. Jennifer Thompson says

    August 28, 2017 at 8:58 AM

    What a cool technique! I can’t wait to try this.

    Reply
  80. Conniecrafter says

    August 28, 2017 at 9:39 AM

    Awesome!

    Reply
  81. Becky M says

    August 28, 2017 at 10:45 AM

    Looks like a great technique – I think it would be a lot of fun in brighter colors too!

    Reply
  82. Bev Wilkinson says

    August 28, 2017 at 1:43 PM

    Tried this technique twice and just couldn’t get it to work. I think I needed to add a layer of glue/water under the first layer of tissue paper. I tried to make a girlie pink and brown looking leather using the Butterflies Coverplate but failed miserably. Lol fun technique to try again though. Love all the other examples!

    Reply
  83. Olga V. says

    August 28, 2017 at 2:06 PM

    Thank you for the cool technique, Nichole! I will surely give it a try!

    Reply
  84. merryf says

    August 28, 2017 at 3:27 PM

    wow, this is gorgeous. It totally looks like leather! Thanks so much for the inspiration!

    Reply
  85. MelissaF says

    August 28, 2017 at 7:21 PM

    LOVE the rich, worn leather look on your beautiful card – and it gives such a different look to the Garden Gild cover die, WOW! I will be trying this technique for bookmarks to give my fellow book club members.

    Reply
  86. Betty D Wright says

    August 28, 2017 at 9:17 PM

    The embossed faux leathering looks amazing!

    Reply
  87. Betty N says

    August 28, 2017 at 10:41 PM

    Beautiful card! What a unique way to use the cover plate!

    Reply
  88. Victoria Nelson says

    August 29, 2017 at 12:04 AM

    This was such a unique technique! Thanks for the inspiration!

    Reply
  89. Nancy M says

    August 29, 2017 at 1:40 AM

    This is a great technique to use for those always challenging masculine cards.

    Reply
  90. Luanne Ford says

    August 29, 2017 at 8:02 PM

    This looks easier than I though it would. I hope to give it a try!

    Reply
  91. Jen says

    August 29, 2017 at 9:48 PM

    I love the look of this. One of my favorites for sure!!

    Reply
  92. Ruth C says

    August 29, 2017 at 11:09 PM

    This will be my next project – I love the look of the faux leather, and I even have that cover plate!

    Reply
  93. angie b says

    August 30, 2017 at 7:41 AM

    We used pieces of our leather….diff look!

    Reply
  94. AOK says

    August 30, 2017 at 9:51 AM

    I loved this really crafty technique and super tutorial. Really happy I gave this one a go.

    Reply
  95. Sue in Grapevine says

    August 30, 2017 at 10:23 AM

    I LOVE THIS LOOK! i EVEN HAVE THE COVERPLATE.

    Reply
  96. D.Ann C says

    August 30, 2017 at 6:53 PM

    That was pretty cool! I never would’ve thought to use tissue paper to get that embossed leather look. Love this idea of using the traditional anniversaries for PTI’s 10th!

    Reply
  97. Cynthia says

    August 30, 2017 at 7:31 PM

    So creative and fun to do!

    Reply
  98. Marilyn in Michigan says

    August 30, 2017 at 8:25 PM

    What a pretty technique!

    Reply
  99. Dawn @Petals.Paper.SimpleThymes says

    August 30, 2017 at 8:36 PM

    Beautiful faux embossed leather, Nichole! I really enjoyed trying this technique and tried two different projects. First, I used the Best Dad Ever die. It turned out well. Next, I created a design using layers from the Twig Wreath die set. Although I loved the design, it was difficult to see all of the details after everything was dry. I want to try another design to create faux embossed leather The third time’s a charm! Thanks for a wonderful video! ?

    Reply
  100. Carrie Crafts says

    August 30, 2017 at 10:07 PM

    2017 SAF was THE event of all crafting events! I loved that there were 3 days of fun crafty activity! I managed to complete 14 of the 21 challenges. SO MUCH FUN!! Thank you PTI for putting on such an amazing event!!

    Reply
  101. Greta H says

    August 30, 2017 at 10:30 PM

    Very impressive results!

    Reply
  102. Angela W says

    August 30, 2017 at 11:03 PM

    This technique is so gorgeous! It truly looks like real leather!

    Reply
  103. erin says

    August 30, 2017 at 11:24 PM

    Loved channeling my inner pre-school persona with the elmer’s.

    Reply
  104. Sharon D says

    August 31, 2017 at 12:43 AM

    This is stunning, Nichole! Very creative!

    Reply
  105. josiane says

    August 31, 2017 at 3:23 AM

    This technique is versatile – for both masculine and feminine cards. Love Nichole’s card which combines the masculine feel of the leather technique with the feminine style of the cover plate.

    Reply
  106. Kristie H says

    August 31, 2017 at 4:26 AM

    Fun technique…so a pretty card!

    Reply

Leave a Reply Cancel reply

Your email address will not be published. Required fields are marked *

Primary Sidebar

papertreyink

papertreyink

Welcome to Papertrey Ink! We specialize in clear stamps and have our own line of exclusive paper crafting embellishments and accessories. All of which is created by stampers for stampers. We pride ourselves in only providing the highest quality product at a reasonable price. Thank you for connecting with us.

INSTAGRAM

papertreyink

2,792

papertreyink

View

Jan 19

Open
On Day 4 of the @papertreyink January release we b On Day 4 of the @papertreyink January release we bring you this beauty from our designer @dkirbystamps using the new Feathered Friends 7 dies.  She’s combined this new die collection with the new Sprigs & Sprays stamp set and dies, Delicate Doilies dies, and Feathered Friends Mini 7 stamp set.  Available tomorrow, January 20th, 10pm EST.  @papertreyink @inktopapercompany #papertreyink #inktopapercompany #clearstamps #stamping #cardmaking #cardmakersofinstagram #papercrafts #papercrafting #steeldies

On Day 4 of the @papertreyink January release we bring you this beauty from our designer @dkirbystamps using the new Feathered Friends 7 dies. She’s combined this new die collection with the new Sprigs & Sprays stamp set and dies, Delicate Doilies dies, and Feathered Friends Mini 7 stamp set. Available tomorrow, January 20th, 10pm EST. @papertreyink @inktopapercompany #papertreyink #inktopapercompany #clearstamps #stamping #cardmaking #cardmakersofinstagram #papercrafts #papercrafting #steeldies ...

papertreyink

View

Jan 18

Open
This card is full of happiness and uses the new Nu This card is full of happiness and uses the new Number Dies, Birthday Balloons, and Inside Greetings:  Established stamp set.  Available on January 20th, 10pm EST.  @handmadebykavya @papertreyink @inktopapercompany #papertreyink #inktopapercompany #clearstamps #stamping #cardmaking #cardmakersofinstagram #papercrafts #papercrafting #steeldies

This card is full of happiness and uses the new Number Dies, Birthday Balloons, and Inside Greetings: Established stamp set. Available on January 20th, 10pm EST. @handmadebykavya @papertreyink @inktopapercompany #papertreyink #inktopapercompany #clearstamps #stamping #cardmaking #cardmakersofinstagram #papercrafts #papercrafting #steeldies ...

papertreyink

View

Jan 18

Open
On Day 3 of our January release we bring you the n On Day 3 of our January release we bring you the new Just Sentiments:  Established mini stamp set and Number dies.  Create personalized and customized cards for anniversaries, birthdays, weddings, etc. Our designer @craftwalks created this lovely card celebrating the 69th birthday of a cherished loved one.  Available on January 20th, 10pm EST @papertreyink @inktopapercompany @papertreyink @inktopapercompany #papertreyink #inktopapercompany #clearstamps #stamping #cardmaking #cardmakersofinstagram #papercrafts #papercrafting #steeldies

On Day 3 of our January release we bring you the new Just Sentiments: Established mini stamp set and Number dies. Create personalized and customized cards for anniversaries, birthdays, weddings, etc. Our designer @craftwalks created this lovely card celebrating the 69th birthday of a cherished loved one. Available on January 20th, 10pm EST @papertreyink @inktopapercompany @papertreyink @inktopapercompany #papertreyink #inktopapercompany #clearstamps #stamping #cardmaking #cardmakersofinstagram #papercrafts #papercrafting #steeldies ...

papertreyink

View

Jan 17

Open
We’ve got so much more to share this month inclu We’ve got so much more to share this month including the new Big Balloons stamp set and dies, the Big Balloons Sentiments set, the Cover Plate:  Big Balloons die, and the Big Balloons Stencils.  Our designer @leighhouston11 created this darling card and it’s got some shaker action going on...brilliant!  New products available on January 20th, 10pm EST.  @papertreyink @inktopapercompany #papertreyink #inktopapercompany #clearstamps #stamping #cardmaking #cardmakersofinstagram #papercrafts #papercrafting #steeldies

We’ve got so much more to share this month including the new Big Balloons stamp set and dies, the Big Balloons Sentiments set, the Cover Plate: Big Balloons die, and the Big Balloons Stencils. Our designer @leighhouston11 created this darling card and it’s got some shaker action going on...brilliant! New products available on January 20th, 10pm EST. @papertreyink @inktopapercompany #papertreyink #inktopapercompany #clearstamps #stamping #cardmaking #cardmakersofinstagram #papercrafts #papercrafting #steeldies ...

papertreyink

View

Jan 17

Open
On Day 2 of the @papertreyink January release, we’re sharing the gorgeous Vintage Flair stamp set and dies and Vintage Flair Print background stamp.  We love the soft, timeless card our designer @craftwalks created pairing these beautiful sets together.  New products will be available on January 20th , 10pm EST. @papertreyink @inktopapercompany #papertreyink #inktopapercompany #clearstamps #stamping #cardmaking #cardmakersofinstagram #papercrafts #papercrafting #steeldies .

On Day 2 of the @papertreyink January release, we’re sharing the gorgeous Vintage Flair stamp set and dies and Vintage Flair Print background stamp. We love the soft, timeless card our designer @craftwalks created pairing these beautiful sets together. New products will be available on January 20th , 10pm EST. @papertreyink @inktopapercompany #papertreyink #inktopapercompany #clearstamps #stamping #cardmaking #cardmakersofinstagram #papercrafts #papercrafting #steeldies . ...

papertreyink

View

Jan 16

Open
Cake Please!! Our designer @thurston_post created Cake Please!! Our designer @thurston_post created this beauty using the new Cake Please stamp set and dies from @papertreyink along with the new Delicate Doilies dies...available on January 20th, 10pm EST.  @papertreyink @inktopapercompany #papertreyink #inktopapercompany #clearstamps #stamping #cardmaking #cardmakersofinstagram #papercrafts #papercrafting #steeldies

Cake Please!! Our designer @thurston_post created this beauty using the new Cake Please stamp set and dies from @papertreyink along with the new Delicate Doilies dies...available on January 20th, 10pm EST. @papertreyink @inktopapercompany #papertreyink #inktopapercompany #clearstamps #stamping #cardmaking #cardmakersofinstagram #papercrafts #papercrafting #steeldies ...

papertreyink

View

Jan 16

Open
It’s Day 1 of the January release from @papertre It’s Day 1 of the January release from @papertreyink and we’re starting it off with the beautiful, new Sprigs & Sprays stamp set and dies.  Our designer @kellylunceford has also used the new Antique Wishes stamp set and dies to frame in her pitcher full of flowers and the new Delicate Doilies dies.  Available on January 20th, 10pm EST.  @papertreyink @inktopapercompany #papertreyink #inktopapercompany #clearstamps #stamping #cardmaking #cardmakersofinstagram #papercrafts #papercrafting #steeldies

It’s Day 1 of the January release from @papertreyink and we’re starting it off with the beautiful, new Sprigs & Sprays stamp set and dies. Our designer @kellylunceford has also used the new Antique Wishes stamp set and dies to frame in her pitcher full of flowers and the new Delicate Doilies dies. Available on January 20th, 10pm EST. @papertreyink @inktopapercompany #papertreyink #inktopapercompany #clearstamps #stamping #cardmaking #cardmakersofinstagram #papercrafts #papercrafting #steeldies ...

papertreyink

View

Jan 16

Open
It’s almost time for the @papertreyink January r It’s almost time for the @papertreyink January release to begin! Here’s one more peek before the design team starts sharing projects tomorrow, January 16th!  @papertreyink @inktopapercompany #papertreyink #inktopapercompany #clearstamps #stamping #cardmaking #cardmakersofinstagram #papercrafts #papercrafting #steeldies

It’s almost time for the @papertreyink January release to begin! Here’s one more peek before the design team starts sharing projects tomorrow, January 16th! @papertreyink @inktopapercompany #papertreyink #inktopapercompany #clearstamps #stamping #cardmaking #cardmakersofinstagram #papercrafts #papercrafting #steeldies ...

papertreyink

View

Jan 15

Open
Irresistible! We love this peek at new products c Irresistible!  We love this peek at new products coming on January 20th to @papertreyink 🤍. Projects start on the 16th!  @kellylunceford @papertreyink @inktopapercompany #papertreyink #inktopapercompany #clearstamps #stamping #cardmaking #cardmakersofinstagram #papercrafts #papercrafting #steeldies

Irresistible! We love this peek at new products coming on January 20th to @papertreyink 🤍. Projects start on the 16th! @kellylunceford @papertreyink @inktopapercompany #papertreyink #inktopapercompany #clearstamps #stamping #cardmaking #cardmakersofinstagram #papercrafts #papercrafting #steeldies ...

Follow on Instagram

Pinterest

FACEBOOK

Papertrey Ink

Email Subscription

I agree to be emailed to confirm my subscription to this list

Categories

Archives

Categories

Recent Posts

  • Feathered Friends 7 + Feathered Friends Mini 7
  • Just Sentiments: Milestones + Numbers + Just Sentiments: Established + Inside Greetings: Established
  • Vintage Flair + Vintage Flair Print + Big Balloon + Big Balloon Sentiments + Cover Plate: Big Balloon + Big Balloon Stencils
  • Sprigs & Sprays + Antique Wishes + Cake Please + Delicate Doilies
  • Guest Designer – Shauna – Dainty Daisies

papertreyink

View

Jan 19

Open
On Day 4 of the @papertreyink January release we b On Day 4 of the @papertreyink January release we bring you this beauty from our designer @dkirbystamps using the new Feathered Friends 7 dies.  She’s combined this new die collection with the new Sprigs & Sprays stamp set and dies, Delicate Doilies dies, and Feathered Friends Mini 7 stamp set.  Available tomorrow, January 20th, 10pm EST.  @papertreyink @inktopapercompany #papertreyink #inktopapercompany #clearstamps #stamping #cardmaking #cardmakersofinstagram #papercrafts #papercrafting #steeldies

papertreyink

View

Jan 18

Open
This card is full of happiness and uses the new Nu This card is full of happiness and uses the new Number Dies, Birthday Balloons, and Inside Greetings:  Established stamp set.  Available on January 20th, 10pm EST.  @handmadebykavya @papertreyink @inktopapercompany #papertreyink #inktopapercompany #clearstamps #stamping #cardmaking #cardmakersofinstagram #papercrafts #papercrafting #steeldies

papertreyink

View

Jan 18

Open
On Day 3 of our January release we bring you the n On Day 3 of our January release we bring you the new Just Sentiments:  Established mini stamp set and Number dies.  Create personalized and customized cards for anniversaries, birthdays, weddings, etc. Our designer @craftwalks created this lovely card celebrating the 69th birthday of a cherished loved one.  Available on January 20th, 10pm EST @papertreyink @inktopapercompany @papertreyink @inktopapercompany #papertreyink #inktopapercompany #clearstamps #stamping #cardmaking #cardmakersofinstagram #papercrafts #papercrafting #steeldies

papertreyink

View

Jan 17

Open
We’ve got so much more to share this month inclu We’ve got so much more to share this month including the new Big Balloons stamp set and dies, the Big Balloons Sentiments set, the Cover Plate:  Big Balloons die, and the Big Balloons Stencils.  Our designer @leighhouston11 created this darling card and it’s got some shaker action going on...brilliant!  New products available on January 20th, 10pm EST.  @papertreyink @inktopapercompany #papertreyink #inktopapercompany #clearstamps #stamping #cardmaking #cardmakersofinstagram #papercrafts #papercrafting #steeldies

papertreyink

View

Jan 17

Open
On Day 2 of the @papertreyink January release, we’re sharing the gorgeous Vintage Flair stamp set and dies and Vintage Flair Print background stamp.  We love the soft, timeless card our designer @craftwalks created pairing these beautiful sets together.  New products will be available on January 20th , 10pm EST. @papertreyink @inktopapercompany #papertreyink #inktopapercompany #clearstamps #stamping #cardmaking #cardmakersofinstagram #papercrafts #papercrafting #steeldies .

papertreyink

View

Jan 16

Open
Cake Please!! Our designer @thurston_post created Cake Please!! Our designer @thurston_post created this beauty using the new Cake Please stamp set and dies from @papertreyink along with the new Delicate Doilies dies...available on January 20th, 10pm EST.  @papertreyink @inktopapercompany #papertreyink #inktopapercompany #clearstamps #stamping #cardmaking #cardmakersofinstagram #papercrafts #papercrafting #steeldies

papertreyink

View

Jan 16

Open
It’s Day 1 of the January release from @papertre It’s Day 1 of the January release from @papertreyink and we’re starting it off with the beautiful, new Sprigs & Sprays stamp set and dies.  Our designer @kellylunceford has also used the new Antique Wishes stamp set and dies to frame in her pitcher full of flowers and the new Delicate Doilies dies.  Available on January 20th, 10pm EST.  @papertreyink @inktopapercompany #papertreyink #inktopapercompany #clearstamps #stamping #cardmaking #cardmakersofinstagram #papercrafts #papercrafting #steeldies

papertreyink

View

Jan 16

Open
It’s almost time for the @papertreyink January r It’s almost time for the @papertreyink January release to begin! Here’s one more peek before the design team starts sharing projects tomorrow, January 16th!  @papertreyink @inktopapercompany #papertreyink #inktopapercompany #clearstamps #stamping #cardmaking #cardmakersofinstagram #papercrafts #papercrafting #steeldies

papertreyink

View

Jan 15

Open
Irresistible! We love this peek at new products c Irresistible!  We love this peek at new products coming on January 20th to @papertreyink 🤍. Projects start on the 16th!  @kellylunceford @papertreyink @inktopapercompany #papertreyink #inktopapercompany #clearstamps #stamping #cardmaking #cardmakersofinstagram #papercrafts #papercrafting #steeldies

papertreyink

View

Jan 14

Open
Another sneak peek at something beautiful coming y Another sneak peek at something beautiful coming your way soon from @inktopapercompany @papertreyink 🤍🤍. Our January release begins in just a couple of days with new products available on January 20th, 10pm EST.  @papertreyink @inktopapercompany #papertreyink #inktopapercompany #clearstamps #stamping #cardmaking #cardmakersofinstagram #papercrafts #papercrafting #steeldies

Copyright © 2021 · Papertrey Ink.