

Today we are taking a closer look at a project from the past and showing you how to recreate it step-by-step. Back in August I showed you a background that I created with multiple stamps and colors. In this week's video I provide you with tips and tricks on how to create your own custom backgrounds that can easily be mistaken for purchased designer papers!
Here are some still shots of this week's project.


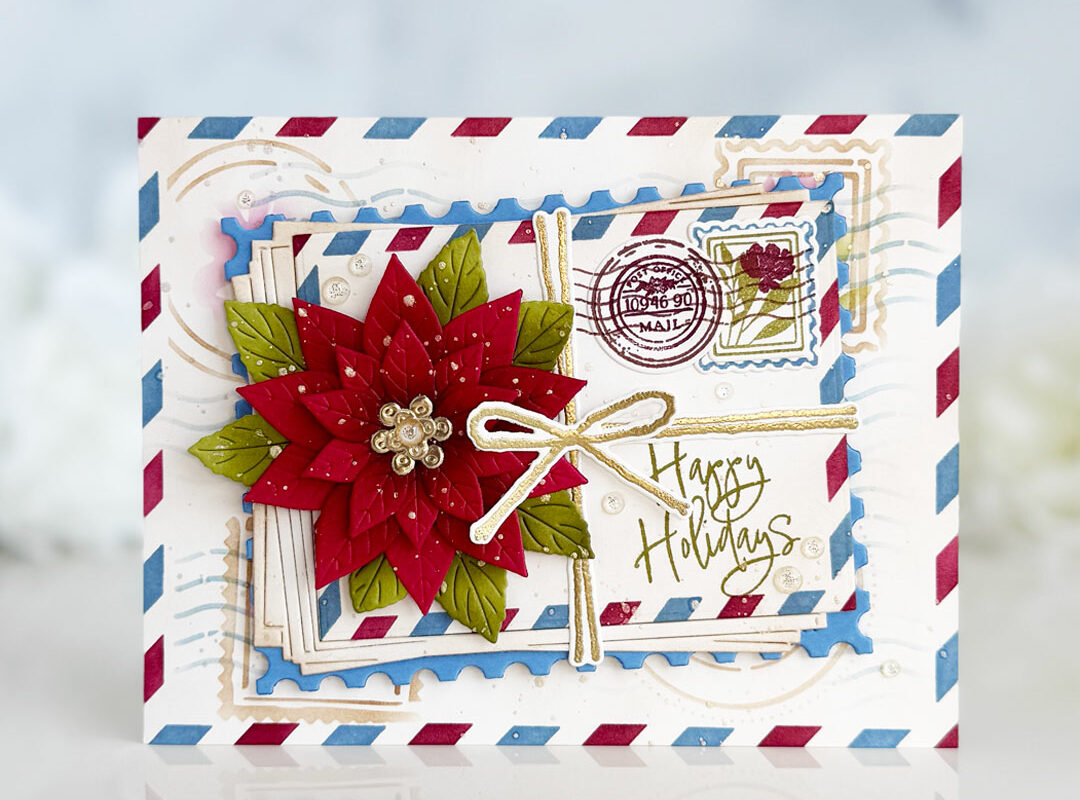
- Step 1: Leaves in Ripe Avocado ink (image from Harvest Berries)
- Step 2: Large flowers in Terracotta Tile ink (image from Flower Fusion #7)
- Step 3: Small leaves in Ripe Avocado ink (image from Harvest Berries)
- Step 4: Small flowers in Orange Zest ink (image from Flower Fusion #7)
- Step 5: Outlined dot in Summer Sunrise ink (image from Flower Fusion #7)
- Step 6: Small dot trio clusters added to flower centers using fine tip pen

Here are some other backgrounds I have created in the past and a step-by-step breakdown of their stamps & colors.


- Step 1: Leaves in True Black ink (image from Harvest Berries)
- Step 2: Large flowers in VersaMark ink (image from Flower Fusion #7)
- Step 3: Small outlined flowers in Fresh Snow ink (image from Flower Fusion #7)
- Step 4: Dot trio in True Black ink (image from Harvest Berries)


- Step 1: Large snowflake frame in Pure Poppy ink (image from Tag-its #8)
- Step 2: Medium snowflake in frame centers in Aqua Mist ink (image from Tag-its #8)
- Step 3: Small snowflakes in Simply Chartreuse ink (image from Winter Cheer)
- Step 4: Small dot in Raspberry Fizz ink (image from Polka Dot Basics)


- Step 1: Outlined dots in True Black ink (image from Polka Dot Basics)
- Step 2: Striped dot in Simply Chartreuse ink (image from Boy Basics: Simple Circles)
- Step 3: Striped trio dot in Summer Sunrise ink (image from Boy Basics: Simple Circles)
- Step 4: Outlined dot in Orange Zest ink (image from Boy Basics: Simple Circles)
- Step 5: Star dot in Aqua Mist ink (image from Boy Basics: Simple Circles)


- Step 1: Scalloped frame in Ripe Avocado ink (image from Tag-its #1)
- Step 2: Large medallion in frame centers in Simply Chartreuse ink (image from Giga Guidelines)
- Step 3: Large medallion again in between frames in VersaMark ink (image from Giga Guidelines)


- Step 1: Cups in Fresh Snow ink (images from Warm Happiness & Warm Happiness Too)
- Step 2: Cup details in Pure Poppy ink (images from Warm Happiness & Warm Happiness Too)


- Step 1: Large leaves in Spring Moss ink (image from Turning a New Leaf)
- Step 2: Small flowers in Lemon Tart ink (image from Beautiful Blooms II)
- Step 3: Small flower centers in New Leaf ink (image from Beautiful Blooms II)
- Step 4: Single leaf in New Leaf ink (image from Turning a New Leaf)


- Step 1: Large solid teardrops in Aqua Mist ink and medium solid teardrops in Simply Chartreuse ink, working in vertical rows (images from Modern Basics)
- Step 2: Large teardrop outlines over large solid teardrops in Hawaiian Shores ink (image from Modern Basics)
- Step 3: Small teardrop outlines over medium solid teardrops in Ripe Avocado ink (image from Modern Basics)
- Step 4: Polka dot teardrops in large solid teardrops in Hawaiian Shores ink (image from Modern Basics)
- Step 4: Small solid teardrops in medium solid teardrops in Ripe Avocado ink (image from Modern Basics)


- Step 1: Gifts stamped in alternating Ripe Avocado, Orange Zest and Summer Sunrise inks (images from Make a Wish Additions)
- Step 2: Ribbons in Pure Poppy, Raspberry Fizz and Hawaiian Shores inks (images from Make a Wish Additions)

- Step 1: Large medallion in Aqua Mist ink (image from Giga Guide Lines)
- Step 2: Small medallion in centers of large medallion in Spring Moss ink (image from Guide Lines Two)
- Step 3: Small medallion in between large in Spring Moss ink (image from Guide Lines Two)
- note: All done on Guide Lines Grid cardstock to help with lining up.
If you are joining along this week, here are the details concerning the Make It Monday Challenge.
–A new Make It Monday Challenge & video will go up every Monday morning at 9am EST.
–Create a project utilizing your take on the challenge. Your project must use at least one Papertrey product and feature this multi-stamp background building technique.
–Post your project on your blog, in your gallery or on any other photo-hosting site (such as photobucket or flickr).
–-Add your project to our —>InLinkz List HERE<—
–You will have until 7am, Monday, November 7th, to add your link to the list to be eligible to win. And you can enter as many times as you like.
–We will be tweeting and posting on our Facebook page every night (between 5-9pm EST) highlighting a Featured Project. These tweets/Facebook postings will just be a shout-out regarding projects that caught our eye. The tweets/Facebook postings no longer have any special merit regarding the actual contest.
–One randomly selected winner will be chosen from ALL the entries on Monday, November 7th, after 7am. The winner will be posted here on this blog post, on Twitter and Facebook. The randomly selected winner will get to select a FREE Papertrey stamp set of their choice!
Good luck to everyone and we look forward to seeing your projects!
And this week's winner is Elena, #33. Congrats Elena! Please contact customer service with your stamp set choice and mailing information. Thank you to everyone who participated!
Leave a Reply