• Skip to primary navigation
  • Skip to main content
  • Skip to primary sidebar
  • HOME
  • SHOP
  • BLOG
  • TEAM
  • Nav Social Menu

    • Email
    • Facebook
    • Instagram
    • Pinterest
    • Twitter
    • YouTube

Papertrey Ink Blog

Clear Stamps, Dies, Paper, Ink, Kits

  • HOME
  • SHOP
  • BLOG
  • TEAM

10 Handmade Card Ideas to Say “I Love You”

Mom’s Kitchen stamps and dies + In Stitches: Adorable Apron dies + Seasoned with Love Sentiments stamps

Project Inspiration: Springtime Blessings Card by Brenda Noelke

Embellish It! Senior Challenge

May 31, 2009      Nichole Heady      114 Comments

Embellishments are the finishing touch that can bring a project from mediocre to amazing in just a matter of minutes, but they also can get to be expensive, especially some of the more intricate versions available on the market today.  This month I have challenged the senior design team to take the path that Michelle Wooderson has explored lately (such as demonstrated in her posts HERE and HERE) and create their own embellishments with supply basics in their stash.  Not only is Michelle's whole idea fun & economical, it also allows you to customize color & style to give you coordination possibilities for nearly any type of project.

Flower closeup

I thought I would start you off with my new little exploration, the world of crocheted flowers.  There are several big-name manufacturers that carry these little homespun beauties, but they can run anywhere from 50-75 cents each and the color selection can tend to be quite limiting.  I decided to go on the hunt for a crochet pattern I could use to create my own, but after hours and hours of research and trial runs, I never found anything that I was completely happy with.  So I combined several aspects from different patterns that I liked and created my own method.  It's quick, easy and inexpensive to build your own little stash of crocheted flowers, ready to use in your paper crafting adventures.

I have created a step by step tutorial that even a beginner could follow along with. 

Supplies 

  • 4 yards DMC cotton embroidery floss (about half a standard package)
  • US size 2 crochet hook

You will notice that I decided to use DMC embroidery floss instead of the traditional crochet thread.  I chose this merely for the color availability.  I was able to find the floss in all of the Papertrey colors and with that as a resource I will be able to create these flowers to coordinate with all of my projects. 

If you would like to see my list of PTI/DMC numbers, you can access it HERE.

ABBREVIATIONS

(you can click on each stitch for step-by-step video tutorials that I located)

ch= chain stitch

sl st= slip stitch

sc= single crochet

dc= double crochet

3dc= three double crochets in same stitch

Step-1

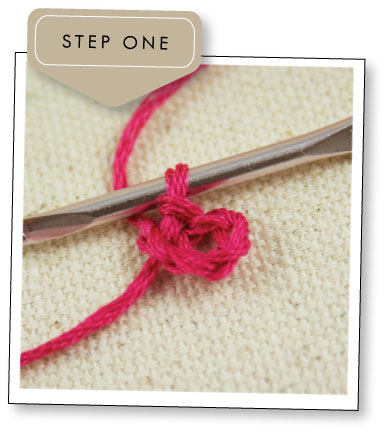
Step 1: ch 5. Join with sl st to form ring.

Step-2

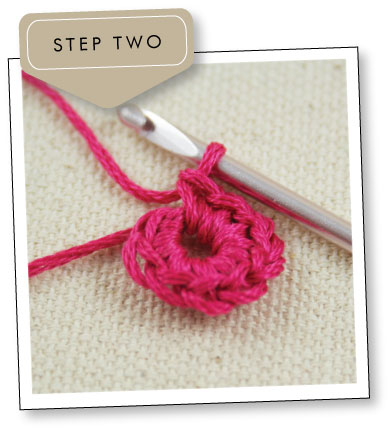
Step 2: Add 10 sc through ring.

Step-3

Step 3: sl st to top of first sc.

Step-4

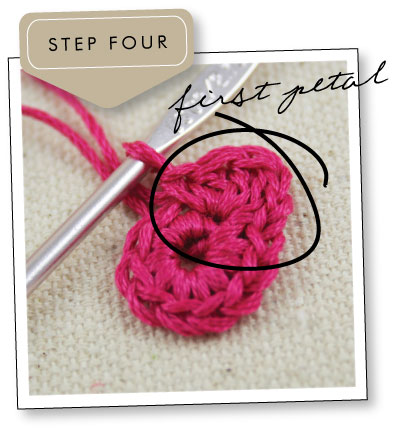
Step 4: create a small petal in the first sc using the following pattern (sc, 3dc, sc). 

Step-5

Step 5: continue creating a small petal in every other sc with the same pattern (creating 5 petals total).  sl st to join with first sc of first petal.  You can stop here and fasten off for a small flower that measures approximately 1-inch in diameter.  Or you can continue to create a more elaborate 2-layer flower.

Step-6

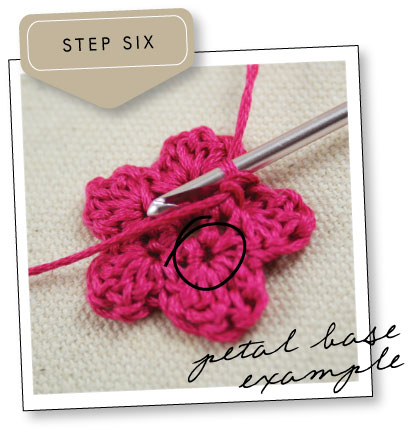
Step 6: flipping to the back of the flower, sc down through base opening of small petal.

Step-7

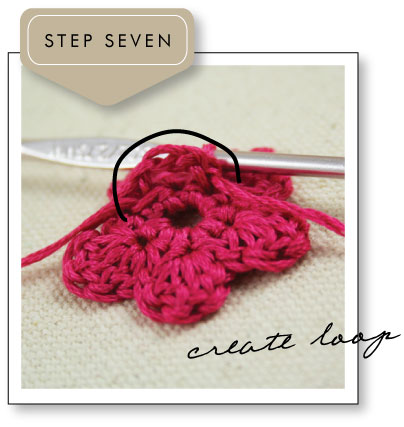
Step 7: ch 3, and sc through next petal base opening.  

Step-8

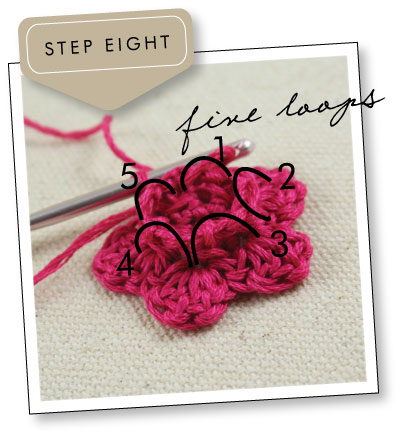
Step 8: repeat 4 more times in each opening. sl st through first sc, creating a series of 5 loops total.

Step-9

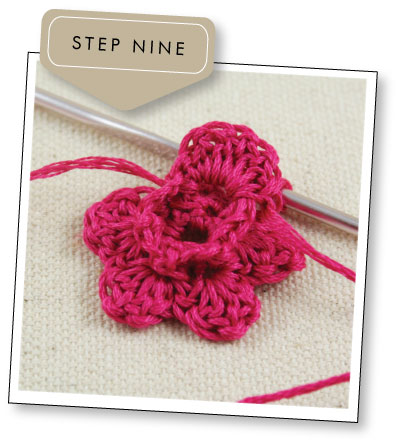
Step 9: create a large petal in the first loop using the following pattern (sc, 5dc, sc).

Completed-flower  

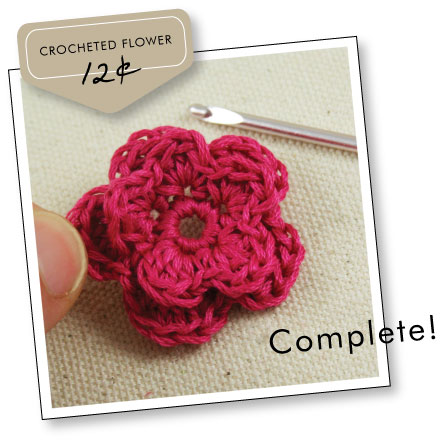
step 10: continue creating a large petal in each of the remaining 4 loops with the same pattern. sl st to join with first sc of first petal.  COMPLETE!  These really only take a matter of minutes to put together, and once you have the hang of it, it's something you can do while watching tv or waiting in the doctor's office. 

Flower closeup

The perfect finishing touch for the center is one of our vintage buttons. 

Flower card

(click the image for an enlarged view)

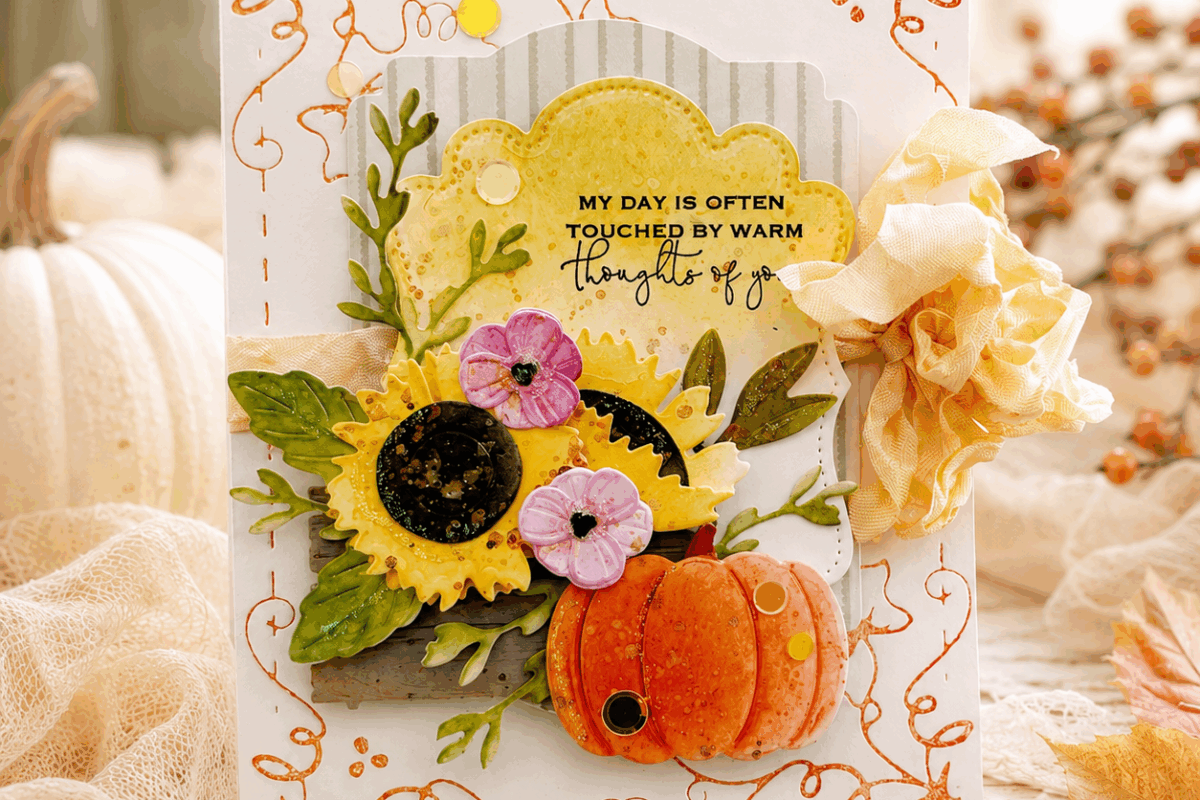
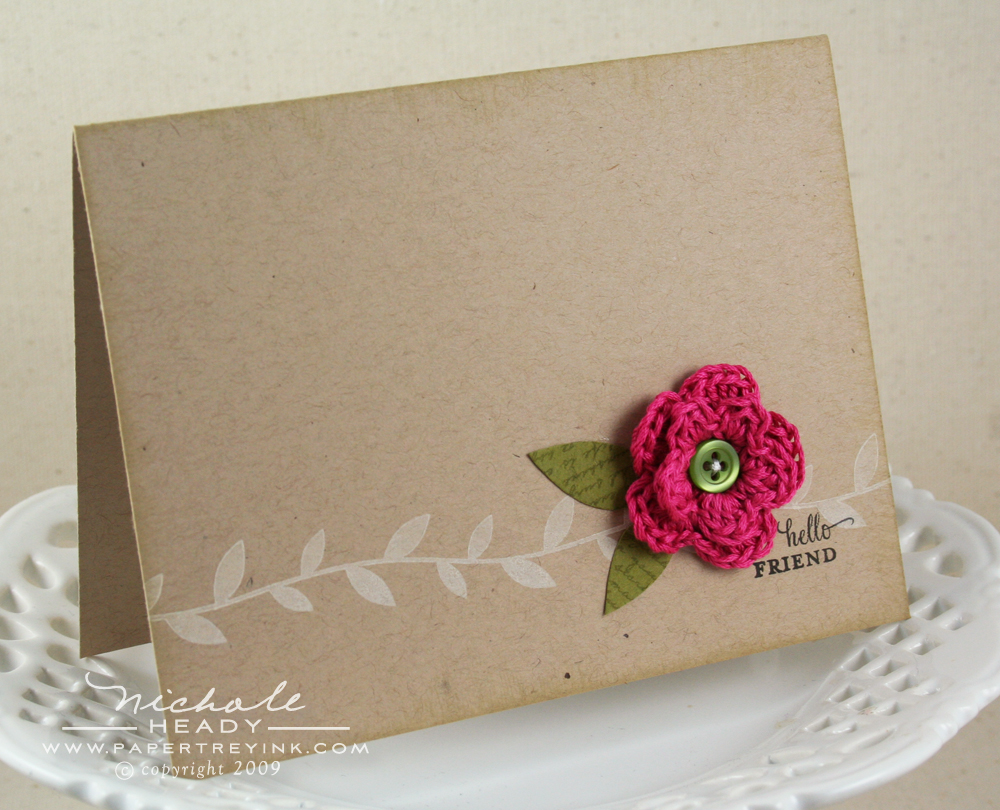
Here is a quick little card I put together using my handmade flower and a few of my favorite stamp sets: Birds of a Feather for the sentiment, Beyond Basic Borders for the border and Background Basics: Text Style to accent the leaves I cut from cardstock (inspired by a recent post by Dawn).  

I'm looking forward to using these little beauties in the future.  I mean, what's not to love?  They are even post office friendly! 

OTHER FUN FLOWER RESOURCES…

Here are some other interesting resources that I stumbled on along the way that I thought you may find of interest.

Crochet Pattern Central shares an entire library of flower patterns, all for free!

You can register to receive the Lion Brand Yarn Newsletter yourself HERE.  Every week they provide a new flower pattern!

If you like to do things by the book, THIS ONE is an awesome resource.

Creative-Clicks

Now for even more AMAZING, economical embellishment options, be sure to check out what the rest of the gals have done!!!

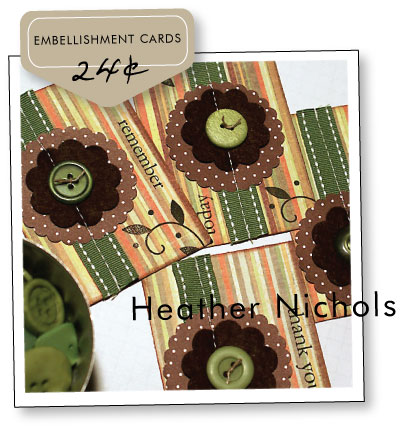
CLICK HERE to read more from  Heather Nichols

Heather's-cards  

CLICK HERE to read more from Lisa Johnson

Lisa's-wood-frames

CLICK HERE to read more from Becky Oehlers

Becky's-3D-stickers

CLICK HERE to read more from Lauren Meader

Lauren's-ghost-shapes

CLICK HERE to read more from Michelle Wooderson

Mish's-borders

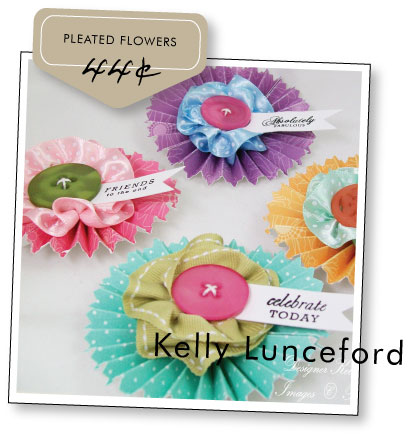
CLICK HERE to read more from Kelly Lunceford

Kelly's-pleated-flowers

On a side note, I wanted to take a moment to thank Kelly for particpating with us for the past two months as our Distinguished Guest Designer!  She has inspired me SO much in the different ways to utilize our products and she has been an absolute joy to work with.  We are thrilled that she will be continuing on with us in her participation within the Timeless Template Team.  Look for more of her work during the upcoming countdown week and in the future!  Thank you, Kelly!!!

I hope you have all been inspired to start mass producing your own embellishments after all of the idea springboards that have been presented today!  We would love o see what you do!  Please feel free to leave a link in the comments section!  Happy stamping!

Supplies-&-Tools

Supplies for my project, please visit individual team members blogs for complete instructions & supplies for their projects…

Stamps: Birds of a Feather, Beyond Basic Borders, Background Basics: Text Style

Ink: Vintage Cream (leaf border), True Black Detail (sentiment), Versamark (text leaves), Vintage Touch Tea Dye Duo (card edges)

Paper: classic kraft, ripe avocado

Other: new leaf vintage button, needle & thread, handmade flower (directions above)

Finished Size: 4.25 x 5.5"

Reader Interactions

Comments

  1. ElizabethB says

    May 31, 2009 at 11:13 PM

    I just posted a link to a crochet flower tutorial on twitter about 20 minutes ago. 🙂 I will be posting another one now to your tutorial. How awesome all of these ideas are. Great job by all the designers.

    Reply
  2. Julia Aston says

    May 31, 2009 at 11:25 PM

    What great ideas for easy embellishments! I love your crocheted flowers Nichole – thanks for all the details on ‘how to’ – maybe I can give it a try!

    Reply
  3. Anne Lawrie says

    May 31, 2009 at 11:33 PM

    Thanks so much, Nichole. I had already asked my mom to teach me how to do such flowers. Now she won’t have to re-invent the wheel.

    Reply
  4. Linda C. says

    May 31, 2009 at 11:55 PM

    Thank you, thank you for the step-by-step instructions for the crochet flowers! Great ideas & great inspiration!

    Reply
  5. Karen says

    June 1, 2009 at 12:47 AM

    Thank you, Nichole! About a year ago, I stopped buying premade embellishments and decided to focus my crafting dollars on supplies to make my own…..whatever I want to make with it! I have oodles and oodles of premade embellishments and while so many of them are simply devine, they often are either not exactly what I am looking for at the moment or I just forget that I have them! So, I think it is FABULOUS that you have challenged your DT to show us their fantastic ideas for ways to make our own embellishments…..with PTI’s great supplies, of course! :>

    Reply
  6. Deepa M. says

    June 1, 2009 at 12:48 AM

    THANK YOU for sharing the pattern for the crochet flowers!! I’ve loved that look but it’s just not in my budget right now … love that I can make my own. Now if only they turn out as pretty as yours …. You are a doll 🙂

    Reply
  7. Katie says

    June 1, 2009 at 12:51 AM

    THANK YOU! THANK YOU! THANK YOU! Now all I need to do is practice! Hopefully I’ll be able to get mine looking just as nice as yours!

    Reply
  8. Tamikko Gordin says

    June 1, 2009 at 12:52 AM

    I love love love these! They’re actually the nicest ones I’ve seen. Thank you so much for sharing these with us. Crochet flowers are so expensive. I think they’ll be fun to make too.

    Reply
  9. Leonie - Australia says

    June 1, 2009 at 1:08 AM

    How cute, Thank you for sharing how to make them. I was wondering if we are going to get a tour of your new craft room you were doing a while back, I would love to see it. Thanks for the inspiration!

    Reply
  10. Kim P says

    June 1, 2009 at 2:43 AM

    Hi. Love your tutorial. I’ve made a few of my own embellies as well, probably not so much because of the $ factor, but more to do with not being able to find exactly the right colour, style etc. A short while ago I came across an idea on the web to create paper casting embellishments using rubber stamps. I think you will like this idea too.

    http://kimsprice.blogspot.com/2009/05/cp-sketch-13.html

    Just finished making another card using this technique which I’ll post tomorrow when I photograph it.

    Here’s to making your own embellies 😉

    Reply
  11. SueB says

    June 1, 2009 at 6:03 AM

    Nichole – you are the BESTEST!!! I have been looking for a crocheted pattern for several months and could never find one I liked or the size I wanted. Thank you for doing this for me! I just love these little crocheted flowers.

    Reply
  12. Janelle says

    June 1, 2009 at 7:13 AM

    Wow! After looking at each blog I’m feeling very inspired. Also wondering, Nichole, if you’re going to add Kelly to your sidebar along with Maggie — which would be helpful to me (and I’m sure others!) as I often jump from your blog to those of the DT. And now I just need to learn how to crochet…

    Reply
  13. Kacey says

    June 1, 2009 at 7:30 AM

    WOW – thanks for all the hard work on the tutorial for the flowers – I can’t wait to try it (I have never crocheted in my life!). I love the DMC list too – again thank you! I have found a lot of inspiration here today, from you and the other designers – thank you all!

    Reply
  14. Conniecrafter says

    June 1, 2009 at 8:19 AM

    Love all the embellishment ideas, especially the flower, I too have been working on doing my own, I appreaciate you sharing your flower pattern!

    Reply
  15. Monica says

    June 1, 2009 at 8:28 AM

    Great topic!
    I love making my own embellishments! Always surfing around the net to find new ideas and inspiration. Actually put a post on my blog yesterday, showing some cute strawberry charms I made the day before.
    And today you have this great topic about homemade embellishments! Great! Love it!
    Once and a while I get the taste of croching flowers and as I am, I am fully into it LOL!! And guess what: have been croching flowers for days! I do them before sleeping LOL!! Just a few every night… I am weird, I know! But….I really like your tutorial on this flower chroching and I will sure try this recipe! It seems to taste great!

    Happy Srappings,
    Monica

    Reply
  16. cindi says

    June 1, 2009 at 8:48 AM

    Those flowers are beautiful!!!
    Now I need to learn to crochet! 😉

    Reply
  17. Jessica says

    June 1, 2009 at 8:57 AM

    Lovely embellishment ideas!!! I learned to crotchet flowers a little while ago. I used Learning to Crochet by Klutz (yeah, the kids book) If you are looking into learning how to crochet this book is fun it has cute projects (plus a similar flower) and is kid friendly (if you have a little girl you’d like to teach). Thanks again ladies for the inspiration 🙂

    Reply
  18. BethieJ says

    June 1, 2009 at 8:57 AM

    I LOVE EVERYTHING.. THANKS for sharing such INSPIRING goodies with us! I am off to peek closer at the teams goodies!
    Have a GREAT day!

    Reply
  19. conniemelancon says

    June 1, 2009 at 9:14 AM

    Thank you for the instructions. Love your flower and the other embellishments.

    Reply
  20. Nimue says

    June 1, 2009 at 9:45 AM

    Thanks for the tutorial, Nichole. I’m really looking forward to making up a bunch – Nimmy

    Reply
  21. Mary Duffek says

    June 1, 2009 at 10:47 AM

    Nichole!!! Wowzers…love, love this pattern and will have to try it. I have been searching and searching for the perfect crochet flower pattern to use on my cards and you did it! Sweetness for me. thanks for sharing.

    I also purchased some DMC floss this morning….There is a discrepancy on the color chart. Sweet blush is DMC # 225 (not 3804) and Raspberry Fizz is DMC# 3804 (not 225) looks like numbers were accidently switched. Thought you’d like know.

    Many Blessings and thanks ALL of the continual inspiration!

    Reply
  22. erica m. says

    June 1, 2009 at 12:13 PM

    I just learned how to crochet flowers the other night. I saw the ones that Melissa Bickford’s mom makes and decided to learn for myself. I had never crocheted before, so I looked for tutuorials online and ended up learning from a video on you tube. I say this because I wanted everyone to know they can do it, too, even if they haven’t crocheted before. It just takes a little patience. Thanks for the new pattern. I will be trying this one today.

    Reply
  23. Elizabeth S. says

    June 1, 2009 at 12:40 PM

    Oh, I love crocheted flowers. Thank you for the pattern I am going to have to sit down and make some.

    Reply
  24. BarbW says

    June 1, 2009 at 12:47 PM

    I love your crocheted flower pattern. I’ve been trying out various patterns I found online and nothing suited me…until now. I LOVE LOVE LOVE this flower and I plan to make many of them in all of the coordinating PTI colors. Thank you so much for sharing. You’re the best! 🙂

    Barb

    Reply
  25. amymom24 says

    June 1, 2009 at 1:01 PM

    GORGEOUS!!!!!! You are so insanely talented;)

    Reply
  26. Dizzy Broad says

    June 1, 2009 at 1:20 PM

    What a clever idea to use DMC floss!!! I have been crocheting similar flowers using the limited colors of crochet thread so I’ll be sure to pick up some floss next time I’m at the craft store. Thx for the DMC/Papertrey Ink color comparison! You’re amazing!

    Reply
  27. Jean in NH says

    June 1, 2009 at 2:07 PM

    PERFECT project to work on while waiting in the carpool line at school, dentist office or at the lake this summer!! Packable, portable and pretty! I can’t wait to pick up my crochet hooks again! Thanks for the very clear instructions!!

    Reply
  28. WIndy Robinson says

    June 1, 2009 at 2:48 PM

    Awesome ideas all around– thanks so much for putting this post together.

    Reply
  29. trina says

    June 1, 2009 at 4:06 PM

    OMG!!! the crochet flowers are ingenious and thanks for sharing how you made them and the step by step instructions. Can’t wait to try them, gonna stop at Michael’s on the way home tonight.

    Reply
  30. Debbie Fisher says

    June 1, 2009 at 5:57 PM

    My g’ma used to make me crocheted flowers before they were so popular now! I wish she was alive to teach me.

    Thank you so much for sharing how to make these. I am going to have to give it a try!

    I love that you used embroidery floss! I would never have thought to do that and I have LOTS of colors from my cross-stitch days!

    Reply
  31. Vina says

    June 1, 2009 at 6:24 PM

    I love the pretty crochet flowers! I have some pink DMC & a ton of crochet hooks in my stash. I can’t wait to make a few tonight. Thank you for sharing the tutorial!!

    Reply
  32. CarolLynn says

    June 1, 2009 at 7:19 PM

    Thanks for sharing your pattern. I really enjoy crocheting flowers. I use the DMC No. 5 Cotton Perle.

    Reply
  33. Tamara says

    June 1, 2009 at 7:29 PM

    I love these flowers! thanks for the tutorial, now I just have to learn how to crochet, or convince a friend to make them for me.

    Reply
  34. Heidi S says

    June 1, 2009 at 7:53 PM

    Oh my Nichole! You’ve outdone yourself again! Wow!!!!

    Reply
  35. Julie Masse says

    June 1, 2009 at 8:35 PM

    Beautiful card and flower!! I love making them – although I never thought to try using DMC floss – I have a TON of that too!! 🙂

    Reply
  36. ChrisTea says

    June 1, 2009 at 9:16 PM

    I am in heaven. I think I might just melt right here into the floor with all these AMAZING ideas!

    Reply
  37. Ree says

    June 1, 2009 at 10:00 PM

    OMG! Thank you so much for the crochet pattern. This is too funny, because I recently taught myself to knit. I made a friend a baby blanket. Then I decided that I’d teach myself to crochet…why not right? I had seen the book on knitted and crocheted flowers and thought maybe someday…scaned the internet for hours searching for free patterns. I went to the store just today and bought a kit to teach meselfself to crochet. My Grandma had taught me a few things when I was little. So, I am picking up crocheting faster than knitting. Long story cut short….Thank you for the crochet pattern. It is just what I’ve been looking for and wanted.
    As always, you do such amazing things.

    Reply
  38. Julie Sokolowski says

    June 1, 2009 at 10:05 PM

    Thanks to the entire DT for all the inspiration today! I will definately be duplicating several of the ideaas. Thanks a ton for the crocheted flower pattern. I don’t know how you always do it just exactly the way I would want to do it. I searched extensively online for just the right flower pattern and tried several without much success. I mean, I made the flowers but they weren’t the right size, couldn’t find the right color yarn….yada, yada, yada. It never occured to me to use DMC floss. To bad it’s almost 10pm and I can’t run out and buy thread now.

    What a round about way to get to it, but your a genius!

    Reply
  39. Jacque (SCS: Petals) says

    June 1, 2009 at 10:05 PM

    Thank you so much! I struggled a bit to get the second layer done and in the right position. But, after a few trial/error attempts, I got it figured out. It’s great, and you’re right, now that I’ve got it down…super quick! Again, many thanks for taking the time to make this and share the pattern!

    Reply
  40. Andrea McCulley says

    June 1, 2009 at 11:49 PM

    Thank you so much for the instructions and resources on crocheted flowers. This is EXACTLY what I have been wanting access to!! I really appreciate you sharing!

    Reply
  41. Paula says

    June 2, 2009 at 5:53 AM

    Lovely ideas. If only I could use a needle!

    Reply
  42. marti {pezadoodle} says

    June 2, 2009 at 6:12 AM

    wonderful post – i too love to make my own crocheted embellies! the tutorial was really well done!

    Reply
  43. Diane says

    June 2, 2009 at 7:31 AM

    LOVE the idea of using embroidery floss for these! I recently started making my own flowers and found several colors of crochet thread, but they are such large spools, I will probably never use all of the thread. Plus, embroidery floss comes in a ton of colors. Thanks so much for sharing these awesome ideas!
    Diane

    Reply
  44. Eveline van Heijst says

    June 2, 2009 at 7:55 AM

    Nicole, thank you very much for this great tutorial and pattern. I have been haunting the web for a good crochet pattern for a flower like this. I have so many DMC yarn I can make a boatful of flowers.
    Eveline.

    Reply
  45. Tamara W says

    June 2, 2009 at 10:29 AM

    Ohhhhh – I can NOT wait to get home! I can not believe I have floss, crochet hook and PTI vintage buttons. You are SOOO talented and I am going to make flowers to fill a jar. Thank you so much. Tamara

    Reply
  46. TishSch says

    June 2, 2009 at 11:00 AM

    Love all these tips! I think I love making my own embellishments as much as card making and scrapbooking itself. I love the challenge! By the way, I tried your crocheted flower pattern, and it’s wonderful! As usual, my tension was a little too tight on the first couple I made (a common problem I have) which caused the ‘inside’ flower to poof up a little bit more than yours, but since I was making them in yellow (just happened that was the first yarn I picked up) they ended up looking just like daffodils!! Such a totally cool accident! But, I fixed my tension problems and the others turned out great and look just like yours! It’s a great pattern-fast, easy, and pretty! Thank you thank you thank you!

    Reply
  47. Elizabeth Beasterfield says

    June 2, 2009 at 2:11 PM

    Nichole, dear, this ROCKS!! I’m a crocheter but didn’t have time to find a pattern nor am I advanced enough to create my own – so this ROCKS!! I’m going on a road trip in a few weeks and this will be the PERFECT take along project for me and my sister to work on together perhaps by the pool! 😉 Thanks soooo much!

    Reply
  48. Cheryl says

    June 2, 2009 at 3:04 PM

    I am going to try these flowers; they are soooo cute. Can you tell me if the hook you used is a stainless (my grandmother had a set and not sure they even make them anymore) or aluminum, which is what I have purchased in the past. They have letter markings and not numbers. My grandmother’s set does not have a size 2. Thanks for any help in locating the proper size.

    Reply
  49. Kathie in Vegas says

    June 2, 2009 at 4:28 PM

    Nicole you are awesome, PTI is awesome, your design team is awesome! I spent an hour last week looking on the web for the flower pattern. I sort of gave up for the time being, then there you were with an even cuter one! I tell everyone about PTI. Thanks to you (an the deisgn team) for the great ideas . Month after month you guys give us super new ideas using different products to create unique and fun things!

    Reply
  50. Britiney says

    June 2, 2009 at 5:51 PM

    Did you use regular crochet thread, like you would use for counted cross stitch – with the 6 threads? Or did you use the DMC pearl cotton? I bought the pearl cotton today (which looks like a giant version of the other) and am going to give it a try. Hopefully I bought the right thing! Thanks!

    Reply
  51. Kristina says

    June 2, 2009 at 6:22 PM

    HOLY MOLY is all I have to say! I have been thinking lately about how I could make my own crochet flowers and I am not good at crocheting, AT ALL. I come here and YOU have the perfect tutorial on how to do it and it looks so simple! I can’t thank you enough! Have I mentioned that YOU ROCK?!

    Reply
  52. Karen Rose says

    June 2, 2009 at 8:59 PM

    Nicole … you are so very good to us, PTI fanatics! I can’t wait for your posts and you’ve got such a great design team! I wish I had 8 more hours in a day to try all the projects and this one I’ll be trying real soon… I think I have almost 70% of DMC colours already! Thanks loads!

    Reply
  53. Angela says

    June 2, 2009 at 9:37 PM

    Dear Nichole…

    Thank you! Yesterday, my six year old daughter watched me do the happy dance after reading your blog, and I was in the best mood all day because I have been looking and looking for how to easily crochet a small flower and there you were with the answers. I bought all of the yarn colors (though I didn’t see my favorite Aqua Mist on your list) and last night, I crocheted my first flower.

    I’m especially happy because I’d forgotten everything my grandmother taught me years ago, so that first flower is in memory of her. Thank you so much for taking SO much time to put this together – I appreciate the links, the tutorial, and the outcome. Your products are fabulous, but you and your team are the buttercream icing on any kind of cake.

    I hope you enjoy your week as much as you’ve helped me to enjoy mine. Thanks again.

    Reply
  54. Vina says

    June 2, 2009 at 10:59 PM

    Ok, I’m addicted to making these little crochet gems! I made a bunch in pink last night & now I NEED to pop into Michaels for more DMC colors! Love this crochet pattern! Thank you!

    Reply
  55. Willireb says

    June 3, 2009 at 4:23 AM

    I’ve tried the crochet flowers demonstrated by Nicki Estes in her April 6th blog. They turned out well if I don’t say so myself, and I’ve gotten a lot faster. To get them to match my papers, I died them using distress reinkers. I haven’t tried any other reinkers, but I bet the Palette and the StayzOn will work well. Oh, I do love this hobby!!!

    Reply
  56. Katy says

    June 3, 2009 at 4:44 AM

    TFS! I love the flower! I have not cared for them,but you definitly sold me on this one!

    Reply
  57. Allison F says

    June 3, 2009 at 6:01 AM

    Gorgeous crocheted flower. I’ll have to give that a try – I’ve just started learning how to crochet!

    Reply
  58. Emmy says

    June 3, 2009 at 2:48 PM

    I am so excited you gave a tutorial on this. I have been wanting to do this for a long time! Many thanks! Your flower is gorgeous!

    Reply
  59. Cindy says

    June 3, 2009 at 3:56 PM

    Gorgeous card! Love the simplicity and that flower! I will be making some of these tonight in front of the tube. I have gotten my flower patterns from various sources and have been experimenting too. Thanks for the great tutorial!

    XO
    Cindy

    Reply
  60. Margo says

    June 3, 2009 at 4:10 PM

    I have been following your blog for almost a year now. We have a small card club and I am making crocheted flowers for their Christmas in July presents…thanks for another pattern I can use for one more flower for each of them! I too use the embroidery floss for color choices–the varigated are beautiful!

    Reply
  61. Laura P says

    June 3, 2009 at 6:44 PM

    I have never crocheted before but my mother is rather nifty in the field, so I’ll be passing your instructions onto her so she can teach me! Thanks so much, the one on your card is divine.

    Reply
  62. Rose says

    June 4, 2009 at 5:51 AM

    Really cute idea! I’ll have to give it a go!

    Reply
  63. Giovana says

    June 4, 2009 at 3:02 PM

    Awesome ideas!!! I am a “zero” crochet person, but after this I will give it a try.
    I love all the ideas!! Thanks so much for all the inspiration.

    God bless
    Giovana

    Reply
  64. TishSch says

    June 4, 2009 at 4:00 PM

    I love your pattern! I’ve been making them like crazy out of all kinds of yarns and crochet thread and using different sizes of needles. I’ve got these little flowers of all sizes and colors now! They are just so super easy and fun!

    Reply
  65. HeidiQ says

    June 4, 2009 at 5:36 PM

    wonderful instructions for crocheting a flower – i’m new to crochet and i just finished one….it was easy the way you explained it and showed the pictures 🙂
    thanks!!

    Reply
  66. Julie Koerber says

    June 4, 2009 at 8:04 PM

    WOW! Thank you so much for the crocheted flower instruction – I am off to look for yarn as we speak! All of the designers ideas were just fabulous!

    Reply
  67. Jeneen Lloyd says

    June 4, 2009 at 11:58 PM

    Nichole,
    Thank you so much for this tutorial. I’ve tried several times to learn to crochet and never had very much luck. I tried your tutorial and my flowers came out really good.
    Thanks, Jeneen

    Reply
  68. Michelle Payne says

    June 5, 2009 at 10:04 AM

    I was so excited to see this post. My grandma is here visiting and she crochets! I printed off the directions, went and bought all the DMC colors, and grandma has been making flowers like crazy for me. Thanks Nicole.

    Reply
  69. kjo13 says

    June 5, 2009 at 11:36 AM

    Dang! I so love your flowers but I knit & never learned to crochet. Yours ARE the best! Awesome of you to share. I have searched for knitted ones online, & like you, I don’t see just want i want. I WANT yours in KNITTED form! Maybe some kind soul will see this and post one. I will keep checking.

    And I LOVE your products. I always get my white cs from you and of course some other ‘extras’ (wink) when i order!!!

    Thank you much!

    Reply
  70. Jan Brooks says

    June 5, 2009 at 5:04 PM

    Hi Nicole, Great flowers!

    I have a question for you. You said you used DMC cotton embroidery floss. How do you prevent the 5 threads from unwinding as you crochet with it? I’m having a heck of a time keeping them all together.

    Are you by chance using DMC Perle Cotton instead?

    Thanks,
    Jan

    Reply
  71. Roxanne says

    June 7, 2009 at 3:27 PM

    Thank you so much Nichole! I sure hope this pattern turns into a quick link from your site. I’ve been really wanting to find a pattern and give it a try myself. It’s been forever since I’ve crocheted but this just makes it too easy not to “just do it”! Amazing how you just “know” what’s on my mind and what is of interest to me. So awesome!

    Reply
  72. Beth R. says

    June 8, 2009 at 6:21 PM

    Great idea! I’ve been looking for a nice small flower to start with my very limited crochet skills. Thanks so much. Hey have you ever tried to dye string to match the PT colors? I’ve never tried it but seems like it would be very cool.

    Reply
  73. Karen in Houston says

    June 9, 2009 at 7:12 AM

    Hi, thanks Elizabeth for the inspiration for others. I am a senior who has crocheted for years and I have an etsy store(karensneedle) with some crochet flowers and other embellies in it. I have tried and use several different types of fiber to create unique flowers and I do sell my flowers rather inexpensively depending on the design,the above comments re store are for those who do not crochet or do not want to take the time to crochet. I sell these to supplement my social security and to have extra $$$ for scrappy supplies. It is so much fun to create your own embellies. Thanks to all the gals who created great embellies and tutorials for this thread. BTW the tutorials are fantastic. Thanks again.

    Reply
  74. Karen in Houston says

    June 9, 2009 at 7:14 AM

    Here is a link to my blog:
    http://treasureddreams.blogspot.com

    Reply
  75. Amy Kilbreath says

    June 9, 2009 at 12:53 PM

    This is amazing!! Thank you, thank you!! I don’t know what I’d do without PTI or your blog! And your post of “sharing my bliss” makes me so happy… life is good!

    Reply
  76. Tammy Hershberger says

    June 9, 2009 at 2:40 PM

    Nicole, you are utterly fabulous! Thanks for the amazing instructions, and the idea of using DMC floss for more color variety! I can’t wait to give this a try!

    Reply
  77. Lisa says

    June 10, 2009 at 1:22 PM

    Love the crocheted flower. I’ve made a dozen and can not seem to stop. These will add to all the cards I’m making nowadays. 🙂

    Thanks so MUCH

    Reply
  78. Lindsay Weirich says

    June 14, 2009 at 6:28 AM

    Wow, nicole, love this! thanks for taking the time to put the photos and intructions down! I’m bookmarking this!

    Reply
  79. merry says

    June 22, 2009 at 4:26 PM

    Thanks so much for the wonderful tutorial…what a beautiful simple card you have created with the flower.

    Reply
  80. Suzanne Deyarmond says

    July 7, 2009 at 8:40 AM

    I LOVE your site! So far everything I have seen is Beautiful!!! There is sooo much to look at! I think it is great to see people sharing ideas and tips etc. My husband says I should put things up but first I would have to get one of my kids to all of the computer part. (also I’m alittle intimated by others…I’m my own worst enemy. Once again GREAT ideas…
    God Bless you & yours
    Suzanne

    Reply
  81. Suzanne says

    July 7, 2009 at 8:45 AM

    Beautiful, I Love your site. THANKS

    Reply
  82. gift to Philippines says

    August 25, 2009 at 9:57 PM

    This post is very innovative you saw the quality was so great, it’s good to be use also as a gift no doubt very nice work. Keep up the good work!

    ford

    Reply
  83. rac says

    September 8, 2009 at 1:35 PM

    thank you! I’ve been bugging my mom for this pattern, but she has not have time….

    Reply
  84. Edzia says

    September 27, 2009 at 9:10 AM

    Thank you

    Reply
  85. gifts delivery philippines says

    October 28, 2009 at 6:33 AM

    Amazing project!How did you do that?such a great idea.

    ~Ashley~

    Reply
  86. Nerina says

    November 15, 2009 at 7:36 PM

    I’m pretty late here, but wanted to say that this post is *awesome*! Thanks for sharing this!

    Reply
  87. Term Paper says

    January 14, 2010 at 4:27 AM

    What a interesting Challenge,I like it.And There is much important information about that how to make this artificial flower I like it so much.

    Reply
  88. Flowers Online says

    March 7, 2010 at 2:02 PM

    Just wondering, if i can use this information for my research paper’s project. However, i admire the way you present your words … Thank u anywys..

    Reply
  89. Harpa says

    March 24, 2010 at 7:05 PM

    These fowers are buitiful.

    So I decided to translate it to Icelandic, mostly for my doghter living ín Denmark but also for my scrapbook freands at http://www.scrapbook.is.
    Hope you don´t mind.
    Please let me know if you don´t want me to post this.

    Here is a link to my blog and there is another link to the pdf document I created.
    http://harpahauks.blogspot.com/2010/03/hekla-blom-crochet-flower.html

    hope this all will turn out to be ok on the web.
    Best regards
    Harpa in Iceland
    e-mail: harpahauksd@gmail.com

    Reply
  90. ร้านดอกไม้ says

    June 10, 2010 at 1:55 PM

    Great!
    Those result – flowers are so nice!!!
    So now I have to learn what is crochet!

    Reply
  91. Johnah says

    July 22, 2010 at 2:41 PM

    What an awesome site!!!!

    Reply
  92. Vivienne C says

    July 30, 2010 at 7:42 PM

    My Mum just taught me to crochet flowers two days ago, using your tutorial here. I’ve now already made 3 flowers! Thank you for sharing your instructions.

    Reply
  93. Dianna says

    August 9, 2010 at 10:14 PM

    LOVE this crochet tutorial! I just started crocheting a few weeks ago and have been searching for a flower tutorial that I could follow. I’ve found it! Your pic’s are awesome, but even better than those are the instructions with them. Super easy to understand even for me! Thank you! There’s one thing that I can’t figure out still. Could you clarify in step #9 exactly where to crochet the pattern into the 1st loop? Thru the same little hole as before or what? Help, please!

    Reply
  94. viagra online says

    August 31, 2010 at 1:20 PM

    Oh you are an enabler. I pointed these out to DH and he said that Hanukkah isn’t that far, Maybe if I waited they might show up. I can wait. Maybe.
    Ooooo! Thanks! I have been looking for just this thing!! I am going to order right now!!! Bye!

    Reply
  95. Laurel says

    January 9, 2011 at 8:27 PM

    Please help!! I am trying to follow your instructions here. But am having difficulty moving from step 8 to step 9. Can you give more guidance as how to transition from making the 5 loops into making the larger petals? I’m lost. Thanks for any assistance you can provide. Very cute embellishment!!

    Reply
  96. JenniWren says

    January 15, 2011 at 10:13 PM

    awesome, now I can combine my two favourite past-times – crochet and card making… I’ve given it a go and it looks great… thanks for this…

    Reply
  97. Julie says

    January 27, 2011 at 4:25 PM

    Thanks a “bunch” I’ve had so much fun,got a bit confused with the first by doind trbl by mistake for my first but will soon get the hang of it. Thanks again,Julie.x

    Reply
  98. Lindy says

    February 27, 2011 at 11:28 PM

    what great ideas!! Love your crocheted flowers, I have listed them on my blog with the things I want to try. Thank you for sharing!!! A way to use up all that embroidery floss I have stashed in a drawer!

    Reply
  99. Marion says

    March 3, 2011 at 3:40 PM

    Thank you so much Nichole for the pattern. I have tried the pattern and I am so pleased with the result. Only difference for me in the Uk is it costs 79pence for a skein of thread so not quite as inexpensive as you can do in the USA.
    Marion

    Reply
  100. Khin Hnin says

    March 29, 2011 at 8:51 PM

    Hello (: Thanks so much for the lovely tutorial. I was wondering for 3dc to make the small petals, does that “3dc” stand for 3 of double crochets or three double crochets in same stitch? I used three double crochets in the same stitch, but my petals are awful 😛 So I’m guessing it should be 3 of dc. (: I just want a confirmation. hehe thanks so much!

    Hugs,
    Khin

    Reply
  101. reviewsant says

    August 19, 2011 at 1:33 AM

    “You made fantastic nice points here.
    I performed a search on the issue and discovered almost all peoples will agree with your blog.
    All inclusive travel deals are not for everyone,
    but most people enjoy a vacation that is put together for them”

    Reply
  102. reviewsant says

    August 19, 2011 at 1:33 AM

    “You made fantastic nice points here.
    I performed a search on the issue and discovered almost all peoples will agree with your blog.
    All inclusive travel deals are not for everyone,
    but most people enjoy a vacation that is put together for them”

    Reply
  103. خياطة وتفصيل says

    February 14, 2012 at 4:27 AM

    Thanks for the tutorial, Nichole. I’m really looking forward to making up a bunch – Nimmy

    Reply
  104. Seema Mulgaonkar Desai says

    March 13, 2012 at 6:30 AM

    my daughter likes such stuff and me too!

    Reply
  105. Tamara says

    August 14, 2012 at 3:03 PM

    Such a great idea! Found you via a series of links back on Pinterest, and linked direct to this page on my blog this afternoon – http://tinyurl.com/unpinning-pinterest if you want to check it out. Thank so much for sharing!

    Reply
  106. Lisa K says

    October 6, 2012 at 2:14 PM

    So, I am a few years behind the rest of the world in creating embellishments. I love to crochet and just found your tutorial on these wonderful flowers. I would love this tutorial is an easy to print format, which for me is a PDF file. I copied down the instructions and will give them a try. Thank you for the wonderful tutorial.

    Reply
  107. Mike says

    October 11, 2012 at 7:25 PM

    It’s true one fine detail can make all the difference. What separates great art from mediocre art is those little differences.

    Reply
  108. Debi Y. says

    October 30, 2012 at 10:08 PM

    Thanks so much for your flower pattern. I have made one to put on a hat for my daughter. 🙂

    Reply
  109. vaz05@yahoo.com says

    November 21, 2012 at 7:28 AM

    Thanks for the easy flower tute. I found you on Pinterest. I used worsted weight yarn and it came out just the right size to put on a headband/ear warmer. Thanks for sharing 🙂

    Reply
  110. Alyssa says

    December 24, 2012 at 10:16 AM

    Thanks so much!! How did you attach the flower to the card. Was it a hot glue gun?
    Thanks!

    Reply
  111. Linda says

    February 18, 2013 at 10:43 AM

    Thank you so much, I was looking for an easy yet beautiful flower to use!

    Reply
  112. April says

    October 25, 2014 at 7:52 AM

    I tried to find an email to say “thank you” personally for the embroidery floss flower pattern. I love colors and have always thought maybe embroidery floss would work for small things such as flowers. Still, I wanted to SEE where someone had done it before neatly. I’m now very excited about this new prospect! So, thank you from the bottom of my colorful heart!

    Reply
  113. kamoe fiu says

    February 24, 2015 at 5:35 PM

    Thank you so much for this tutorial..i’ve just finished making this flower and it looks beautiful. it is for a thank you card for the people at my work for my recovery.

    Thank you once again.

    Reply
  114. Polina says

    June 6, 2015 at 12:49 AM

    The pattern is wrong written. Step 5 – if you keep creating [sc, 3 dc, sc] in every other sc – you will end up with 10 petals, because the pattern said to make 10 of them. You, however, have 5 petals obviously. So something is wrong with the pattern.

    Reply

Leave a Reply Cancel reply

Your email address will not be published. Required fields are marked *

Primary Sidebar

papertreyink

papertreyink

Welcome to Papertrey Ink! We bet you have an amazing artistic side of you that loves to craft. We want to be your new home for everything stamp, dies, paper, and ink. Everything we offer will help you build a toolkit where you can create anything for any occasion for anybody. Take a look around and find your next project here.

INSTAGRAM

papertreyink

5,348 45,811

Simple Style • Endless Possibilities
#PapertreyInk #PapertreyProjects

Papertrey Ink | Paper Crafting

papertreyink

View

May 12

Open
Add a soft, whimsical touch to your next project w Add a soft, whimsical touch to your next project with the Elegant Edges: Fresh Cuts Die. Designed to evoke gentle curves and airy movement, it’s perfect for sky-inspired scenes, baby cards, and all things dreamy.

#elegantedges, #papercraftdetails, #papertreyink, #cardmakinglove, #diesetdesign

Add a soft, whimsical touch to your next project with the Elegant Edges: Fresh Cuts Die. Designed to evoke gentle curves and airy movement, it’s perfect for sky-inspired scenes, baby cards, and all things dreamy.

#elegantedges, #papercraftdetails, #papertreyink, #cardmakinglove, #diesetdesign
...

23 1

papertreyink

View

May 12

Open
Graduation season is here, and our Big Congrats to Graduation season is here, and our Big Congrats to the Grad stamp and die set is the perfect way to celebrate the milestone! Whether you’re crafting something simple or adding all the bells and whistles, this bold cap-centered design makes every card a standout.

Comment April and we’ll send you the link!

#graduationcards, #handmadecongrats, #papercrafting, #papertreyink, #cardmakersofinstagram

Graduation season is here, and our Big Congrats to the Grad stamp and die set is the perfect way to celebrate the milestone! Whether you’re crafting something simple or adding all the bells and whistles, this bold cap-centered design makes every card a standout.

Comment April and we’ll send you the link!

#graduationcards, #handmadecongrats, #papercrafting, #papertreyink, #cardmakersofinstagram
...

109 1

papertreyink

View

May 11

Open
This Mother’s Day, we’re saying thank you the This Mother’s Day, we’re saying thank you the best way we know how—
With 15% off, just for you. 💗

Whether you’re a mom, a memory-keeper, or someone who lifts others up one card at a time—we see you. We celebrate you. And we’re so grateful you’re part of this beautiful community.

Swipe through to feel the love—and then head to the site to treat yourself. You’ve earned it. ✨

#papercraftinglove, #mothersdaygifts, #handmadecards, #papertreyink, #cardmakersofinstagram, #craftingcommunity

This Mother’s Day, we’re saying thank you the best way we know how—
With 15% off, just for you. 💗

Whether you’re a mom, a memory-keeper, or someone who lifts others up one card at a time—we see you. We celebrate you. And we’re so grateful you’re part of this beautiful community.

Swipe through to feel the love—and then head to the site to treat yourself. You’ve earned it. ✨

#papercraftinglove, #mothersdaygifts, #handmadecards, #papertreyink, #cardmakersofinstagram, #craftingcommunity
...

74 2

papertreyink

View

May 11

Open
There’s never a wrong time to say “I love you”… but with today being Mother’s Day, it feels especially meaningful. 💖

Whether it’s for your mom, a friend who’s like a mom, or someone who simply deserves to feel loved, we’ve rounded up 10 handmade card ideas that say I love you — without needing a Valentine’s excuse.

📝 Comment 10 and we’ll send it to you a link to the blog post. 

#CardMakingIdeas, #MothersDayCards, #PapercraftingInspiration, #HandmadeCardsWithLove, #PapertreyInk

There’s never a wrong time to say “I love you”… but with today being Mother’s Day, it feels especially meaningful. 💖

Whether it’s for your mom, a friend who’s like a mom, or someone who simply deserves to feel loved, we’ve rounded up 10 handmade card ideas that say I love you — without needing a Valentine’s excuse.

📝 Comment 10 and we’ll send it to you a link to the blog post.

#CardMakingIdeas, #MothersDayCards, #PapercraftingInspiration, #HandmadeCardsWithLove, #PapertreyInk
...

139 6

papertreyink

View

May 10

Open
Some dies just shine in every season. ✨ The Bord Some dies just shine in every season. ✨
The Border Bling: Skinny Star Frame adds a whimsical touch to any card with its delicate star-lined border. Whether you’re celebrating a new baby, the Fourth of July, or just want to sprinkle a little magic onto your project, this versatile frame brings dimension and charm every time.

It’s playful. It’s timeless. And it’s one of those dies you’ll reach for again and again.

⭐ #papertreyink #borderbling #cardmakersofinstagram #handmadecards #starframe #papercraftlove #versatiledies

Some dies just shine in every season. ✨
The Border Bling: Skinny Star Frame adds a whimsical touch to any card with its delicate star-lined border. Whether you’re celebrating a new baby, the Fourth of July, or just want to sprinkle a little magic onto your project, this versatile frame brings dimension and charm every time.

It’s playful. It’s timeless. And it’s one of those dies you’ll reach for again and again.

⭐ #papertreyink #borderbling #cardmakersofinstagram #handmadecards #starframe #papercraftlove #versatiledies
...

113 1

papertreyink

View

May 10

Open
You don’t need the fanciest embellishments to sa You don’t need the fanciest embellishments to say something that matters.
Sometimes, one big word—love—is all it takes.

The This Is Big Sentiments: Love Stamp Set makes it easy to create cards that speak from the heart. Whether it’s for your mom, a friend, or someone who just needs to hear it… this set helps you say what matters most.

Because when you make something by hand, you’re not just crafting—you’re showing love.

🖤 Comment April for the link or head to PapertreyInk.com to grab yours.

#cardmakersofinstagram, #papercraftingcommunity, #mothersdaycards, #handmadecards, #craftingwithlove, #papertreyink

You don’t need the fanciest embellishments to say something that matters.
Sometimes, one big word—love—is all it takes.

The This Is Big Sentiments: Love Stamp Set makes it easy to create cards that speak from the heart. Whether it’s for your mom, a friend, or someone who just needs to hear it… this set helps you say what matters most.

Because when you make something by hand, you’re not just crafting—you’re showing love.

🖤 Comment April for the link or head to PapertreyInk.com to grab yours.

#cardmakersofinstagram, #papercraftingcommunity, #mothersdaycards, #handmadecards, #craftingwithlove, #papertreyink
...

193 3

papertreyink

View

May 10

Open
We’re using our new Cascading Stars Hot Foil Pla We’re using our new Cascading Stars Hot Foil Plate to celebrate graduation season—but don’t let the caps fool you… this versatile plate is a true staple! ✨ Whether you’re welcoming a new baby, crafting a dreamy wedding card, or just want to add a magical sparkle to your everyday designs, this hot foil plate brings texture, shine, and elegance to any project. A must-have for year-round paper crafting!

#hotfoiling #papercraftstaples #graduationcards #cardmakingessentials #handmadecards #papertreyink

We’re using our new Cascading Stars Hot Foil Plate to celebrate graduation season—but don’t let the caps fool you… this versatile plate is a true staple! ✨ Whether you’re welcoming a new baby, crafting a dreamy wedding card, or just want to add a magical sparkle to your everyday designs, this hot foil plate brings texture, shine, and elegance to any project. A must-have for year-round paper crafting!

#hotfoiling #papercraftstaples #graduationcards #cardmakingessentials #handmadecards #papertreyink
...

105 0

papertreyink

View

May 9

Open
Comment BLOOMS for a link! If you love florals wi Comment BLOOMS for a link!

If you love florals with depth and drama, Into the Blooms II is a must-have! 🌸 This die set features a gorgeous mix of flower styles, designed to add lush layers and striking dimension to any handmade card. Whether you’re crafting for birthdays, thank-yous, or just because—it’s the kind of set that makes every card pop, no matter the season.

#intotheblooms #papercraftflorals #diecutflowers #handmadecards #cardmakersofinstagram #papertreyink

Comment BLOOMS for a link!

If you love florals with depth and drama, Into the Blooms II is a must-have! 🌸 This die set features a gorgeous mix of flower styles, designed to add lush layers and striking dimension to any handmade card. Whether you’re crafting for birthdays, thank-yous, or just because—it’s the kind of set that makes every card pop, no matter the season.

#intotheblooms #papercraftflorals #diecutflowers #handmadecards #cardmakersofinstagram #papertreyink
...

298 11

papertreyink

View

May 8

Open
Looking for modern elegance in your floral cards? Looking for modern elegance in your floral cards? Always in Bloom features clean lines and layered blooms that feel fresh, minimal, and timeless. These florals are beautiful on their own or paired with your favorite sentiments for a truly polished design.

#modernflorals, #handmadecards, #papercraftingflowers, #papertreyink, #cardmakersofinstagram

Looking for modern elegance in your floral cards? Always in Bloom features clean lines and layered blooms that feel fresh, minimal, and timeless. These florals are beautiful on their own or paired with your favorite sentiments for a truly polished design.

#modernflorals, #handmadecards, #papercraftingflowers, #papertreyink, #cardmakersofinstagram
...

292 5
Follow on Instagram

FACEBOOK

Papertrey Ink

Email Subscription

I agree to be emailed to confirm my subscription to this list

Categories

Archives

Categories

Recent Posts

  • 10 Handmade Card Ideas to Say “I Love You”
  • Mom’s Kitchen stamps and dies + In Stitches: Adorable Apron dies + Seasoned with Love Sentiments stamps
  • Project Inspiration: Springtime Blessings Card by Brenda Noelke
  • Elegant Edges: Graduation dies + Reflections Numbers 6 stamps and dies
  • Framed in Success stamps and dies & Love to Layer: To a Point dies + Into the Blooms: Anenomes dies + This is Big Sentiments: Love stamps and dies #2

papertreyink

View

May 12

Open
Add a soft, whimsical touch to your next project w Add a soft, whimsical touch to your next project with the Elegant Edges: Fresh Cuts Die. Designed to evoke gentle curves and airy movement, it’s perfect for sky-inspired scenes, baby cards, and all things dreamy.

#elegantedges, #papercraftdetails, #papertreyink, #cardmakinglove, #diesetdesign
23 1

papertreyink

View

May 12

Open
Graduation season is here, and our Big Congrats to Graduation season is here, and our Big Congrats to the Grad stamp and die set is the perfect way to celebrate the milestone! Whether you’re crafting something simple or adding all the bells and whistles, this bold cap-centered design makes every card a standout.

Comment April and we’ll send you the link!

#graduationcards, #handmadecongrats, #papercrafting, #papertreyink, #cardmakersofinstagram
109 1

papertreyink

View

May 11

Open
This Mother’s Day, we’re saying thank you the This Mother’s Day, we’re saying thank you the best way we know how—
With 15% off, just for you. 💗

Whether you’re a mom, a memory-keeper, or someone who lifts others up one card at a time—we see you. We celebrate you. And we’re so grateful you’re part of this beautiful community.

Swipe through to feel the love—and then head to the site to treat yourself. You’ve earned it. ✨

#papercraftinglove, #mothersdaygifts, #handmadecards, #papertreyink, #cardmakersofinstagram, #craftingcommunity
74 2

papertreyink

View

May 11

Open
There’s never a wrong time to say “I love you”… but with today being Mother’s Day, it feels especially meaningful. 💖

Whether it’s for your mom, a friend who’s like a mom, or someone who simply deserves to feel loved, we’ve rounded up 10 handmade card ideas that say I love you — without needing a Valentine’s excuse.

📝 Comment 10 and we’ll send it to you a link to the blog post. 

#CardMakingIdeas, #MothersDayCards, #PapercraftingInspiration, #HandmadeCardsWithLove, #PapertreyInk
139 6

papertreyink

View

May 10

Open
Some dies just shine in every season. ✨ The Bord Some dies just shine in every season. ✨
The Border Bling: Skinny Star Frame adds a whimsical touch to any card with its delicate star-lined border. Whether you’re celebrating a new baby, the Fourth of July, or just want to sprinkle a little magic onto your project, this versatile frame brings dimension and charm every time.

It’s playful. It’s timeless. And it’s one of those dies you’ll reach for again and again.

⭐ #papertreyink #borderbling #cardmakersofinstagram #handmadecards #starframe #papercraftlove #versatiledies
113 1

papertreyink

View

May 10

Open
You don’t need the fanciest embellishments to sa You don’t need the fanciest embellishments to say something that matters.
Sometimes, one big word—love—is all it takes.

The This Is Big Sentiments: Love Stamp Set makes it easy to create cards that speak from the heart. Whether it’s for your mom, a friend, or someone who just needs to hear it… this set helps you say what matters most.

Because when you make something by hand, you’re not just crafting—you’re showing love.

🖤 Comment April for the link or head to PapertreyInk.com to grab yours.

#cardmakersofinstagram, #papercraftingcommunity, #mothersdaycards, #handmadecards, #craftingwithlove, #papertreyink
193 3

papertreyink

View

May 10

Open
We’re using our new Cascading Stars Hot Foil Pla We’re using our new Cascading Stars Hot Foil Plate to celebrate graduation season—but don’t let the caps fool you… this versatile plate is a true staple! ✨ Whether you’re welcoming a new baby, crafting a dreamy wedding card, or just want to add a magical sparkle to your everyday designs, this hot foil plate brings texture, shine, and elegance to any project. A must-have for year-round paper crafting!

#hotfoiling #papercraftstaples #graduationcards #cardmakingessentials #handmadecards #papertreyink
105 0

papertreyink

View

May 9

Open
Comment BLOOMS for a link! If you love florals wi Comment BLOOMS for a link!

If you love florals with depth and drama, Into the Blooms II is a must-have! 🌸 This die set features a gorgeous mix of flower styles, designed to add lush layers and striking dimension to any handmade card. Whether you’re crafting for birthdays, thank-yous, or just because—it’s the kind of set that makes every card pop, no matter the season.

#intotheblooms #papercraftflorals #diecutflowers #handmadecards #cardmakersofinstagram #papertreyink
298 11

papertreyink

View

May 8

Open
Looking for modern elegance in your floral cards? Looking for modern elegance in your floral cards? Always in Bloom features clean lines and layered blooms that feel fresh, minimal, and timeless. These florals are beautiful on their own or paired with your favorite sentiments for a truly polished design.

#modernflorals, #handmadecards, #papercraftingflowers, #papertreyink, #cardmakersofinstagram
292 5

papertreyink

View

May 8

Open
Looking for a fresh take on a classic card frame? Looking for a fresh take on a classic card frame? The Love to Layer: To a Point die brings the perfect balance of softness and structure with its unique arched top and pointed base. It’s the ideal backdrop for floral arrangements, sentiments, or layered elements—adding instant dimension with modern elegance. Whether you’re creating for spring, weddings, or just because, this die makes your design stand out beautifully.

#papercraftingessentials, #cardmakingdies, #papertreyink, #love2layer, #diecuttingfun, #handmadecards
181 1

Copyright © 2025 · Papertrey Ink.