• Skip to primary navigation
  • Skip to main content
  • Skip to primary sidebar
  • HOME
  • SHOP
  • BLOG
  • TEAM
  • Nav Social Menu

    • Email
    • Facebook
    • Instagram
    • Pinterest
    • Twitter
    • YouTube

Papertrey Ink Blog

Clear Stamps, Dies, Paper, Ink, Kits

  • HOME
  • SHOP
  • BLOG
  • TEAM

Guest Designer – Shauna – Feathered Friends

February 2021 Release Day

She Blooms + Effortless Beauties + Feathered Friends 8

Papertrey Stamp Set Assembly & Storage

February 19, 2009      Nichole Heady      35 Comments

We are always getting lots of inquiries as to the best way to assemble our stamp sets once they arrive.  Since we had so many *newbies* make purchases this release, I thought I would share a little tutorial on the easiest steps to take in this quick & easy process!

Stamp set contents

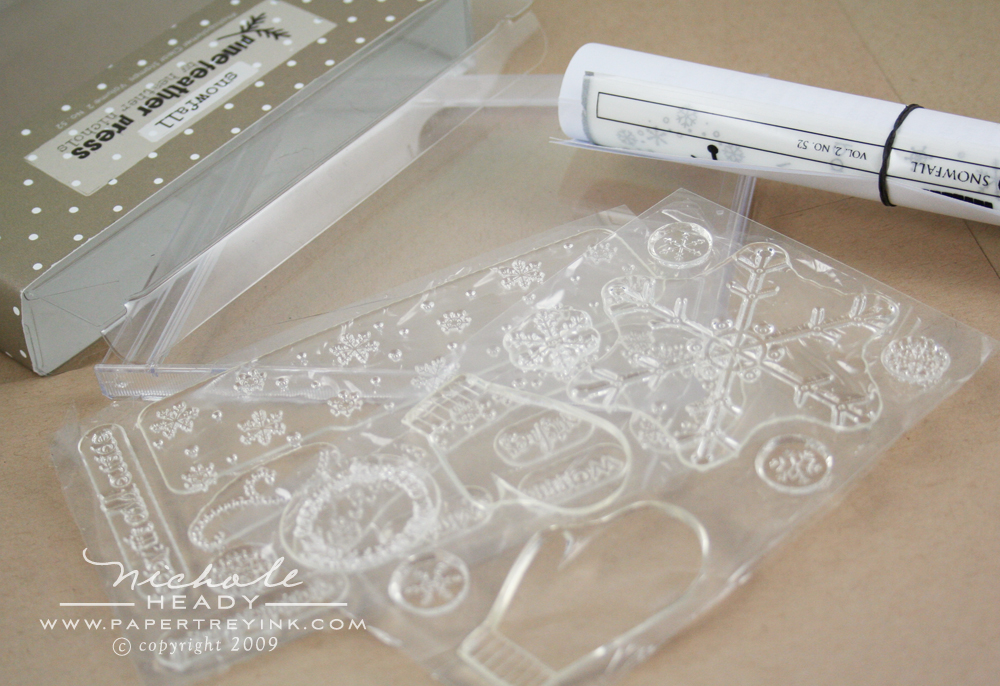
When you receive one of our $15, $18 or $24 stamp sets, they come with index labels that you can adhere to the stamp set to the acetate it comes on or a separate case (which you would need to purchase separately).

Spine label cut

A $15 set generally has one index label and a $24 set two.  One of the labels will have a spine title, noted by the rectangular frame around it.  You want to trim this from the rest of the label using scissors, a paper trimmer or craft knife.  Whichever way you choose to cut, just be sure that you do it fairly close to the black outline so that it ends up being thin enough for the spine.

Spine label applied

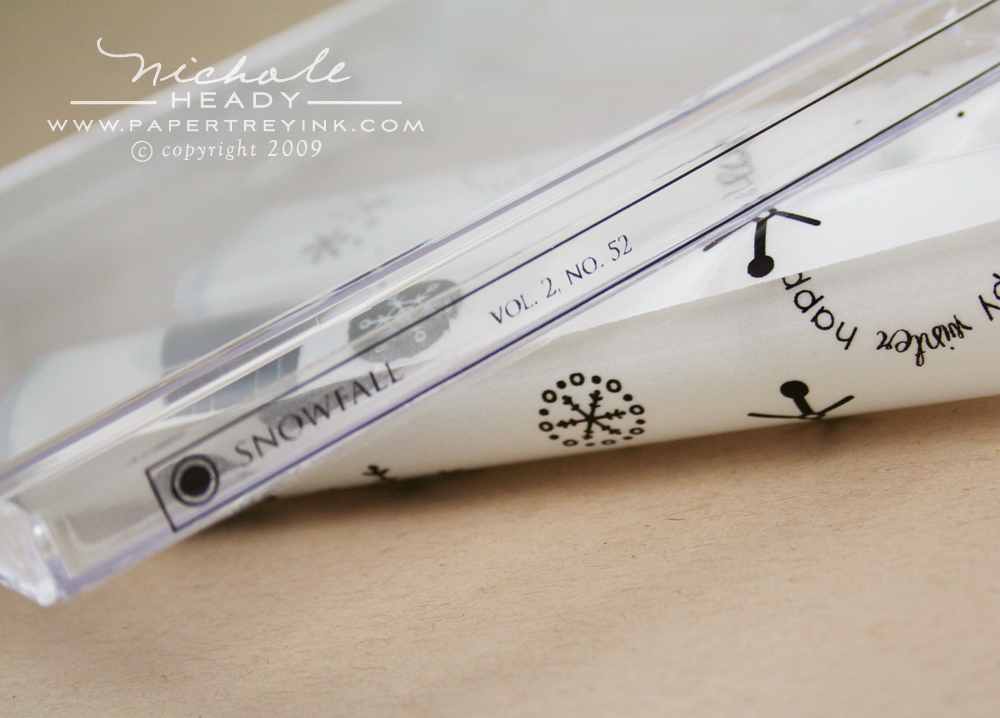
Once trimmed, just peel and stick the title to the spine of the CD case, as shown here.

Starting with end

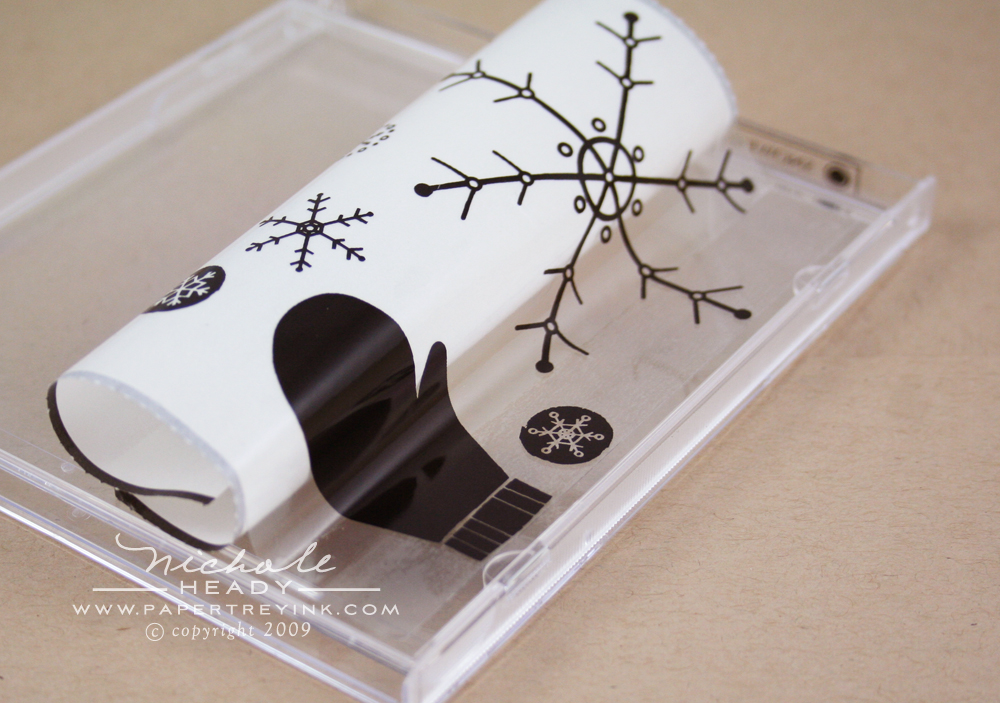
Next, you will want to apply the label you just trimmed the spine title from, to the front cover of the CD case.  Do NOT peel away the paper backing all at once, you will want to remove it gradually.  Start by peeling back about 1/2" of the paper backing and adhering just that portion to the edge of you CD case cover.  This is your chance to make sure that it is nice and straight.

Applying label

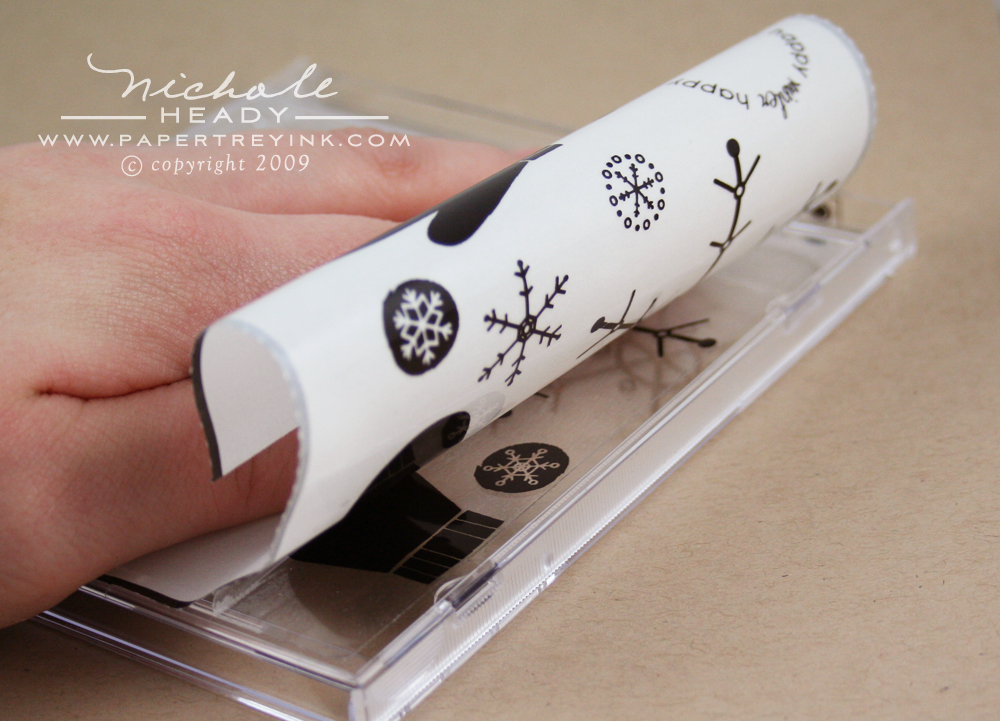
Fold the entire label over onto itself and start pulling downward, pulling the paper backing out as you go.  Since you have the label folded over as you are pulling down, the pressure of that keeps the label nice and flat, with no chance of air bubbles.

Applying label 2

At the very end, just pull the very last of the paper backing out.  Front index label now complete!  If your set has two labels, the remaining label with get applied to the outside back cover in the same manner as described above.  A little tip to remember, when you have very long stamp images in the set, it is best to apply the label so that they are running horizontally.  This gives them a bit more room on either end.

Applying stamps

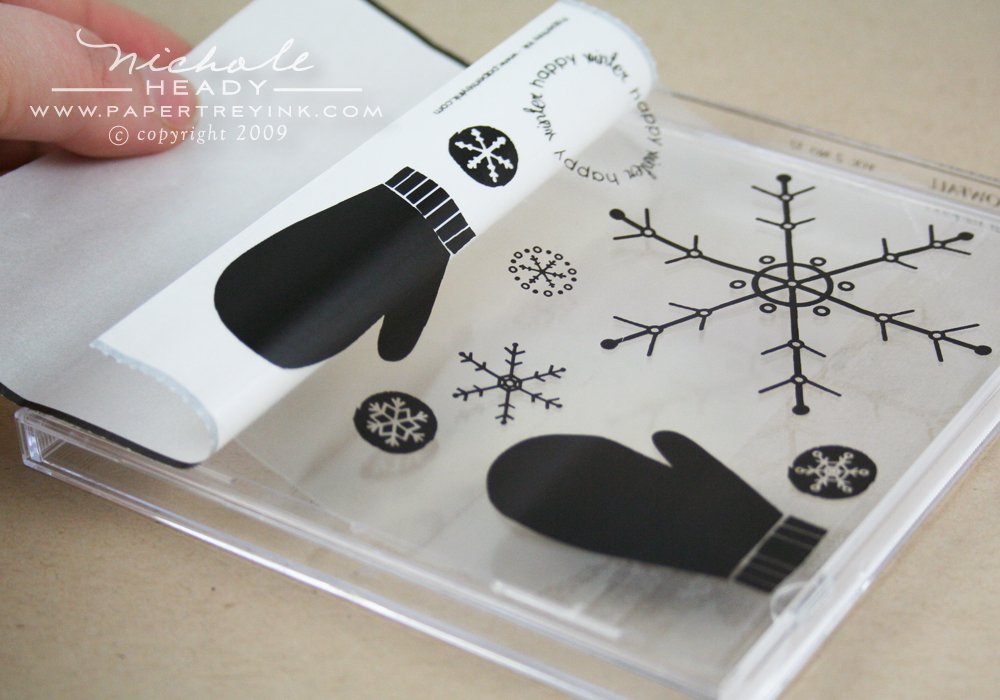
After you have applied your label(s), it is time to put your stamps inside the case.  Just peel each of the images carefully from the acetate housing sheets and match them up with their index label counterpart on the interior of the case.  Once in a while you might need to adjust the arrangement a bit, but all of the images should fit within the case. 

Finished assembled case

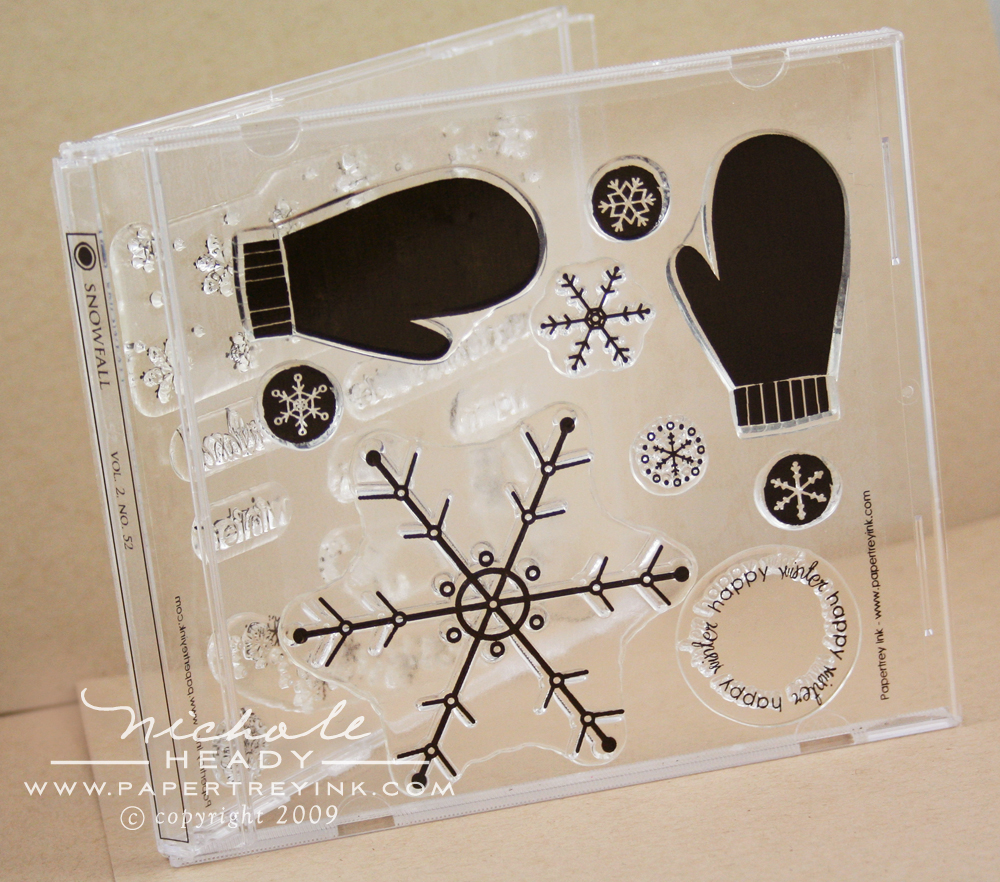
Here is the completed assembly.  One more additional note, when clear stamps are brand new, the two layers of stamps can sometimes stick together after the case has been closed.  After the images have been broken-in a bit and used, they will no longer do this, but in the interim, you can cut both of the acetate housing sheets to fit in between the two layers if you like, one sheet for the left and one sheet for the right.

I hope a few of you will find this helpful as you prepare to ink up your brand new purchases!  Enjoy!

Signature

Reader Interactions

Comments

  1. Michelle W. says

    February 19, 2009 at 12:27 PM

    For those of us who are a little older, and don’t always want to try and hunt down our reading glasses, I have taken to printing out a copy of what’s in each set from your web site. I find I have trouble reading many of the smaller sentiments in the sets when the label has the stamp behind it in the case. I would love a printed copy of what’s in each set to come with the sets so that I could just flip through the sheets and remind myself where a certain sentiment is! (Just a thought for those of us still trying to pretend that we don’t need to keep our reading glasses permanently around our necks!)Thanks:-)

    Michelle,
    We won’t most likely be including a second form of an index along with our stamp sets due to cost prohibitions, but you could adhere the index sheets to white cardstock and create a binder that way if you aren’t using the current labels on the cases. Or you can always continue printing them from the website as well. I hope you find a system that works well for you.

    ~Nichole

    Reply
  2. Elizabeth Knehans says

    February 19, 2009 at 12:34 PM

    Thanks for the tutorial on putting set storage together. I’ve been putting it off on the sets I’ve bought, but now I’m motivated to tackle it.

    Love the suggestion of a copy of what’s in each set as well. I’m always searching for the best sentiment and can’t remember where they are!

    Reply
  3. Meg says

    February 19, 2009 at 12:37 PM

    Thanks for the guide. I also have another newbie question…it says to rub the new stamps with a “good quality” eraser–do you mean like a magic rub white eraser? How much “stuff” am I trying to take off? I tried inking up some mixed messages sentiments last night after erasing & cleaning them, and I just could not get a solid, clean print of some of the words.

    Meg,
    You just want to use a good quality art eraser, preferably white. You don’t need to erase too much, just enough to remove any residue on the surface of the stamps from manufacturing. If you still have trouble getting a clean image even after using the eraser technique, you can just ink and stamp repeatedly on scratch paper and usually after 5-6 times, they are good to go. Good luck.

    ~Nichole

    Reply
  4. Michelle in Boise says

    February 19, 2009 at 12:50 PM

    LOL – I am soooooo LAME!! I thought your packaging was non-functional because I could not get the hard acetate sheets to fit in the cases…but you take them OFF the sheets and put them on the inside of the cases…makes a LOT more sense….and takes up less room; thank you for this!!

    Reply
  5. Sandy Kay says

    February 19, 2009 at 3:12 PM

    That’s a wonderful tip on how to transfer the decal to the CD case! I have always pulled it off and hoped I wouldn’t get too many bubbles when I would stick it on! Thanks – now I know!

    Reply
  6. sarah says

    February 19, 2009 at 3:22 PM

    this just ads one more layer to the awesomeness of this company! I am new to clear stamps. I love storing them in a cd case! who knew?!

    Reply
  7. Christy B. says

    February 19, 2009 at 3:37 PM

    Wow! I just got done doing this with the 5 sets that came in the mail today… too bad I didn’t check your blog first! Would have made things go a lot smoother with the wonderful tips you have provided! 🙂

    Reply
  8. Chelle says

    February 19, 2009 at 5:44 PM

    thank you for this! i am certainly not a newbie anymore, but just wanted to tell you that this was fabulous!
    thank you!!!
    chelle

    Reply
  9. Lola Goldberg says

    February 19, 2009 at 5:45 PM

    Now we can all add “Mind Reader” to your title of Queen of Awesome Stamping Products and Designs! After receiving my first order of delicious goodies yesterday, I carefully muddled my way through adhering decals to one set. Phew! I decided to wait (I didn’t know for what) before I attempted any more, and what do I find today?! These wonderful instructions, for which I am most grateful. No wonder so many people hold you and your company in such high regard. Thank you so very much for all that you do.

    Reply
  10. Tammy says

    February 19, 2009 at 5:52 PM

    great tutorial, thanks for taking the time!

    Reply
  11. Bonnie Sharp says

    February 19, 2009 at 6:25 PM

    Wonderful tutorial Nichole! I might just add a little thing…..instead of using the acetate in between the layers of stamps, I use the backing off of the label. Since it is white, then I can see the layers of stamps on each side a lot better. It works for me anyway!

    Reply
  12. Jeanne says

    February 19, 2009 at 7:48 PM

    What a terrific tutorial. I also use the waxed white backing for the labels to use inside my cases. Really does make it easy to read the stamps and they do not stick to them. Love the way you explain the details for everyone. Papertrey Ink is truly the best! I am hopeful that my order will arrive tomorrow.

    Reply
  13. Kristi Z. says

    February 19, 2009 at 9:49 PM

    thanks for putting this together. the visual was really helpful. too bad i already put my set together……not the way you described here. oh well, there’s always next time. thanks again! :o)

    Reply
  14. Angel Posadas-Miller says

    February 20, 2009 at 12:37 AM

    Wow, I wish I waited to see this! I’m a Papertrey newbie, and got my first shipment of 10 stamp sets and 4 sets of cardstock yesterday, and totally screwed up the first label on my cd cover! Once it’s on, there, it’s on, unless you peel it off, and the label gets that frosted look! Arrrgggh! I later on did do the ‘slowly roll the label on’ method. The stamps are awesome, clean cut, and so glad that I didn’t have to do much cutting of excess….what to buy next…..

    Reply
  15. Susan says

    February 20, 2009 at 6:21 AM

    Can we purchase this type of labeling for older sets? Seems like you addressed this a while back, but I can’t find it. Thanks!

    Reply
  16. Robyn says

    February 20, 2009 at 7:49 AM

    I take a narrow piece of light colored card stock and put on the inside binding of the CD holder that way it is easier for me to read the label.

    Reply
  17. Janet says

    February 20, 2009 at 8:10 AM

    Thanks for the tutorial. I have trouble with the stamps sticking together, so this will help me a lot. Also, when a stamp has been used a lot, it seems to lose it’s sticking power. Can this be resolved? And I still can’t figure out what is the front of the CD case and what is that back. I “think” the front is the side that is solid and the back has the space. However, it opens better the other way around, so I have the spines labeled differently on different sets. Which way is correct? Thank you!

    Reply
  18. Betty Meyskens says

    February 20, 2009 at 9:33 AM

    Great tutorial. I have some sets from before that I did not do this way and don’t look all that great. BUT my new sets I just got will look fabulous – thanks to your tutorial. Love all your stamps – keep them coming.

    Reply
  19. LISA C PARSONS says

    February 20, 2009 at 9:58 AM

    THANKS FOR THIS TUTORIAL! I have had my stamp sets for quite awhile and never did anything with the labels or CD case. I finally got the Halloween set organized. I had a hard time peeling the label with the sentiments on it. I just did not get it! Duh! Anyway, at least the stamps are in the CD case. Still waiting to be inked!!!

    Reply
  20. Charlotte Hutcheson says

    February 20, 2009 at 2:21 PM

    Nicole, I concur with all the other comments–wonderful tutorial. A question: any good ideas of what to use the large clear box for…I’ve kept mine because they seem so useful. I cannot say enough times how much I like your products; I am seriously hooked. Best regards, Charlotte

    Reply
  21. lainey says

    February 21, 2009 at 10:25 AM

    Thank you so much for showing how to put on the decals! I never thought to roll them on that way, and have had a number of air bubbles in them. Next time I’ll try it this way. (and you know there will be a next time! LOL)

    Reply
  22. Mary says

    February 21, 2009 at 10:52 AM

    Oh my goodness!! Just exactly what I needed. I totally messed up trying to do this. You should reference this tutorial in your stamp kits. So helpful. Thank you.

    Reply
  23. Mindy says

    February 21, 2009 at 4:35 PM

    Yeah, wrestling the labels is not how I want to spend my crafting time. Good info. Also, keep the acetate sheets the stamps come on and the clear box everything is loaded into. You never know when Lauren may come up with a template using that exact size of acetate. And I’m sure we can think up a way to fill that box for gifting!

    Reply
  24. Barbara in Bellflower says

    February 25, 2009 at 10:55 AM

    Hello All—–Michelle inquired about additional labels (picture of the stamp set)for reference—-Just make a copy of the label that comes with the stamp set before attaching to the CD case – Perfect for keeping track of all your PaperTrey beauties.

    Barbara from Bellflower

    Reply
  25. Kimberly says

    February 25, 2009 at 5:32 PM

    Thanks for these instructions. I am new to PTI and just received my first order today!!! Now that I know what I am doing I can put my cases together!

    Reply
  26. Jordan Flipsyde says

    July 7, 2010 at 3:15 AM

    Chance to read your blog, I really like your blog, let me learn a lot! I will focus on your blog, refuels!

    Reply
  27. Ela says

    March 2, 2013 at 1:57 AM

    Really very pretty and beautiful design specially that design on glass is very eye catching.

    Reply
  28. Arlene says

    August 25, 2013 at 6:21 PM

    I didn’t receive a cd container with any of my stamps!? Is this something that is no longer being done?

    Reply
  29. susan s says

    January 5, 2014 at 9:07 PM

    Your stamps are really beautiful and detailed. susan

    Reply
  30. Nancy says

    March 16, 2014 at 3:25 PM

    Can you purchase cases empty? Clear cd cases.. Thx

    Reply
  31. andreea says

    December 15, 2014 at 6:26 AM

    Hi! I am about to make my first Papertrey purchase and just wanted to ask you something about the stamps. Do all stamps come with the CD case and the printed foil, or do I have to purchase the item that’s called Index Label? 🙂 Thank you!

    Reply
  32. brittany says

    December 17, 2014 at 9:42 AM

    Some of the sets do not come with a CD case. So what am I supposed to do?

    Reply
  33. Fiona says

    April 7, 2016 at 11:31 PM

    Thanks for the instructions. I always scan the label before I stick it on so that I can print it out and put it in a file for quick reference rather than pulling out all the cases to search the covers to find the stamp I want

    Reply
  34. Bonnie Miller says

    March 3, 2018 at 1:04 PM

    I Ann a newbie add wanted to know….
    1. Is there a way to assemble the stamps and dies in a notebook form
    2. Do you have a swatch book or sheet for your inks. Do they come with updated colors.

    Reply
    • Heather Nichols says

      March 4, 2018 at 2:33 PM

      Hi Bonnie, There are many ways that you can choose to store your stamp sets and dies. If you do some searches online, I am sure that you will be able to find lots of examples to inspire you! Also, we don’t currently have downloadable swatch sheets, but again this is something that you might be able to find online that others have put together.

      Reply

Leave a Reply Cancel reply

Your email address will not be published. Required fields are marked *

Primary Sidebar

papertreyink

papertreyink

Welcome to Papertrey Ink! We specialize in clear stamps and have our own line of exclusive paper crafting embellishments and accessories. All of which is created by stampers for stampers. We pride ourselves in only providing the highest quality product at a reasonable price. Thank you for connecting with us.

INSTAGRAM

papertreyink

2,850

papertreyink

View

Mar 3

Open
Our designer @wheatfield_designs combined the Pop- Our designer @wheatfield_designs combined the Pop-Up Envelope dies with Framed in Florals and Just Sentiments:  Bloom to show how versatile the Pop-Up Envelope dies can be.  Think of all of the different stamp sets you can use inside this die collection.  @papertreyink @inktopapercompany #papertreyink #inktopapercompany #clearstamps #stamping #cardmaking #cardmakersofinstagram #papercrafts #papercrafting #steeldies

Our designer @wheatfield_designs combined the Pop-Up Envelope dies with Framed in Florals and Just Sentiments: Bloom to show how versatile the Pop-Up Envelope dies can be. Think of all of the different stamp sets you can use inside this die collection. @papertreyink @inktopapercompany #papertreyink #inktopapercompany #clearstamps #stamping #cardmaking #cardmakersofinstagram #papercrafts #papercrafting #steeldies ...

papertreyink

View

Mar 2

Open
We love to see Lush Bloom in action and the many d We love to see Lush Bloom in action and the many different ways there are to use it.  This gorgeous card created by our Guest Designer @vjsjoey used this set in colors and design that are just stunning. @papertreyink @inktopapercompany #papertreyink #inktopapercompany #clearstamps #stamping #cardmaking #cardmakersofinstagram #papercrafts #papercrafting #steeldies

We love to see Lush Bloom in action and the many different ways there are to use it. This gorgeous card created by our Guest Designer @vjsjoey used this set in colors and design that are just stunning. @papertreyink @inktopapercompany #papertreyink #inktopapercompany #clearstamps #stamping #cardmaking #cardmakersofinstagram #papercrafts #papercrafting #steeldies ...

papertreyink

View

Mar 2

Open
Kelly's FLASH SALE starts NOW and runs until Wedne Kelly's FLASH SALE starts NOW and runs until Wednesday at 6 PM ET.
Don't miss out on 20% off of the products below.
Just Sentiments: Easter Stamp Set
Flourishing Florals Stamp Set
Flourshing Florals Die
To Die For Sentiments: Risen
Perfect Match Pale Peony Card Stock
Bitty Big: Pale Peony Patterned Paper Collection
Bitty Big: Lilac Grace Patterned Paper Collection
Perfect Match Pale Peony Ink Pad
Perfect Match Lemon Tart Ink Pad
Perfect Match Harvest Gold Ink Pad
Perfect Match Aqua Mist Ink Pad
Perfect Match Ocean Tides Ink Pad
Perfect Match Lilac Grace Ink Pad
Perfect Match Winter Wisteria Ink Pad
Perfect Match Spring Moss Ink Pad
Perfect Match Simply Chartreuse Ink Pad
Perfect Match Hawaiian Shores Ink Pad @kellylunceford @papertreyink @inktopapercompany #papertreyink #inktopapercompany #clearstamps #stamping #cardmaking #cardmakersofinstagram #papercrafts #papercrafting #steeldies

Kelly's FLASH SALE starts NOW and runs until Wednesday at 6 PM ET.
Don't miss out on 20% off of the products below.
Just Sentiments: Easter Stamp Set
Flourishing Florals Stamp Set
Flourshing Florals Die
To Die For Sentiments: Risen
Perfect Match Pale Peony Card Stock
Bitty Big: Pale Peony Patterned Paper Collection
Bitty Big: Lilac Grace Patterned Paper Collection
Perfect Match Pale Peony Ink Pad
Perfect Match Lemon Tart Ink Pad
Perfect Match Harvest Gold Ink Pad
Perfect Match Aqua Mist Ink Pad
Perfect Match Ocean Tides Ink Pad
Perfect Match Lilac Grace Ink Pad
Perfect Match Winter Wisteria Ink Pad
Perfect Match Spring Moss Ink Pad
Perfect Match Simply Chartreuse Ink Pad
Perfect Match Hawaiian Shores Ink Pad @kellylunceford @papertreyink @inktopapercompany #papertreyink #inktopapercompany #clearstamps #stamping #cardmaking #cardmakersofinstagram #papercrafts #papercrafting #steeldies
...

papertreyink

View

Mar 1

Open
Framed in Florals is a sure way to brighten someon Framed in Florals is a sure way to brighten someone’s day ☀️. This beautiful card was created by our designer @amykolling using this stamp set and dies.  Her coloring over the stark white background is perfect! @papertreyink @inktopapercompany #papertreyink #inktopapercompany #clearstamps #stamping #cardmaking #cardmakersofinstagram #papercrafts #papercrafting #steeldies

Framed in Florals is a sure way to brighten someone’s day ☀️. This beautiful card was created by our designer @amykolling using this stamp set and dies. Her coloring over the stark white background is perfect! @papertreyink @inktopapercompany #papertreyink #inktopapercompany #clearstamps #stamping #cardmaking #cardmakersofinstagram #papercrafts #papercrafting #steeldies ...

papertreyink

View

Feb 28

Open
On this beautiful Sunday, it’s only appropriate On this beautiful Sunday, it’s only appropriate that we share a beautiful card with you.  Our Guest Designer @vjsjoey created this gorgeous card and we are smitten with it!  The Pop-Up Florals stamp set combined with the stems from Lush Bloom were used along with the amazing mix of colors. @papertreyink @inktopapercompany #papertreyink #inktopapercompany #clearstamps #stamping #cardmaking #cardmakersofinstagram #papercrafts #papercrafting #steeldies

On this beautiful Sunday, it’s only appropriate that we share a beautiful card with you. Our Guest Designer @vjsjoey created this gorgeous card and we are smitten with it! The Pop-Up Florals stamp set combined with the stems from Lush Bloom were used along with the amazing mix of colors. @papertreyink @inktopapercompany #papertreyink #inktopapercompany #clearstamps #stamping #cardmaking #cardmakersofinstagram #papercrafts #papercrafting #steeldies ...

papertreyink

View

Feb 27

Open
Effortless Beauties + Cover Plate: Vines + @wheat Effortless Beauties + Cover Plate:  Vines + @wheatfield_designs = gorgeousness!  @papertreyink @inktopapercompany #papertreyink #inktopapercompany #clearstamps #stamping #cardmaking #cardmakersofinstagram #papercrafts #papercrafting #steeldies

Effortless Beauties + Cover Plate: Vines + @wheatfield_designs = gorgeousness! @papertreyink @inktopapercompany #papertreyink #inktopapercompany #clearstamps #stamping #cardmaking #cardmakersofinstagram #papercrafts #papercrafting #steeldies ...

papertreyink

View

Feb 26

Open
Sweet as can be! This darling card was created by Sweet as can be!  This darling card was created by our designer @amykolling and uses the Sweet Hoppiness stamp set and dies combined with the Rainbow Arches die.  Such beautiful colors!  @papertreyink @inktopapercompany #papertreyink #inktopapercompany #clearstamps #stamping #cardmaking #cardmakersofinstagram #papercrafts #papercrafting #steeldies

Sweet as can be! This darling card was created by our designer @amykolling and uses the Sweet Hoppiness stamp set and dies combined with the Rainbow Arches die. Such beautiful colors! @papertreyink @inktopapercompany #papertreyink #inktopapercompany #clearstamps #stamping #cardmaking #cardmakersofinstagram #papercrafts #papercrafting #steeldies ...

papertreyink

View

Feb 25

Open
Look at this beauty! Our Guest Designer @vjsjoey Look at this beauty!  Our Guest Designer @vjsjoey has created this mini masterpiece using the She Blooms stamp set and dies mixed with Tiny Blooms.  Such a dreamy creation!  @papertreyink @inktopapercompany #papertreyink #inktopapercompany #clearstamps #stamping #cardmaking #cardmakersofinstagram #papercrafts #papercrafting #steeldies

Look at this beauty! Our Guest Designer @vjsjoey has created this mini masterpiece using the She Blooms stamp set and dies mixed with Tiny Blooms. Such a dreamy creation! @papertreyink @inktopapercompany #papertreyink #inktopapercompany #clearstamps #stamping #cardmaking #cardmakersofinstagram #papercrafts #papercrafting #steeldies ...

papertreyink

View

Feb 24

Open
Hello! This happy card was created by @crncards u Hello!  This happy card was created by @crncards using the Pop-Up Florals stamp set and dies!  There are so many creative ways to use this delightful set.  @papertreyink @inktopapercompany #papertreyink #inktopapercompany #clearstamps #stamping #cardmaking #cardmakersofinstagram #papercrafts #papercrafting #steeldies

Hello! This happy card was created by @crncards using the Pop-Up Florals stamp set and dies! There are so many creative ways to use this delightful set. @papertreyink @inktopapercompany #papertreyink #inktopapercompany #clearstamps #stamping #cardmaking #cardmakersofinstagram #papercrafts #papercrafting #steeldies ...

Follow on Instagram

Pinterest

FACEBOOK

Papertrey Ink

Email Subscription

I agree to be emailed to confirm my subscription to this list

Categories

Archives

Categories

Recent Posts

  • Guest Designer – Shauna – Feathered Friends
  • February 2021 Release Day
  • She Blooms + Effortless Beauties + Feathered Friends 8
  • Framed in Florals + Cover Plate: Vines + Feathered Friends Mini 8
  • Pop-Up Envelope + Pop-Up Florals + Just Sentiments: Blooms + Lush Blooms + Inside Greetings: Blooms

papertreyink

View

Mar 3

Open
Our designer @wheatfield_designs combined the Pop- Our designer @wheatfield_designs combined the Pop-Up Envelope dies with Framed in Florals and Just Sentiments:  Bloom to show how versatile the Pop-Up Envelope dies can be.  Think of all of the different stamp sets you can use inside this die collection.  @papertreyink @inktopapercompany #papertreyink #inktopapercompany #clearstamps #stamping #cardmaking #cardmakersofinstagram #papercrafts #papercrafting #steeldies

papertreyink

View

Mar 2

Open
We love to see Lush Bloom in action and the many d We love to see Lush Bloom in action and the many different ways there are to use it.  This gorgeous card created by our Guest Designer @vjsjoey used this set in colors and design that are just stunning. @papertreyink @inktopapercompany #papertreyink #inktopapercompany #clearstamps #stamping #cardmaking #cardmakersofinstagram #papercrafts #papercrafting #steeldies

papertreyink

View

Mar 2

Open
Kelly's FLASH SALE starts NOW and runs until Wedne Kelly's FLASH SALE starts NOW and runs until Wednesday at 6 PM ET.
Don't miss out on 20% off of the products below.
Just Sentiments: Easter Stamp Set
Flourishing Florals Stamp Set
Flourshing Florals Die
To Die For Sentiments: Risen
Perfect Match Pale Peony Card Stock
Bitty Big: Pale Peony Patterned Paper Collection
Bitty Big: Lilac Grace Patterned Paper Collection
Perfect Match Pale Peony Ink Pad
Perfect Match Lemon Tart Ink Pad
Perfect Match Harvest Gold Ink Pad
Perfect Match Aqua Mist Ink Pad
Perfect Match Ocean Tides Ink Pad
Perfect Match Lilac Grace Ink Pad
Perfect Match Winter Wisteria Ink Pad
Perfect Match Spring Moss Ink Pad
Perfect Match Simply Chartreuse Ink Pad
Perfect Match Hawaiian Shores Ink Pad @kellylunceford @papertreyink @inktopapercompany #papertreyink #inktopapercompany #clearstamps #stamping #cardmaking #cardmakersofinstagram #papercrafts #papercrafting #steeldies

papertreyink

View

Mar 1

Open
Framed in Florals is a sure way to brighten someon Framed in Florals is a sure way to brighten someone’s day ☀️. This beautiful card was created by our designer @amykolling using this stamp set and dies.  Her coloring over the stark white background is perfect! @papertreyink @inktopapercompany #papertreyink #inktopapercompany #clearstamps #stamping #cardmaking #cardmakersofinstagram #papercrafts #papercrafting #steeldies

papertreyink

View

Feb 28

Open
On this beautiful Sunday, it’s only appropriate On this beautiful Sunday, it’s only appropriate that we share a beautiful card with you.  Our Guest Designer @vjsjoey created this gorgeous card and we are smitten with it!  The Pop-Up Florals stamp set combined with the stems from Lush Bloom were used along with the amazing mix of colors. @papertreyink @inktopapercompany #papertreyink #inktopapercompany #clearstamps #stamping #cardmaking #cardmakersofinstagram #papercrafts #papercrafting #steeldies

papertreyink

View

Feb 27

Open
Effortless Beauties + Cover Plate: Vines + @wheat Effortless Beauties + Cover Plate:  Vines + @wheatfield_designs = gorgeousness!  @papertreyink @inktopapercompany #papertreyink #inktopapercompany #clearstamps #stamping #cardmaking #cardmakersofinstagram #papercrafts #papercrafting #steeldies

papertreyink

View

Feb 26

Open
Sweet as can be! This darling card was created by Sweet as can be!  This darling card was created by our designer @amykolling and uses the Sweet Hoppiness stamp set and dies combined with the Rainbow Arches die.  Such beautiful colors!  @papertreyink @inktopapercompany #papertreyink #inktopapercompany #clearstamps #stamping #cardmaking #cardmakersofinstagram #papercrafts #papercrafting #steeldies

papertreyink

View

Feb 25

Open
Look at this beauty! Our Guest Designer @vjsjoey Look at this beauty!  Our Guest Designer @vjsjoey has created this mini masterpiece using the She Blooms stamp set and dies mixed with Tiny Blooms.  Such a dreamy creation!  @papertreyink @inktopapercompany #papertreyink #inktopapercompany #clearstamps #stamping #cardmaking #cardmakersofinstagram #papercrafts #papercrafting #steeldies

papertreyink

View

Feb 24

Open
Hello! This happy card was created by @crncards u Hello!  This happy card was created by @crncards using the Pop-Up Florals stamp set and dies!  There are so many creative ways to use this delightful set.  @papertreyink @inktopapercompany #papertreyink #inktopapercompany #clearstamps #stamping #cardmaking #cardmakersofinstagram #papercrafts #papercrafting #steeldies

papertreyink

View

Feb 23

Open
A sweet hello to let you know we’re thinking of A sweet hello to let you know we’re thinking of you!  Our amazing designer @wheatfield_designs created this darling card using the Feathered Friends 8 Mini and Tiny Blooms stamp set and dies and the Cover Plate:  Vines dies.  Enjoy a beautiful day!  @papertreyink @inktopapercompany #papertreyink #inktopapercompany #clearstamps #stamping #cardmaking #cardmakersofinstagram #papercrafts #papercrafting #steeldies

Copyright © 2021 · Papertrey Ink.