Many of you already know that Saturday, October 6th is World Card Making Day (WCMD)! In honor of this FABULOUS holiday, Papertrey has teamed up with Paper Crafts Magazine to offer you
THREE Digital Card Making Kits! Absolutely FREE!
Two of the three have already been made available for upload on the Paper Crafts Magazine website. One of which is entitled Spiral Bouquet Boutique:
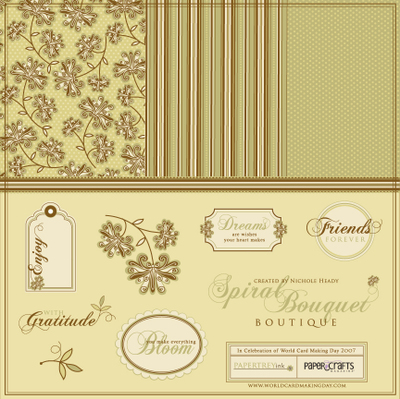 (By the way, if this artwork appeals to you, you won’t want to miss the coordinating stamp set being released on October 15th!)
Many people may see the term "digital kit" and immediately run in the other direction. If this is you, then you probably fall into one of two categories…
-You aren’t very computer savvy and the idea of using the darn machine for paper crafting frightens you!
-You’re a tactile person, you like to touch and feel your paper crafting materials. The look of three-dimension really appeals to you.
If you fall into category one, and you just don’t feel as though you have the computer skills to use a digital kit, I am going to show you just how easy it is, step by step. All you need is a word processing program (like Microsoft Word).
If you fall into category two, you will be amazed at how fun & easy it is to integrate your love of dimension and texture with a digital kit. I’ll be showing you a perfect example of this in just a bit!
Now I am going to take you step by step through the process. When I was thinking about how I wanted to approach this blog post, I decided it was better to be overly informative, rather than leave someone confused. So I have divided the directions into three easy to swallow pieces. That way, if you already know how to do one aspect of the process, you can easily skip ahead to the area that you might be unfamiliar with. The three chapters are Downloading, Inserting and Creating.
CHAPTER 1: Downloading
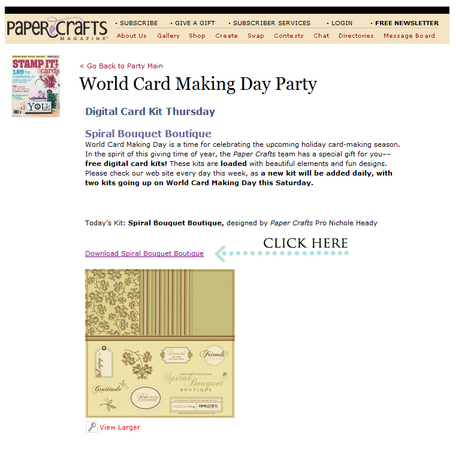
To download your very own FREE version of the above digital kit, Spiral Bouquet Boutique, click HERE. The page you come to will look like this:
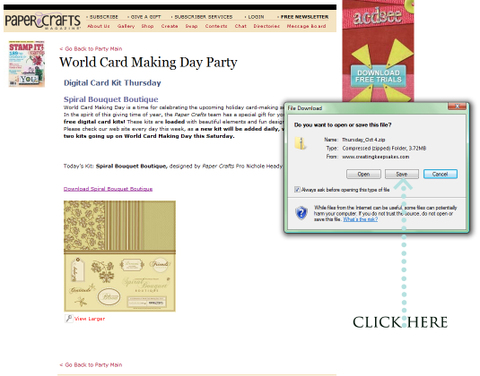
Click on "Download Spiral Bouquet Boutique". You will then have a smaller window pop open that looks like this:
You want to select "SAVE". A second pop-up window will appear that looks like this:
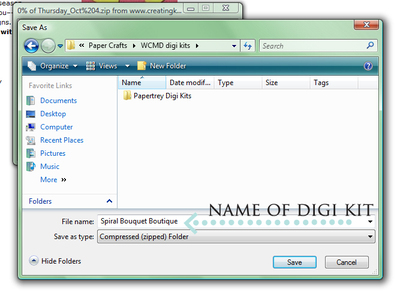
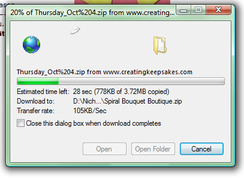
You want to enter the name of the digi kit so that it is easy for you to locate it later. You may want to even start a special folder just to contain all of your digi kits so it becomes you one-stop reference. After you have entered the name, hit "SAVE". A pop-up window will appear that looks like this:
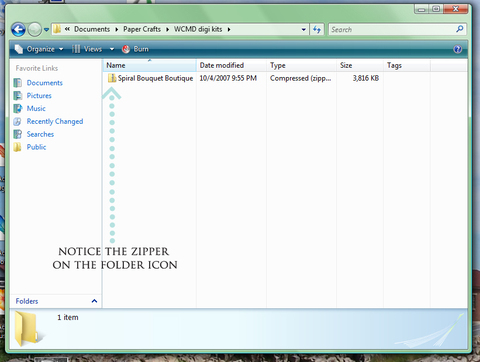
You will visually see papers flying from the globe to the folder. It will take a few minutes for the files to be downloaded, depending on your internet speed. Once it has completed, you’ll want to close all of your current windows and open the folder that you just saved the digital kit to.
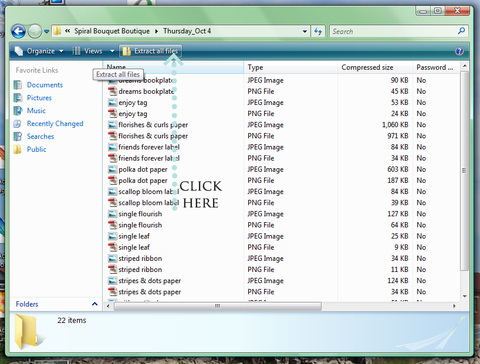
If you’ll notice, the file type is a "zip" file. This is just a special way to save several files within a folder and make it faster to download. (You’ll notice the little zipper on the folder icon). You need to extract the files from the folder in order to use them. So click on your zipped file, and this window will appear, listing all of the files contained in your folder (in other words, ALL the cool elements you get to play with shortly!):
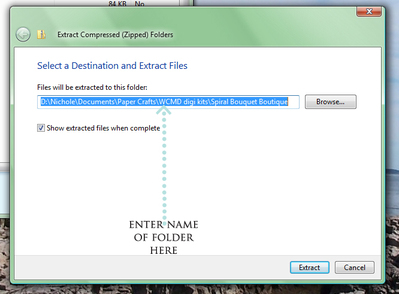
You want to click on "EXTRACT FILES".Then this window will appear:
At this point you want to choose the location of all you new files. I put mine right back in my Spiral Bouquet Boutique Folder. Click "EXTRACT" after you have selected your folder. Once that is completed you’re ready for the fun stuff!
CHAPTER 2: Inserting
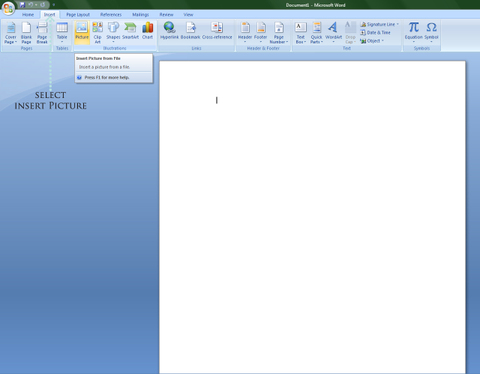
To use all the fabulous stuff you just downloaded, you need to open just your basic word processing program (like Microsoft Word). You want to open a new document so you have a blank canvas to work with! It will look something like this (depending on what version and program you’re using, but the steps should be the same regardless).
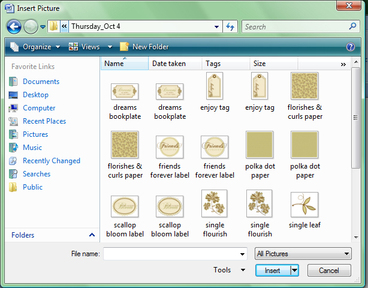
You want to select "INSERT" from your upper menu bar. Once you have done that, it will provide you with a box to select the folder containing the digital kit. Once you have selected the desired folder, a lit of all the images contained in it will appear, just as below (look at all those fun goodies! And to think they are FREE!!!)…
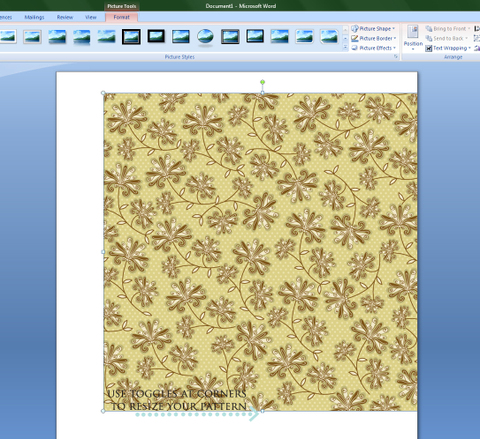
Simply click on the image you want to use and it will be placed in your blank document. (I decided to use the Flourishes & Curls paper here)
You can "pull" the toggles at each of the four corners of the bounding box to change he size of the image. (As another helpful hint, make sure your margins are set at the lowest they can go and still remain compatible with your printer. This is to allow you more printable space). After you have sized your image to your liking, just hit print! (As a side note, it is very easy to insert more than one image onto a sheet so that you conserve paper!)
CHAPTER 3: Creating
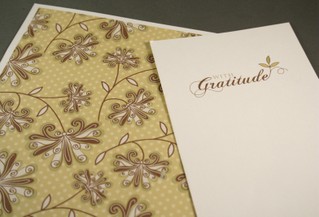 I decided to create a SUPER SIMPLE project with this digital kit. I printed out the Flourishes & Swirls patterned paper along with the Gratitude sentiment.
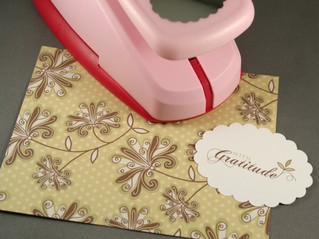 I punched out "Gratitude" using a Mega Scalloped Oval Punch. I also cut a piece of the patterned paper down to size to fit on a card front (4-1/8 x 5-3/8 inches).
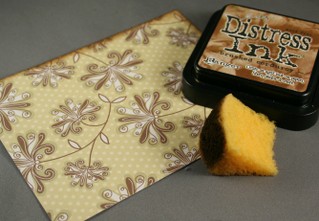 I then sponged the outside edges of both the sentiment and paper with Brushed Corduroy Distress Ink from Ranger. I also pierced a small hole in each scallop with a thumbtack.
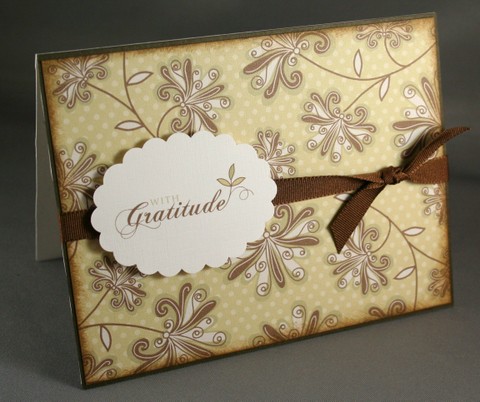 I matted the patterned paper with brown cardstock and tied some pretty ribbon it. I adhered it to my white card base. As a final step, I attached the sentiment with foam dimensionals over the ribbon.
Viola! You did it!!! You’ve gone "DIGI"! Let me know if you have tried digital for the first time with this tutorial and whether or not you enjoyed it. Do you think it is something you would like to expand on and learn more about? Do you see yourself reaching for different elements of this digi kit in the future? I wanna hear about it! The digital part of this industry has really captured my interest!
I will be posting later this afternoon, some details as to how you can use your new digital skills to win some FREE stamps! Be sure to stop by!




Awesome!!! I am new to digi-scapping and have not ever made a digi-card- but will now! It’s adorable!
Gorgeous and fun! Can hardly wait for the coordinating set. I may even give the digi thing a go.
this is awesome! i dont scrap but i could totally see myself using this kit, my mom would love the colors and so do i!! im kinda depressed taht i cant take part in WCMD but a friend of mine is getting married on Sunday and there is stuff Sat. eve and i have to clean house aswell on sat. oh well i’ll download tehkit and hopefully make soem cards with it tomorrow eve.
~Chelsey @ onecanadianchick.blogspot.com
That was a lot easier than I thought! Thanks for the instructions. Heather
The digi kits are gorgeous – but then we wouldn’t expect anything else from you Nichole LOL! Thanks so much!
A note about printing – I’ve always understood that you should select the ‘Photo’ quality option when printing digital downloads so you get the best quality images.
Nichole – this was easier to download than I thought it would be. Thanks for the instructions and your super sample card. Love your blog and your ‘style’.
I am computered challenged. Basically I can do e-mail. Your directions are great I just tried it and it worked!! Thank you for all of your time and effort. It was fun – can’t wait to play with it but must get everyone off to school.
Thanks, Nichole! Happy World Card Making Day to you!
Pat
Thank you so much for this little bit of fun! A new avenue for creating!
My first try at Digi and it was easy to download but I have a problem with the printing. I inserted the “you make everthing bloom” tag and when it prints its huge. How do I size it to fit the scallop punch?
Thanks for everything
You are wonderful. Thanks a lot! Can’t wait til I get home today and try this. TGIF!!!!!!
Thanks, Nichole…you’re the best!! TFS!
I just made one and it was easy, although sometimes it didn’t “behave” quite the way I thought it should be, I tried getting as many elelements on a page as possible and it kept wanting to put it ona separate page even though i had rroom or had resized it. Any tips for how to make the objects exactly the size you want other that looking at the ruler above and seeing it looks like it’s about 1 1/4 ” for your punch? Thanks! I look forward to more tutorials. Any way to change the colors to get a match with the cardstock/ribbons you have on hand?
Love the digi kit. Can’t wait for the coordination stamp set. Have not done digital cards yet but looks easy enough. Just need to get a colored printed.
love the digi kit!!!! thanks, i can’t wait to try it out
Thanks Nichole. The style and colors are yummy. Can’t wait to see the stamp set!
Well who would of thought! This was fun, and fairly easy. I think I have an older version of word… but it still came out, and somehow I managed to use a photo setting and get more of the little tags to print on one page. Note to self…. get a new printer, the one I have doesn’t do the colors justice, nor the quality, but I am off to turn it into a card pronto! Thanks for the help… so easy!
Oh my, oh my… thanks you so much for the tutorial regarding digi-scrapping. I can never understand how to use it…until now. THANK YOU SO MUCH! I can’t wait to see/meet you next year along with Ms. Gina and Ms. Em 🙂
Nichole, I downloaded the kit and followed your directions immediately. Holy Cow! I have been downloading all sorts of free digi stuff for months thinking *one day I’ll learn how to use it.* Well, today is the day!!! I guess I always thought I HAD to learn how to digi SCRAP with it all and never thought of making cards. What a lightbulb moment!!! THANK YOU SO MUCH and keep these tutorials coming!!!!
Thanks again,
~Lana B.~
Thank you so much for the tutorial!! This is amazing. I’ve been wanting to learn how for a long time, and you make it look so easy.
I really appreciate it!
ps – would go on the cruise, but I have a sabbatical that ends 9/30/08. It sounds like a ton of fun, and I will be counting down with you all!
Oh!! Nichole, thank you so much for the tut! I do know l the ins and outs of downloading, but I was SO clueless about actually using these files! GORGEOUS!! Thanks so much for the spark to get my juices flowing, lol!
Hugs,
Betsy
Wow! This is so awesome! I was SO not a digi-girl, but I just went and tried it! I LOVE it!!! You make it so easy and fun!
I will definately be turning to this in the future!
Thank you!!!
I have done some digital crafting (mostly using CDs I’ve bought of vintage images)and enjoyed it, but I do find it can take a long time to find and pull together co-ordinating bits from my stash to go with the one digital image. So these combos of background paper, tags, sentiments, borders and ‘ribbon’, etc., are FANTASTIC, and (whoo!)they’re FREE!! I’ve already downloaded most of the ones that are up on the Paper Crafts site!
**One question I’ve always wondered about — there are typically 2 copies of each image, one PNG and one JPEG. What would be the reason for using one over the other? I think I’ve been able to print either type, but maybe some users can’t, is that it?
Fabulous Nicole!! Thanks so much for the tutorial – I’ve been wanting to try digi stuff so what a great time to do it!! 🙂
Thank you, Nichole, for making this so easy. I have never tried digi before, and you made it as simple as it could be. Yeah! I’m not afraid of digi anymore!! But, I will always love my stamps and paper. Can’t wait for the next release.
Nichole, you are killin’ me! This is such a WOW!!!!! You rock!
This is amazing! I’ve never done any digital stuff but you’ve made it so easy. Thank you for providing all of these goodies and instructions for free!!
Wowie how beautiful! My question is there a certain type of paper that you used to print the background paper? Would regular ol’ typing paper be good enough?
Gee this sounds too good to be true – altho my husband’s a computer guru, I’m a bit challenged! I’m going to try this & will let you know how it turns out!
Holy cow….is there anything you CANNOT do?? I can’t wait to get home (from work), find this and download it. TOTALLY digi impared – but this seems relatively easy, so I’ll give it a whirl!!
Thank you for enabling me YET again. LOL.
🙂
Seriously, I thought I was already about as addicted as I could get to cardmaking…but I was wrong…my mind is going 100 mph thinking of ways to use this! Thank you sooo much for the step by step tutorial…it made it a piece of cake to use. I was already a big fan of yours, and this is just icing on the cake.
You rock.
Seriously.
WOW, Nichole!
Thank you for the incredible tutorial…now I have no excuse not to try it 🙂
And thank you for offering a chance to win a kit to celebrate WCMD!!
WOW WOW WOW!!!That digital set is gorgeous. Love it, love it love it. And the next papertrey release will coordinate with it ?!?!?!?! OMGoodness, I’m not sure I can contain my excitement.
It’s beautiful! I downloaded it and can’t wait to play! I was also wondering what the difference is between the .jpg and .png files. Is the .png for Photoshop? Your tutorial was great, btw, as usual!
I love this!! I’m brand new to digi scrapping/card making. With that said I have some follow up questions… Is there a way to actutally make a card on the computer to email to a friend? I think it would be fun to use these elements when I’m out of town and cannot bring any of my stamping supplies. Then I can still get my crafting fix! Plus, I would love to email cards to my hubby at work.
Next question… I’ve played with the pieces in Word a little bit and have not ventured to print any yet. Do I need to have any special ink cartridges for my printer or will the standard color cartridge work? Also, will printing these use a lot of ink? Another reason I think making a digi card would be great!
Sorry to be so long winded. OH, I would love to see more of these kits in the future. I can’t wait to see the stamps and how use them together!
Thanks,
Jessica K.
I loved it, I just made a great card in less than 5 minutes. I was worried that it would look cheap, but it looks fantastic. I am so glad that it can be done in MS Word. I’m off to try more. Thanks!
Very helpful post! I’m really looking forward to the stamp release on the 15th now too! =)
Thanks so much for the tutorial. I am not computer savvy on my own, I need to be shown how to do things step by step. This is great. Can’t wait to create!
Thanks so much Nichole. I tried digital for the first time. It was fun and so super easy. I just made my first card and it came together so quickly.
can you do a tutorial on how to do the overlays? I assumed they could be put over a photo or on top of one of your designer backgrounds in the kits but it’s opaque, and if you send it to the back it’s behind it, help, thanks!
I know you are inundated with questions on all of this but I have one more…what type of paper works best for printing?
Love the kit by the way, I will probaby *need* the new sets too!
This is so pretty. I am going to try my hand at this digi thing.
Now I get it. I thought we were making e-cards. It did not occur to me that we would print the stuff and make “normal” cards. Duh.
Love the patterns.
Nicole, You’re soooo creative and very inspiring. What a beautiful set. Can’t wait for the next release.
Nichole,
Thanks so much for a step-by-step tutorial for this non-computer savy crafter! This was the first digi kit I have ever tried and it was fun. Tons of possibilities. Now, whether I can try to do this again with another kit…lol!
Thanks for the fantastic directions! It was so easy with your explanation! Beautiful card too! 🙂
This is awsome! I love digital! Especially because I don’t have access to stamps where I live so digital stuff is a very good sollution for me. I really love your kit and I tell you, I have seen many! Acually I love your style in everything you do. I am definitely category 2 digital user. Thanks for your lovely work.
Yikes! You are the best! A friend of mine just sent this to me today…and then I see this in your blog! You rock!!! Thanks a bunch…and I just shared your blog with my friend! Thanks, Nichole!! 😉
Would love to learn more about this process! It seems like a lot of fun. BUT…can the printed out paper really look like the real thing? What is a good brand of reasonably priced printer to have to do this. I’m in the market for one and would like to do more of this but my images look a little “faded” or less sharp than I would like. Thanks!
can I just say you are a papercrafting Goddess!This tutorial was so awesome! I just tried it and it was sooo super easy! Now I’m off to go make a card with my cool new stuff I just printed out! Thanks so much Nichole.
There is no way I would have figure it out on my own. I would have gotten stuck at the “unzipping of the file”.
Am I doing something wrong? I can’t get the “Eat Cake” digital set to work? I got all the others working. Am I the only one with this problem? Thanks. These are great, Nichole! You are a master!
Here is the correct link for the Eat Cake download:
http://www.creatingkeepsakes.com/images/ftp_images/PaperCrafts/EatCake.zip
Here’s a TinyUrl in case the one above wraps and isn’t hyperlinked:
http://tinyurl.com/3bme2d
Thank you so much!
This is so amazing! I downloaded and made the card in no time. It was my first digital project and was so easy. If you haven’t, you’ve got to try it!!! I’ll try to post my card!
I love this!! Before I started stamping I made all my cards with my computer and I am loving this. Your card is darling, as usual. I always look forward to all the neat things you come up with. Thanks for sharing!
Well, that’s interesting and sounds like something I might actually try! I thought you had to do your “layout” on the computer, digitally. I guess I didn’t understand this at all. I thought it was knowing how to do desktop publishing and computer creating (with the items) and, if you printed it out, it was a pixelated-looking flat piece of paper (think of the first computer cards that you printed on 8.5×11 and folded into quarters). THAT didn’t interest me at all, but seeing THIS is different! This is just a way to receive your crafting supplies from the internet and they are delivered through your printer, instead of coming in the mail, or whatever. VERY intriguing!
So generous. Thank you for the free goodies! I’m not very techno savy, but saved them to my computer to try later. Can’t wait to see the new sets!!! 🙂
I love the digi kits. thanks so much. not sure when I’ll be able to use ’em though. While I’m not afraid of going digi or hybrid, I have a problem in the printer department. Since my printer isn’t the too great for pictures and scrappin I tend to shy away from digi.
I’d love to hear about what printers you would recommend so that I can tell Santa what to get me for Christmas.
Love the digital stuff! Keep it coming! I use my printer quite a bit when I make cards. I design my own printed paper as well, but it takes a lot of time. Imagine the convenience of a digi kit that allows us to print our nugget labels by the page and then run a stack of cardstock through the printer once to create designer paper and then flip the stack over and run it through to print cut and score lines on the back for the perfect little matching boxes!
Ok I downloaded the kits and I am giving it a shot! I attempted digi scrapping a while back and it just didn’t suit me. I don’t have the greatest computer and had trouble with the digital programs. I can use Microsoft Word though! I really like the idea of printing off the elements and using them in card making!
Very cool! I can’t wait to try it.